Side Crunch: Proper Form, Oblique Benefits, Sets, Tips & FAQ
Learn the Side Crunch for stronger obliques, better side-core control, and cleaner trunk flexion. Includes form, sets, tips, FAQs, and gear.
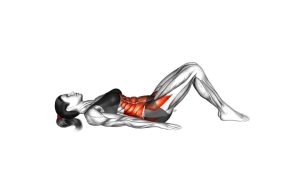
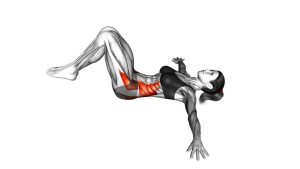
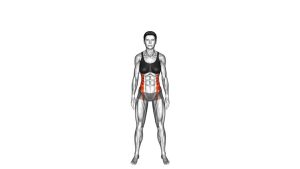
Side Crunch
This exercise works best when the movement stays small, clean, and deliberate. Because the body is lying on one side, the obliques must create the crunch without help from momentum. As a result, the Side Crunch is useful for building side-core strength, improving trunk control, and adding variety to a home ab workout. However, the neck should stay relaxed, and the hand behind the head should never pull the head forward.
Quick Overview
| Body Part | Obliques |
|---|---|
| Primary Muscle | Obliques |
| Secondary Muscle | Rectus abdominis, deep core stabilizers, hip stabilizers |
| Equipment | No equipment required; exercise mat optional |
| Difficulty | Beginner to intermediate, depending on control and range of motion |
Sets & Reps (By Goal)
- Beginner form practice: 2–3 sets × 8–12 reps per side with slow control.
- Oblique endurance: 3–4 sets × 12–20 reps per side with a steady tempo.
- Core strength focus: 3–4 sets × 8–15 reps per side with a 1–2 second squeeze at the top.
- Ab workout finisher: 2–3 sets × 15–25 reps per side, only if form stays clean.
Progression rule: First increase control, pause time, or reps. Then, if needed, progress by using a slower lowering phase. Avoid rushing the movement just to complete more reps.
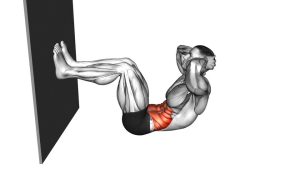
Setup / Starting Position
- Lie on your side: Stack your legs and keep the knees slightly bent for balance.
- Place the lower arm down: Use the bottom arm on the floor for light support and stability.
- Position the top hand: Place the top hand gently behind the head without pulling the neck.
- Set the torso: Keep the body long through the side waist before starting the crunch.
- Brace lightly: Engage the core enough to prevent rolling backward or forward.
In the video, the lower body stays stable while the upper torso performs the visible crunch. Therefore, the setup should help you keep the hips and legs quiet throughout the movement.
Execution (Step-by-Step)
- Start long: Begin in a side-lying position with the torso relaxed but aligned.
- Lift through the side waist: Crunch the upper torso upward by shortening the oblique side.
- Keep the movement lateral: Bring the ribcage slightly toward the hip without twisting the torso.
- Pause briefly: At the top, squeeze the obliques for a short moment while keeping the neck relaxed.
- Lower with control: Return the torso slowly to the starting position without dropping or collapsing.
- Repeat on one side: Finish all reps on one side, then switch and repeat evenly on the other side.
Pro Tips & Common Mistakes
- Lift from the ribs, not the neck: The crunch should come from the side abs, not from yanking the head upward.
- Avoid twisting: This exercise is shown as a side-bending crunch, so keep the chest from rotating aggressively.
- Control the lowering phase: Lower slowly because the return phase helps train stability and body control.
- Keep the legs quiet: If the legs swing or shift, reduce the range and focus on torso movement only.
- Use a moderate range: A clean small lift is better than a large, sloppy crunch.
- Do both sides evenly: Train the left and right obliques with the same reps, tempo, and attention.
- Breathe smoothly: Exhale as you crunch upward, then inhale as you return to the start.
FAQ
What muscles does the Side Crunch work?
The Side Crunch primarily targets the obliques. It also involves the rectus abdominis, deep core stabilizers, and small hip-stabilizing muscles that help keep the body steady.
Is the Side Crunch good for beginners?
Yes. It is beginner-friendly when performed slowly with a small range of motion. However, beginners should focus on control first instead of trying to lift high.
Should I pull on my head during the Side Crunch?
No. The top hand should only support the head lightly. If you pull with the arm, the neck may strain and the obliques may do less work.
Is this exercise the same as a twisting crunch?
No. In the visible exercise, the movement is mainly a side crunch with lateral trunk flexion. A twisting crunch uses more rotation, while this version focuses on shortening the side waist.
How can I make the Side Crunch harder?
First, slow down the lowering phase or hold the top contraction for 1–2 seconds. After that, you can add more reps, but only if your hips stay stable and your neck remains relaxed.
Why do I feel it in my neck?
Neck tension usually happens when you pull the head with the hand or lift too aggressively. Instead, keep the hand light, move from the ribs, and reduce the range of motion.
Recommended Equipment (Optional)
- Exercise Mat — provides comfort for side-lying core exercises on the floor.
- Thick Yoga Mat — useful if your hip, elbow, or shoulder feels pressure on hard surfaces.
- Pilates Mat — offers extra cushioning for repeated ab and oblique floor work.
- Ab Workout Mat — supports floor-based core training and helps maintain comfort during sets.
- Fitness Interval Timer — helps track rest periods, side changes, and timed core circuits.
Tip: Equipment is optional for the Side Crunch. However, a comfortable mat can improve consistency, especially when performing multiple sets on each side.