Smith Machine Front Squat Clean Grip: Form, Benefits, Sets & Tips
Learn the Smith Machine Front Squat Clean Grip for stronger quads, glutes, and legs with setup cues, step-by-step form, mistakes, FAQs, and equipment.
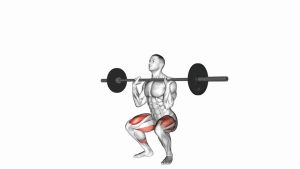
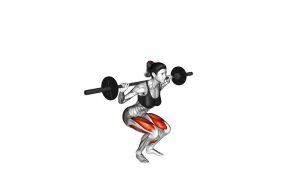
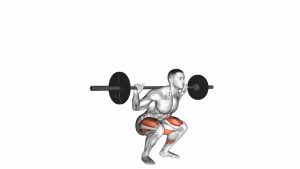
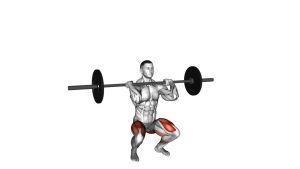
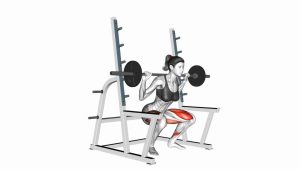
Smith Machine Front Squat (Clean Grip)
This exercise works best when you focus on a vertical torso, controlled knee travel, and stable foot pressure. Because the bar is held in front of the body, the Smith Machine Front Squat naturally encourages a more upright position than many back squat variations. It is especially useful for training the quads, improving squat depth, and building leg strength with a guided bar path.
Quick Overview
| Body Part | Quads |
|---|---|
| Primary Muscle | Quadriceps |
| Secondary Muscle | Glutes, hamstrings, calves, core, upper back stabilizers |
| Equipment | Smith machine |
| Difficulty | Intermediate |
Sets & Reps (By Goal)
- Strength: 4–5 sets × 4–6 reps using a controlled descent and strong drive upward.
- Muscle growth: 3–4 sets × 8–12 reps with moderate weight and full range of motion.
- Quad focus: 3–5 sets × 10–15 reps using slow tempo and deep knee flexion.
- Technique practice: 2–3 sets × 8–10 reps with light weight and perfect elbow position.
Progression rule: Add weight only when you can keep your chest tall, elbows high, heels grounded, and knees tracking smoothly over the toes.
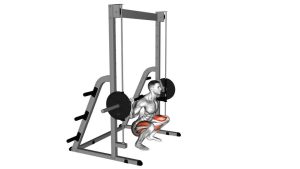
Setup / Starting Position
- Set the bar height: Position the Smith machine bar at upper-chest height so you can unrack it without standing on your toes.
- Step under the bar: Place the bar across the front of your shoulders, resting it on the front delts instead of the neck.
- Use a clean grip: Hold the bar with your fingers under or around it, keeping your elbows lifted forward and slightly upward.
- Set your feet: Stand about shoulder-width apart with toes slightly turned out. Place your feet where your knees can travel comfortably.
- Brace your body: Keep your ribs down, core tight, chest tall, and eyes forward before unlocking the Smith machine hooks.
Tip: If wrist mobility is limited, use a lighter grip with the fingers supporting the bar while the shoulders carry most of the load.
Execution (Step-by-Step)
- Unrack the bar: Rotate the Smith bar out of the hooks and stand tall with the bar stable on your front shoulders.
- Start the descent: Bend the knees and hips together while keeping the torso upright and the elbows lifted.
- Lower under control: Squat down smoothly, allowing the knees to travel forward while keeping the heels planted.
- Reach your working depth: Descend until your thighs are at least near parallel, or deeper if your mobility allows without losing posture.
- Drive upward: Push through the mid-foot and heel, extending the knees and hips while keeping the bar path vertical.
- Finish tall: Return to a strong standing position without leaning back, bouncing, or letting the elbows collapse.
Pro Tips & Common Mistakes
- Keep elbows high: Low elbows usually cause the upper back to round and the bar to feel unstable.
- Do not sit too far back: This is a front squat pattern, so allow natural knee travel to keep the movement quad-focused.
- Keep heels down: If your heels lift, reduce depth, adjust foot position, or improve ankle mobility.
- Avoid rushing the bottom: Control the descent and do not bounce aggressively out of the deepest position.
- Brace before every rep: A tight core helps protect posture and keeps the torso upright.
- Use a load you can own: The Smith machine adds stability, but the front rack position still requires control.
- Watch knee tracking: Knees should follow the same direction as the toes, not collapse inward.
FAQ
Is the Smith Machine Front Squat good for building quads?
Yes. The upright torso, forward knee travel, and front-loaded position make this exercise highly effective for targeting the quadriceps. It can be especially useful for lifters who want a stable squat variation focused on the front thighs.
What is the difference between a clean grip and crossed-arm grip?
A clean grip uses the hands and fingers under the bar with the elbows lifted forward. A crossed-arm grip places the hands over the bar with the arms crossed. The clean grip often feels more athletic but requires more wrist, shoulder, and upper-back mobility.
Should my feet be directly under the Smith machine bar?
Your feet should be placed where you can squat comfortably while keeping your heels grounded and knees tracking well. Many lifters place the feet slightly forward compared with a free-weight front squat because the Smith machine path is fixed.
How deep should I squat?
Squat as deep as you can while maintaining a tall chest, stable heels, and neutral spine. If you lose control at the bottom, use a slightly shorter range of motion until your mobility and strength improve.
Is this exercise beginner-friendly?
It can be used by newer lifters, but the clean grip and front rack position may feel challenging. Beginners should start light, learn the setup carefully, and focus on smooth reps before adding weight.
Recommended Equipment
- Smith Machine — main equipment for performing this guided front squat variation.
- Barbell Squat Pad — optional comfort support for lifters who feel pressure on the front shoulders.
- Weightlifting Shoes — raised heel support can improve squat depth and upright torso positioning.
- Weightlifting Belt — useful for heavy sets when bracing and trunk stability become more important.
- Wrist Wraps — helpful for lifters who need extra wrist support in the clean grip position.
Tip: Equipment should support better technique, not hide poor form. Master the front rack position and squat pattern before increasing load.