Standing Side Crunch Elbow to Knee: Form, Sets, Tips & FAQ
Learn the Standing Side Crunch Elbow to Knee for oblique control, core stability, and bodyweight abs training with form steps, tips, FAQs, and gear.
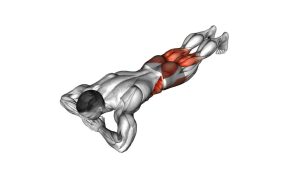
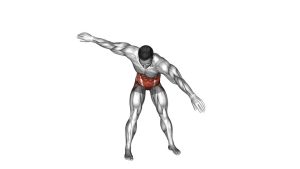
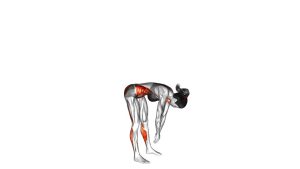
Standing Side Crunch Elbow to Knee
This exercise works best when the movement stays smooth, upright, and controlled. First, stand tall with your hands behind your head. Then, lift one knee out to the side while lowering the same-side elbow toward it. Because the movement is lateral, your side waist should shorten as your obliques contract. However, your chest should stay open, and your planted foot should remain steady.
Quick Overview
| Body Part | Core |
|---|---|
| Primary Muscle | Obliques |
| Secondary Muscle | Rectus abdominis, hip flexors, glute medius, standing-leg stabilizers |
| Equipment | None |
| Difficulty | Beginner |
Sets & Reps (By Goal)
- Beginner technique: 2–3 sets × 8–10 reps per side with slow control.
- Core endurance: 3–4 sets × 12–20 reps per side with a steady rhythm.
- Warm-up activation: 1–2 sets × 10–12 reps per side before core or lower-body training.
- Low-impact cardio core: 3–5 rounds × 30–45 seconds, alternating sides continuously.
Progression rule: Add reps first. After that, slow the lowering phase, increase control, or use a longer set duration.
Setup / Starting Position
- Stand tall: Place your feet about hip-width to shoulder-width apart.
- Set your hands: Bring both hands behind your head with your elbows pointing outward.
- Brace lightly: Keep your ribs controlled and your abdomen gently engaged.
- Keep your chest open: Avoid rounding forward before the movement begins.
- Find balance: Press evenly through the standing foot before lifting the opposite knee.
Tip: Start slower than you think you need. Better balance makes the oblique contraction cleaner.
Execution (Step-by-Step)
- Begin upright: Stand tall with both elbows wide and your gaze forward.
- Lift one knee: Raise one knee out to the side while keeping the opposite foot planted.
- Crunch sideways: Lower the same-side elbow toward the lifted knee.
- Shorten the side waist: Let the obliques create the side bend instead of pulling hard on the neck.
- Reach the top position: Bring the elbow and knee close together without forcing contact.
- Return with control: Lower the leg and bring the torso back to upright.
- Repeat or alternate: Continue on the same side or switch sides in a smooth rhythm.
Pro Tips & Common Mistakes
- Think “side crunch,” not forward crunch: Bend sideways instead of collapsing your chest forward.
- Keep your hands light: Do not pull on your head or neck to reach the knee.
- Use your obliques: Focus on shortening the side waist as the knee lifts.
- Control the standing leg: Keep the planted foot stable instead of bouncing or hopping.
- Avoid rushing: Fast reps can turn the exercise into leg swinging instead of core work.
- Stay tall between reps: Return to a clean upright position before starting the next crunch.
- Match both sides: Use the same range and tempo on the right and left side.
FAQ
What muscles does the Standing Side Crunch Elbow to Knee work?
It mainly works the obliques. In addition, the rectus abdominis, hip flexors, glute medius, and standing-leg stabilizers help control the movement.
Is this exercise good for beginners?
Yes. Since it uses bodyweight only and does not require lying on the floor, it is beginner-friendly. However, beginners should move slowly and focus on balance first.
Should my elbow touch my knee?
Contact is optional. The main goal is to bring the elbow and knee toward each other while creating a clean side crunch. Therefore, do not force the range if it changes your posture.
Can I alternate sides?
Yes. You can perform all reps on one side or alternate from side to side. Alternating creates a more rhythmic core and conditioning effect, while single-side sets make it easier to focus on form.
Why do I feel this more in my hip than my abs?
Your hip flexors help lift the knee, so some hip effort is normal. However, if the hip dominates, slow down, reduce knee height, and focus on bending the side waist toward the knee.
Recommended Equipment (Optional)
- Exercise Mat — useful for warm-ups, cooldowns, and extra floor-based core work.
- Non-Slip Training Shoes — helps improve foot grip and balance during standing core drills.
- Adjustable Ankle Weights — optional progression for advanced users who already control the bodyweight version.
- Mini Resistance Bands — useful for glute medius and hip stability work that supports standing balance.
- Fitness Interval Timer — helpful for timed core circuits and low-impact conditioning rounds.
Tip: Keep the exercise bodyweight until your balance and side-crunch control feel consistent on both sides.