Suspension-Assisted Bicycle Crunch: Form, Core Benefits, Sets & Tips
Learn the Suspension-Assisted Bicycle Crunch to train abs, obliques, and core stability with straps. Includes form, sets, tips, FAQs, and gear.
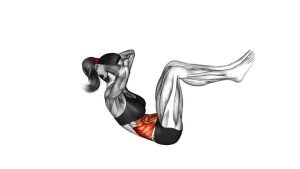
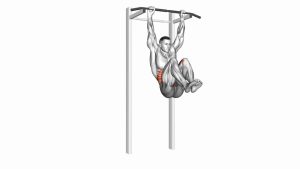
Suspension-Assisted Bicycle Crunch
This exercise is best performed with smooth control, not speed. The goal is to keep the lower back stable, rotate from the trunk, and alternate each knee toward the opposite elbow without pulling on the neck. The suspension straps make the legs feel lighter, but they also create instability, so your core must stay active through every phase of the movement.
Quick Overview
| Body Part | Abs |
|---|---|
| Primary Muscle | Rectus abdominis |
| Secondary Muscle | Obliques, hip flexors, transverse abdominis, deep core stabilizers |
| Equipment | Suspension trainer, exercise mat, stable anchor point |
| Difficulty | Intermediate — requires core control, coordination, and strap stability |
Sets & Reps (By Goal)
- Core activation: 2–3 sets × 8–10 reps per side with slow control
- Abs and oblique strength: 3–4 sets × 10–14 reps per side with a short squeeze
- Core endurance: 2–3 sets × 30–45 seconds using a steady alternating rhythm
- Workout finisher: 2–3 rounds × 20–30 total reps with clean form and minimal rest
Progression rule: First improve control and range. Then increase reps, time under tension, or tempo difficulty. Do not progress by swinging the straps or rushing the bicycle motion.
Setup / Starting Position
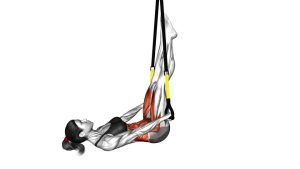
- Anchor the straps securely: Set the suspension trainer at a low height so your feet can rest in the foot cradles while you lie on your back.
- Lie supine: Position your body under the anchor with your back on the mat and legs extended forward in the straps.
- Place hands lightly behind the head: Keep elbows open and avoid pulling the head forward.
- Brace the core: Gently draw the ribs down and keep the lower back controlled against the floor.
- Lift slightly into a crunch: Raise the head and shoulders just enough to create abdominal tension before the first knee drive.
Tip: Before starting the alternating motion, pause for one breath and make sure the straps are even, your pelvis is stable, and your neck feels relaxed.
Execution (Step-by-Step)
- Start with both legs extended: Keep your feet supported in the suspension straps and your core lightly braced.
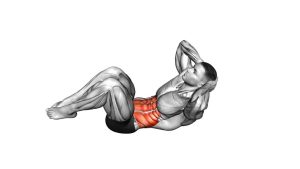
- Drive one knee in: Bend one knee toward the torso while the opposite leg stays extended and controlled.
- Rotate toward the bent knee: Bring the opposite shoulder toward the working knee without yanking the neck.
- Squeeze briefly: Pause for a moment at the top to feel the abs and obliques contract.
- Return through center: Extend the bent leg back out while bringing the torso toward neutral.
- Switch sides: Bend the opposite knee and rotate the torso toward it in a smooth bicycle pattern.
- Repeat with control: Continue alternating sides while keeping the straps quiet and the lower back stable.
Pro Tips & Common Mistakes
- Rotate from the ribs, not the neck: Your shoulder should travel toward the opposite knee, but your hands should not pull the head.
- Keep the lower back controlled: Avoid arching as the legs extend. Think ribs down and pelvis steady.
- Control the straps: Swinging straps usually mean the reps are too fast or the core is not braced enough.
- Do not collapse the elbows inward: Keep the chest open so rotation comes from the trunk.
- Use a full exhale: Exhale during each crunch to increase abdominal contraction and reduce neck tension.
- Do not chase speed: This is a core-control exercise. Slower reps often create better abs and oblique engagement.
- Match both sides: Keep the same range and tempo on the left and right to avoid twisting unevenly.
FAQ
What muscles does the Suspension-Assisted Bicycle Crunch work?
It mainly trains the rectus abdominis and obliques. The hip flexors assist during the knee drive, while the deep core helps stabilize the pelvis and control the suspended legs.
Is this harder than a regular bicycle crunch?
Yes, it is usually more challenging because the suspension trainer adds instability. Even though the straps support the feet, your core must work harder to control leg movement, prevent swinging, and maintain trunk position.
Should my lower back stay on the floor?
Your lower back should stay controlled and avoid excessive arching. A small natural curve is acceptable, but if your back lifts aggressively as the legs extend, reduce the range or slow the movement.
Why do I feel this in my hip flexors?
Some hip flexor activity is normal because each rep includes hip flexion. However, if the hip flexors dominate, focus on exhaling, curling the ribs toward the pelvis, and moving slower through each rotation.
Can beginners do this exercise?
Beginners should first master regular bicycle crunches, dead bugs, and basic suspension knee tucks. This variation is better for users who already have enough core control to keep the straps stable.
How can I make the exercise easier?
Shorten the leg extension, reduce the crunch height, move slower, or perform fewer reps per set. You can also practice with one knee drive at a time before using a continuous bicycle pattern.
Recommended Equipment
- Suspension Trainer — the main tool for performing suspended bicycle crunches and other strap-based core exercises
- Thick Exercise Mat — adds comfort for the spine, shoulders, and head during supine core work
- Suspension Trainer Door Anchor — useful for home setups when a fixed overhead anchor is not available
- Ab Workout Mat — supports repeated crunch variations and helps reduce pressure on the lower back
- Core Sliders — helpful for similar core-control progressions such as mountain climbers, knee tucks, and body saws
Tip: Choose equipment that lets you keep the straps even and secure. A stable anchor and comfortable mat make it much easier to focus on clean core engagement instead of adjusting your setup.