Inverted Chin Curl with Bent Knee Between Chairs: Form, Sets, Tips & FAQ
Learn how to perform the Inverted Chin Curl with Bent Knee Between Chairs for bodyweight biceps growth and arm strength. Includes setup, step-by-step form, sets by goal, common mistakes, FAQs, and recommended equipment.
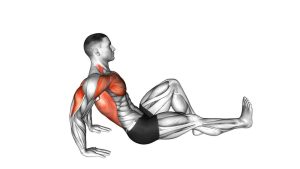
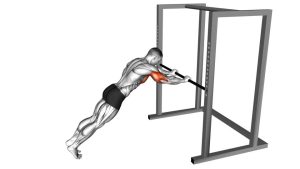
Inverted Chin Curl with Bent Knee Between Chairs
This variation works best when you keep the movement strict and controlled. The main goal is to initiate the pull by bending the elbows and squeezing the biceps rather than yanking with the hips or turning it into a full upper-back row. The bent-knee setup helps reduce overall bodyweight load, making it a smart option for home trainees who want a stronger arm-focused pulling movement without a barbell, dumbbells, or cables.
Quick Overview
| Body Part | Biceps |
|---|---|
| Primary Muscle | Biceps brachii |
| Secondary Muscle | Brachialis, brachioradialis, forearms, rear delts, upper back stabilizers, core |
| Equipment | Two sturdy chairs, dip bars, or stable parallel supports |
| Difficulty | Intermediate bodyweight exercise |
Sets & Reps (By Goal)
- Muscle growth: 3–4 sets × 8–12 reps with controlled tempo and 60–90 sec rest
- Strength emphasis: 4–5 sets × 5–8 reps with slower lowering and 90–120 sec rest
- Bodyweight skill / control: 2–4 sets × 6–10 reps focusing on perfect elbow-driven form
- Home workout finisher: 2–3 sets taken close to technical failure with clean reps only
Progression rule: First improve rep quality, then add reps, then slow the eccentric. You can also straighten the legs slightly over time to increase difficulty.
Setup / Starting Position
- Place the supports securely: Set two sturdy chairs or bars parallel to each other on a stable floor. Make sure they will not slide or tip.
- Grip the edges firmly: Use an underhand or slightly neutral hand position, depending on the setup and comfort of your wrists.
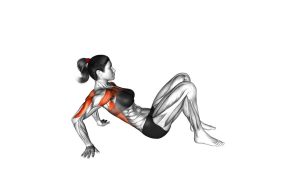
- Position your body underneath: Sit or slide under the supports so your chest faces upward and your hands are above your torso.
- Bend your knees: Keep both feet flat on the floor with knees bent to reduce the lever length and make the exercise more controlled.
- Start with straight arms: Let the body hang under control with the elbows extended but not violently locked out.
- Brace lightly: Tighten your abs and glutes so your torso stays firm while you pull.
Tip: Your body should feel supported and stable before the first rep. If the setup feels shaky, do not continue until it is secure.
Execution (Step-by-Step)
- Set your shoulders: Keep the shoulders down and back slightly without shrugging toward the ears.
- Initiate with the elbows: Begin the rep by bending the elbows and thinking about pulling your body toward your hands using your biceps.
- Keep the body tight: Maintain a braced torso and planted feet so the movement stays smooth and controlled.
- Pull until the chin or upper chest gets close: Rise until your chin, upper chest, or collarbone area comes near hand level based on your setup.
- Squeeze at the top: Pause briefly and contract the biceps hard without letting the shoulders roll forward.
- Lower slowly: Extend the elbows under control and return to the start without dropping or bouncing.
- Repeat with clean reps: Keep every repetition elbow-driven and avoid turning the movement into a loose body row.
Pro Tips & Common Mistakes
- Think curl, not row: Lead with elbow flexion instead of aggressively pulling the chest with the back.
- Use a slow eccentric: Lowering under control increases tension on the biceps and improves technique.
- Keep the wrists comfortable: Choose the hand angle that feels natural and stable on your setup.
- Do not rush the top: A brief squeeze at peak contraction makes the movement much more effective.
- Avoid hip cheating: Do not thrust the hips or use momentum to finish tough reps.
- Do not let the chairs move: Stability matters more than rep count. Reset immediately if anything shifts.
- Stay within control: Full-body tension is useful, but the elbows should still be the main movers.
FAQ
Is this an inverted row or a curl?
It sits between both, but the goal is to make it more biceps-dominant by focusing on elbow flexion. If you pull mainly with your upper back, it becomes more like a row.
Why keep the knees bent?
Bent knees shorten the lever and reduce the amount of bodyweight you have to move. That makes the exercise more manageable and helps you keep the curl mechanics stricter.
Where should I feel this exercise most?
You should mostly feel it in the biceps, front of the upper arms, and forearms. Some upper-back and core tension is normal, but the arms should be doing most of the work.
Can beginners do this movement?
Yes, if the setup is safe and the bent-knee position is used. True beginners may still need fewer reps, a smaller range of motion, or easier bodyweight pulling variations first.
How can I make it harder?
You can slow the lowering phase, pause longer at the top, increase total reps, or gradually move toward a straighter-leg position to increase the load.
Recommended Equipment
- Dip Bars Station — a more stable and purpose-built alternative to chairs for bodyweight pulling and support work
- Heavy-Duty Push-Up Bars — useful for compact home setups when you want a lower-profile support option
- Resistance Bands Set — can be used for assistance, warm-ups, or added biceps volume after bodyweight sets
- Workout Gloves or Grip Pads — helpful if the chair or bar surface feels hard or slippery during longer sets
- Exercise Mat — adds comfort and traction for your feet and helps protect the floor in home workouts
Tip: If you plan to use this exercise regularly, dedicated dip bars or stable parallel supports are safer and more consistent than household chairs.