Barbell Reverse Spider Curl: Proper Form, Muscles Worked, Sets, Tips & FAQ
Learn how to perform the Barbell Reverse Spider Curl with strict form to target the brachialis, brachioradialis, and forearms. Includes setup, step-by-step execution, sets and reps by goal, common mistakes, FAQs, and recommended equipment.
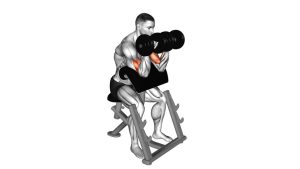
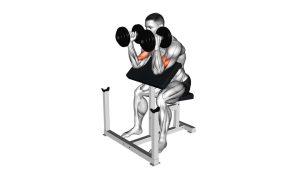
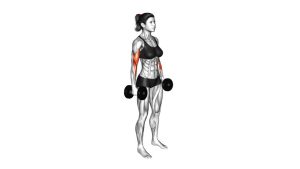
Barbell Reverse Spider Curl
This exercise works best when the elbows stay fixed and the bar travels through a smooth, controlled arc. The overhand grip reduces biceps dominance compared with a standard spider curl, which makes the reverse variation especially useful for bringing up the brachialis and upper forearms. Focus on strict elbow flexion, stable wrists, and a full range of motion from the stretched bottom position to a strong squeeze at the top.
Quick Overview
| Body Part | Arms |
|---|---|
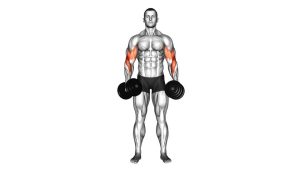
| Primary Muscle | Brachialis and brachioradialis |
| Secondary Muscle | Biceps brachii, forearm extensors, forearm flexors |
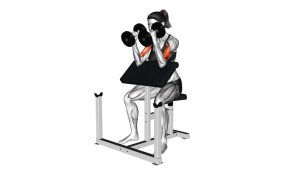
| Equipment | Barbell and incline bench |
| Difficulty | Beginner to Intermediate |
Sets & Reps (By Goal)
- Muscle growth: 3–4 sets × 8–12 reps with controlled tempo and 60–90 seconds rest
- Forearm and brachialis emphasis: 3–4 sets × 10–15 reps with lighter weight and strict form
- Strength-focused arm accessory: 4–5 sets × 6–8 reps with longer rest and no body English
- Technique refinement / pump finisher: 2–3 sets × 12–15 reps with moderate weight and slow lowering
Progression rule: Increase reps first, then add small amounts of weight only when you can keep your chest planted, wrists stable, and elbows fixed throughout every rep.
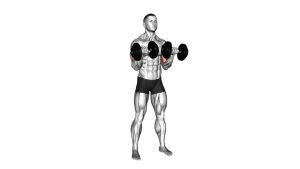
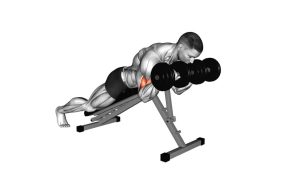
Setup / Starting Position
- Set the bench: Adjust an incline bench to a comfortable angle that allows your chest to stay firmly supported while your arms hang freely.
- Lie face down: Position your chest against the pad with your head neutral and feet planted for stability.
- Grab the barbell with an overhand grip: Use a shoulder-width or slightly narrower grip based on comfort and wrist position.
- Let the arms hang straight down: Start with the elbows extended and the barbell hanging under the shoulders.
- Brace lightly: Keep the torso still, shoulders down, and wrists straight before beginning the curl.
Tip: A lighter barbell or fixed-weight straight bar often works best for keeping the reverse grip comfortable and the reps strict.
Execution (Step-by-Step)
- Start from a dead hang: Allow the arms to fully extend while keeping tension through the hands and forearms.
- Curl the bar upward: Flex the elbows and raise the bar in a smooth arc without swinging or shifting the torso.
- Keep the elbows fixed: Do not let them drift forward or backward as the bar rises.
- Squeeze at the top: Bring the bar toward the upper chest area and briefly contract the brachialis and forearms.
- Lower under control: Slowly return the bar to the starting position until the arms are fully extended again.
- Repeat with strict tempo: Keep the same path, range, and elbow position on every rep.
Pro Tips & Common Mistakes
- Use a true overhand grip: A pronated grip is what makes this a reverse curl and shifts more work to the brachialis and brachioradialis.
- Keep the chest glued to the bench: Lifting the torso reduces isolation and turns the rep into a cheat curl.
- Don’t overload too early: Reverse-grip curls usually require less weight than standard curls.
- Control the eccentric: Lowering slowly helps build tension in the forearms and upper arms.
- Keep wrists neutral: Excessive wrist extension can create discomfort and reduce force transfer.
- Avoid elbow travel: The movement should stay centered at the elbow joint, not become a shoulder-driven curl.
- Use full range: Start from full extension and finish with a strong but controlled squeeze at the top.
FAQ
What muscles does the Barbell Reverse Spider Curl work most?
It mainly targets the brachialis and brachioradialis, while the biceps and other forearm muscles assist. The reverse grip changes the emphasis compared with a normal underhand spider curl.
Is this better than a regular spider curl for forearms?
For most lifters, yes. The overhand grip increases forearm and brachioradialis involvement, which makes it a better choice when the goal is forearm development and overall arm thickness rather than peak biceps emphasis.
How heavy should I go on reverse spider curls?
Use a load that allows strict reps with stable wrists and no torso movement. This exercise usually works best with moderate or light-to-moderate weight rather than maximum loading.
Can beginners do this exercise?
Yes. It is beginner-friendly when performed with a manageable weight. The bench support helps reduce cheating and teaches proper arm isolation.
What is the most common mistake?
The most common mistakes are using too much weight, bending the wrists back, and letting the shoulders or torso help drive the bar upward. Strict control is what makes this exercise effective.
Recommended Equipment
- Adjustable Incline Weight Bench — essential for the chest-supported spider curl position
- Straight Barbell Set — ideal for performing reverse curls with progressive loading
- Weight Plates Set — useful for adjusting resistance in small increments
- Wrist Support Wraps — helpful for lifters who need extra wrist stability during reverse-grip work
- Home Gym Floor Mat — protects flooring and creates a more stable training setup around the bench
Tip: For this movement, comfort and control matter more than heavy loading. Choose equipment that helps you keep the setup stable and the reps strict.