Bridge Mountain Climber Cross Body: Form, Core Benefits, Sets & Tips
Learn how to do the Bridge Mountain Climber Cross Body exercise with proper form. Build core strength, oblique control, glute stability, and waist definition with step-by-step coaching.
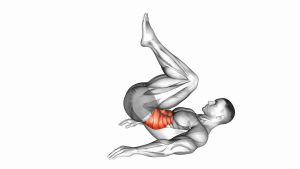
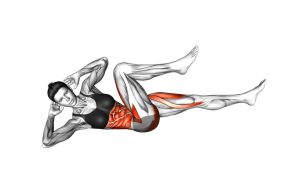
Bridge Mountain Climber (Cross Body)
This exercise is excellent for building waist control, pelvic stability, anti-rotation strength, and glute endurance. Because the hips remain lifted throughout the movement, the body must resist dropping, twisting, or arching. Each cross-body knee drive challenges the obliques while the planted leg works hard to keep the bridge position strong and level.
The movement should look smooth and controlled. Think of it as a combination of a single-leg bridge stability drill and a slow cross-body mountain climber. The working knee travels toward the opposite side of the torso, but the hips should not swing or collapse. Quality is more important than speed.
Quick Overview
| Body Part | Core |
|---|---|
| Primary Muscle | Obliques, rectus abdominis, and deep core stabilizers |
| Secondary Muscle | Glutes, hamstrings, hip flexors, lower abs, and pelvic stabilizers |
| Equipment | Bodyweight only; optional exercise mat |
| Difficulty | Intermediate because it requires bridge strength, hip control, and coordinated cross-body movement |
Sets & Reps (By Goal)
- Core activation: 2–3 sets × 8–10 reps per side with slow control.
- Waist and oblique endurance: 3–4 sets × 10–15 reps per side.
- Glute bridge stability: 3 sets × 6–10 reps per side with a 2-second pause on each knee drive.
- Conditioning finisher: 2–4 rounds × 30–45 seconds, keeping the hips lifted the entire time.
- Beginner modification: 2 sets × 6–8 reps per side with smaller knee drives and short rests.
Progression rule: First improve control and hip height. Then increase reps, add pauses, or slow the tempo. Do not progress by rushing the knee drive if your hips start dropping or rotating.
Setup / Starting Position
- Lie on your back: Place your back on the floor or exercise mat with your knees bent and feet flat.
- Set your feet: Keep your feet about hip-width apart, close enough that your heels are near your glutes.
- Brace your core: Gently tighten your abs and keep your ribs from flaring upward.
- Position your arms: Place your arms on the floor beside your body for balance.
- Lift into a bridge: Press through your heels and raise your hips until your knees, hips, and shoulders form a strong line.
- Stabilize before moving: Squeeze your glutes and keep your pelvis level before starting the cross-body knee drive.
Setup cue: Your bridge should feel strong before the first rep. If your hips are already shaking or your lower back is arching, lower the hips slightly and reset your brace.
Execution (Step-by-Step)
- Start in a strong bridge: Keep both feet planted, hips lifted, glutes squeezed, and ribs controlled.
- Lift one foot: Slowly raise one foot from the floor without letting the opposite hip drop.
- Drive the knee across: Bring the lifted knee diagonally toward the opposite side of your torso.
- Keep the pelvis stable: Resist twisting as the knee crosses the body. Your hips should stay as level as possible.
- Pause briefly: Hold the cross-body position for a moment while keeping the glutes and abs engaged.
- Return the foot: Move the leg back to the starting position and place the foot down softly.
- Switch sides: Repeat the same diagonal knee drive with the opposite leg.
- Continue alternating: Maintain a steady rhythm without bouncing, rushing, or losing bridge height.
Pro Tips & Common Mistakes
Pro Tips
- Press through the heel of the planted foot: This helps keep the glute active and prevents the bridge from collapsing.
- Keep your ribs down: A strong rib position protects the lower back and improves abdominal engagement.
- Move diagonally, not straight up: The cross-body path is what increases oblique involvement.
- Control the return: Do not let the foot slam down. A slow return keeps tension in the core and glutes.
- Use a smaller range if needed: A short, clean cross-body knee drive is better than a large, messy rep.
- Pause at the top: A brief pause improves balance, stability, and core awareness.
Common Mistakes
- Dropping the hips: This removes tension from the glutes and reduces the effectiveness of the exercise.
- Overarching the lower back: Keep the abs engaged so the bridge does not become a lumbar extension movement.
- Twisting the pelvis too much: The knee crosses, but the torso and hips should stay controlled.
- Rushing the reps: Fast reps often turn the movement into momentum instead of core control.
- Pushing through the toes: This can shift tension away from the glutes and into the calves or hip flexors.
- Holding the breath: Breathe steadily so the core stays braced without excessive tension.
FAQ
What muscles does the Bridge Mountain Climber Cross Body work?
It mainly works the obliques, rectus abdominis, deep core stabilizers, glutes, and hamstrings. The cross-body knee drive targets waist control, while the bridge position challenges the glutes and posterior chain.
Is this exercise good for the waist?
Yes. The diagonal knee drive trains the obliques and deep core muscles that help control rotation around the waist. For best results, perform it slowly and focus on keeping the hips stable instead of swinging side to side.
Why do my hips drop during the movement?
Hip dropping usually means the glutes, hamstrings, or core are losing tension. Reduce the range of the knee drive, slow down, and focus on pressing firmly through the planted heel.
Can beginners do this exercise?
Beginners can do it with modifications. Start with a regular glute bridge, then practice lifting one foot slightly. Once you can keep the hips level, add a small cross-body knee drive.
Should this exercise be done fast or slow?
Slow and controlled is better for strength, stability, and form. Faster reps can be used for conditioning, but only after you can keep the hips lifted and controlled.
What should I do if I feel it in my lower back?
Lower the hips slightly, brace your abs, and squeeze your glutes harder. If the lower back still takes over, regress to a basic glute bridge or single-leg bridge hold before returning to this variation.
Recommended Equipment
- Exercise Mat — provides comfort and grip for floor-based bridge and core exercises.
- Thick Yoga Mat — useful if your lower back, hips, or shoulders need extra floor cushioning.
- Mini Resistance Bands — can be used for glute activation drills before performing this movement.
- Core Sliders — helpful for other mountain climber and core stability progressions.
- Adjustable Ankle Weights — optional advanced tool for increasing hip flexor and core demand once form is mastered.
Equipment tip: This exercise does not require equipment. Start with bodyweight only, then add tools only if your hips stay stable, your lower back feels comfortable, and your reps remain controlled.