Bicycle Twisting Crunch: Form, Benefits, Sets, Tips & FAQ
Learn how to perform the Bicycle Twisting Crunch with proper form. Build stronger abs and obliques with step-by-step instructions, sets, common mistakes, FAQs, and equipment tips.
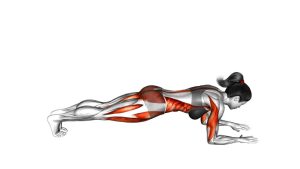
Bicycle Twisting Crunch
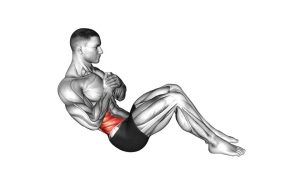
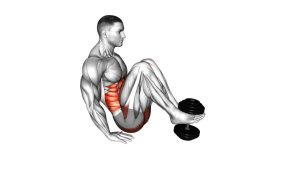
This exercise is not just about moving fast. The best Bicycle Twisting Crunch reps are controlled, deliberate, and consistent. Your shoulders should stay slightly lifted, your core should remain engaged, and your legs should move in an alternating pattern without dropping completely to the floor. The rotation should come from your ribs and torso rather than from pulling your neck with your hands.
During the movement, one leg bends toward the body while the opposite leg extends away. At the same time, the torso twists so the opposite elbow moves toward the bent knee. The elbow and knee do not need to touch. What matters most is the quality of the rotation, the tension through the abs, and the ability to keep the lower back controlled.
Quick Overview
| Body Part | Core |
|---|---|
| Primary Muscle | Rectus abdominis and obliques |
| Secondary Muscle | Hip flexors, transverse abdominis, deep core stabilizers |
| Equipment | No equipment required; optional exercise mat |
| Difficulty | Beginner to Intermediate |
Sets & Reps (By Goal)
- Beginner core control: 2–3 sets × 8–12 reps per side, slow tempo, 45–60 sec rest.
- Muscle endurance: 3–4 sets × 15–25 reps per side, steady rhythm, 30–45 sec rest.
- Oblique emphasis: 3 sets × 10–15 reps per side with a 1-second squeeze on each twist.
- Home abs finisher: 2–4 rounds × 30–45 seconds, controlled pace, 30 sec rest.
- Core conditioning: 4–5 rounds × 40–60 seconds, alternating with planks or leg raises.
Progression rule: First improve control and range. Then increase reps, set duration, or time under tension. Do not progress by pulling harder with the neck or rushing the twist.
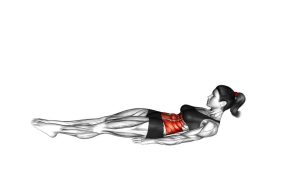
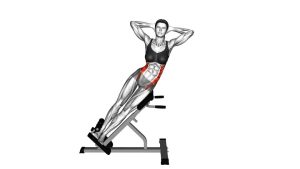
Setup / Starting Position
- Lie on your back: Use a mat if possible. Keep your body long and your spine comfortable.
- Place your hands lightly behind your head: Your fingers can support the head, but they should not pull the neck forward.
- Lift your shoulders slightly: Raise the upper back just enough to create abdominal tension.
- Bring your legs up: Start with both knees bent or with one leg extended depending on your level.
- Brace your core: Gently pull the ribs down and keep the lower back from arching excessively.
- Set your breathing: Exhale during the twist and inhale as you switch sides.
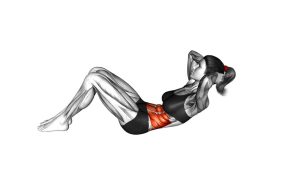
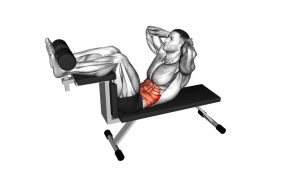
Execution (Step-by-Step)
- Start with your upper back lifted: Keep the shoulders slightly off the floor so the abs stay active.
- Drive one knee toward your torso: Bend one knee toward the chest while the opposite leg extends outward.
- Rotate across the body: Twist your torso so the opposite shoulder moves toward the bent knee.
- Squeeze the abs: Pause briefly at the top of the twist without forcing the elbow to touch the knee.
- Switch sides smoothly: Extend the bent leg while bringing the opposite knee in.
- Rotate to the other side: Turn the opposite shoulder toward the new bent knee.
- Continue alternating: Keep a cycling pattern while maintaining control through the core.
- Finish with control: Lower the shoulders and legs slowly instead of dropping them suddenly.
Pro Tips & Common Mistakes
Pro Tips
- Move with control: A slower bicycle crunch usually builds better core tension than a rushed one.
- Keep your elbows wide: This prevents excessive neck pulling and encourages torso rotation.
- Rotate from the ribs: Let the shoulder blade lift and turn instead of only moving the elbow.
- Keep the extended leg active: Reach through the heel while keeping the leg elevated.
- Exhale during each twist: This helps the abs contract more strongly at the peak.
- Use a smaller range if needed: Quality rotation matters more than forcing big movement.
Common Mistakes
- Pulling the neck: This can create discomfort and reduces the focus on the abs.
- Moving too fast: Speed often turns the exercise into momentum instead of controlled core work.
- Letting the lower back arch: Raise the legs higher or bend the knees more if this happens.
- Only moving the elbows: The torso should rotate; the elbow should not be the main driver.
- Dropping the extended leg too low: This may overload the lower back before the abs are ready.
- Holding the breath: Smooth breathing helps maintain rhythm and abdominal control.
FAQ
What muscles does the Bicycle Twisting Crunch work?
The Bicycle Twisting Crunch mainly works the rectus abdominis and the obliques. The hip flexors assist as the legs alternate, while the deep core helps stabilize the pelvis and lower back.
Is the Bicycle Twisting Crunch good for obliques?
Yes. Because the movement includes rotation, it strongly challenges the internal and external obliques. For better oblique activation, slow the twist and focus on bringing the opposite shoulder toward the knee.
Should my elbow touch my knee?
It does not have to touch. The goal is controlled torso rotation, not forcing contact. If you pull your head forward just to touch the knee, the form becomes less effective and less comfortable.
Why does my lower back hurt during bicycle crunches?
Lower-back discomfort often happens when the legs are too low, the core loses tension, or the movement is rushed. Try bending the knees more, lifting the legs higher, slowing down, and keeping the ribs pulled down.
Is this exercise beginner-friendly?
It can be beginner-friendly when performed slowly with a small range of motion. Beginners can keep the legs higher, reduce reps, or pause between sides until core control improves.
Can I do Bicycle Twisting Crunches every day?
You can perform them frequently if the volume is moderate and there is no discomfort. However, for stronger results, combine them with planks, leg raises, anti-rotation exercises, and proper recovery.
Recommended Equipment
- Thick Exercise Mat — provides cushioning for the spine, hips, and shoulders during floor-based core work.
- Non-Slip Yoga Mat — helps keep your body stable while rotating and switching sides.
- Ab Mat — useful for adding support and comfort during crunch-style movements.
- Adjustable Ankle Weights — optional progression tool for advanced users who can maintain perfect form.
- Core Sliders — useful for adding variety to core and oblique training routines.
Tip: Equipment is optional for this exercise. A comfortable mat is usually the most useful item because it helps you focus on clean core mechanics without floor discomfort.