Chair L-Sit Lift: Form, Benefits, Sets, Tips & FAQ
Learn the Chair L-Sit Lift to build abs, hip flexor strength, and core compression with safe setup, step-by-step form, sets, tips, and gear.
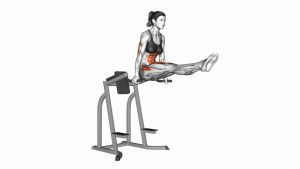
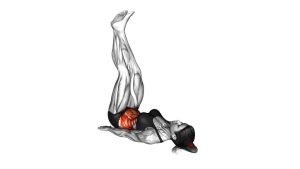
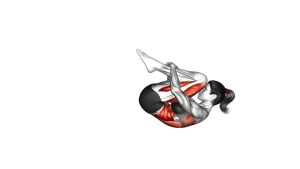
Chair L-Sit Lift
This exercise works best when the movement is slow, tight, and controlled. The goal is not to jump off the chair or swing the legs upward. Instead, press down through your hands, keep your shoulders stable, pull your knees toward your torso, and lift your hips using abdominal compression. You should feel strong work through the lower abs, hip flexors, and the front of the core while your arms support the lift.
Quick Overview
| Body Part | Core |
|---|---|
| Primary Muscle | Rectus abdominis, lower abs, iliopsoas, hip flexors |
| Secondary Muscle | Obliques, quadriceps, triceps, shoulders, serratus anterior, forearms |
| Equipment | Stable chair, bench, or sturdy parallel surface |
| Difficulty | Beginner to Intermediate — excellent for L-sit progression and seated core compression |
Sets & Reps (By Goal)
- Beginner control: 2–3 sets × 5–8 reps with a 1–2 second lift hold
- Core strength: 3–4 sets × 8–12 reps with slow controlled lowering
- L-sit progression: 3–5 sets × 5–10 reps with a 3–5 second top hold
- Isometric endurance: 3–4 sets × 10–20 second tuck holds
- Warm-up activation: 1–2 sets × 6–10 smooth reps before core or calisthenics work
Progression rule: First increase control and hold time. After that, try lifting the knees higher, extending the legs slightly, or progressing toward a full chair-supported L-sit.
Setup / Starting Position
- Choose a stable chair: Use a strong chair or bench that will not slide, tip, or roll.
- Sit near the front edge: Place your hips close enough to the edge so your legs can lift freely.
- Place your hands beside your hips: Grip the chair edges or press your palms firmly into the seat.
- Set your shoulders: Push your shoulders slightly down away from your ears without rounding aggressively.
- Brace your core: Tighten your abs as if preparing to lift your hips away from the chair.
- Lean slightly forward: Bring your shoulders over your hands to make the lift more efficient.
- Keep your knees bent: Start with a compact tuck position before attempting straighter-leg variations.
Setup tip: The closer your hands are to your hips, the easier it is to press down and lift your body. If the chair is too soft or unstable, switch to a firm bench or parallettes.
Execution (Step-by-Step)
- Start tall: Sit upright with your hands pressing into the chair and your feet lightly on the floor.
- Lean forward slightly: Shift your shoulders over your hands while keeping your core tight.
- Press down strongly: Drive your palms into the chair as if trying to push the seat away from you.
- Lift your hips: Use your arms and abs together to raise your hips slightly off the chair.
- Pull your knees up: Draw your knees toward your torso and keep the legs compact.
- Hold the top: Pause briefly while keeping your shoulders depressed and your abs tight.
- Lower with control: Return your hips and feet softly to the starting position without dropping.
- Reset your posture: Breathe, re-brace, and repeat each rep with the same clean setup.
Pro Tips & Common Mistakes
- Press before you lift: The lift starts by pushing down through the hands, not by kicking the legs upward.
- Lean forward slightly: A small forward lean helps shift your center of mass over your hands.
- Keep the shoulders down: Avoid shrugging toward your ears during the top position.
- Use a compact tuck first: Bent knees make the exercise easier and help you build compression strength.
- Do not swing: Momentum reduces core tension and makes the movement less effective.
- Control the descent: Lower slowly instead of dropping back into the chair.
- Avoid wrist collapse: Spread your fingers and press evenly through the palms.
- Keep your abs braced: Do not arch your lower back or let the ribs flare upward.
- Progress gradually: Add longer holds before trying straighter legs.
- Use a stable surface: Avoid rolling chairs, soft cushions, or unstable furniture.
FAQ
What is the Chair L-Sit Lift good for?
The Chair L-Sit Lift is good for building abdominal strength, hip flexor strength, core compression, and beginner L-sit control. It also teaches you how to press down through the arms while lifting the hips and legs together.
Is the Chair L-Sit Lift beginner-friendly?
Yes. It is beginner-friendly when performed with bent knees and a small range of motion. Beginners can start with partial lifts, short holds, or simply pressing down while trying to make the hips lighter on the chair.
Where should I feel this exercise?
You should feel it mainly in the abs, lower abs, and hip flexors. You may also feel your triceps, shoulders, and forearms working because they help support the body during the lift.
Why can’t I lift my hips off the chair?
This usually means you need more pressing strength, hip flexor strength, or core compression. Start with smaller attempts, lean forward slightly, press harder through your hands, and lift the knees before trying to raise the hips higher.
Can this help me learn a full L-sit?
Yes. The Chair L-Sit Lift is a useful L-sit progression because it trains the same core compression pattern used in tuck L-sits and full L-sits. Progress by increasing hold time, lifting higher, and slowly straightening the legs.
Should my legs be straight or bent?
Start with bent knees. Straight legs make the exercise much harder because they increase the lever length and demand more hip flexor and abdominal strength.
How often should I train the Chair L-Sit Lift?
You can train it 2–4 times per week depending on your recovery. Keep the reps clean and stop before your shoulders, wrists, or lower back compensate.
Recommended Equipment
- Parallel Dip Bars — useful for progressing from chair lifts to tuck L-sits and support holds
- Wooden Parallettes — wrist-friendly handles for L-sit progressions, compression lifts, and calisthenics drills
- Flat Workout Bench — a stable surface for seated core lifts, tuck holds, and bodyweight strength practice
- Push-Up Handles — simple handles that can reduce wrist extension during pressing and lift drills
- Non-Slip Exercise Mat — helps keep the chair or bench area stable and provides a safer training surface
Equipment tip: A strong chair is enough to begin, but parallettes or dip bars give you more clearance and make long-term L-sit progression easier.