Lever Seated Leg Raise Crunch: Proper Form, Muscles Worked, Sets, Tips & FAQ
Learn the Lever Seated Leg Raise Crunch with proper form, target muscles, setup, step-by-step execution, sets by goal, common mistakes, FAQs, and recommended equipment.
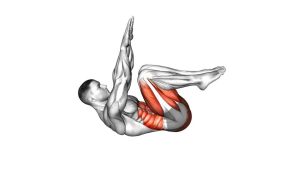
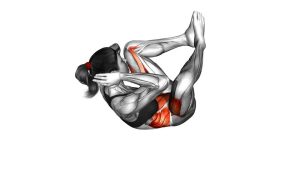
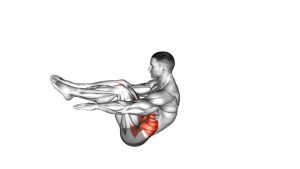
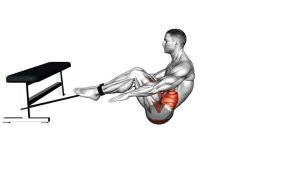
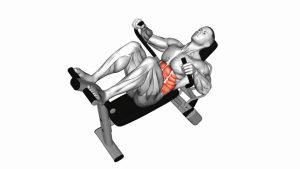
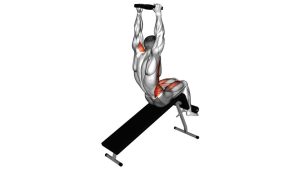
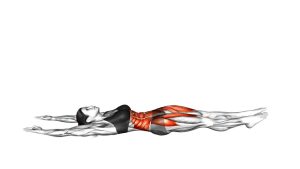
Lever Seated Leg Raise Crunch (Plate-Loaded)
The Lever Seated Leg Raise Crunch is useful for lifters who want a more controlled way to train weighted abdominal flexion. Because the machine supports the back and guides the path of motion, it can help you focus on the contraction instead of balance. However, the support does not mean the exercise should be rushed. For better results, every rep should start with a controlled brace, continue with a smooth pelvic tuck, and finish with a strong abdominal squeeze.
In addition, this exercise can be easier to load progressively than many bodyweight ab drills. You can add small plates over time, which makes it useful for hypertrophy and strength-focused core training. Nevertheless, the weight should never become so heavy that your hips swing or your lower back loses control. Therefore, use the machine as a tool for precise tension rather than a way to chase heavy numbers.
Quick Overview
| Body Part | Core |
|---|---|
| Primary Muscle | Rectus abdominis |
| Secondary Muscle | Hip flexors, obliques, transverse abdominis, deep core stabilizers |
| Equipment | Plate-loaded seated leg raise crunch machine / lever ab crunch machine |
| Difficulty | Intermediate |
Sets & Reps (By Goal)
- Muscle growth: Perform 3–4 sets of 10–15 reps. Also, pause briefly at the top to increase abdominal tension.
- Core strength: Perform 4–5 sets of 6–10 reps. However, only use heavier loading if your reps stay strict.
- Abdominal endurance: Perform 2–4 sets of 15–25 reps. In this case, use lighter weight and a steady rhythm.
- Technique practice: Perform 2–3 sets of 8–12 reps. First, learn the pelvic tuck before adding more plates.
- Workout finisher: Perform 2 sets of 12–20 reps. Finally, stop each set before your lower back takes over.
Progression rule: Increase reps before increasing the plate load. Then, once every rep feels controlled, add a small amount of weight. However, if the movement becomes fast, jerky, or hip-flexor dominant, return to a lighter load.
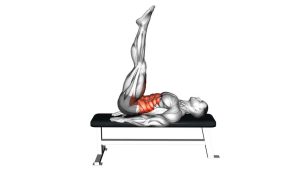
Setup / Starting Position
- Load the machine carefully: First, add a light plate or choose a resistance that allows complete control. This helps you learn the movement without relying on momentum.
- Sit deep into the seat: Next, place your hips firmly against the pad. Your back should feel supported, but your abs should still stay active.
- Position your legs evenly: Then, place your feet or lower legs against the lever pad. Make sure both sides are balanced before you start.
- Grip the handles: After that, hold the handles for stability. However, avoid pulling with your arms because the abs should create the crunch.
- Brace your midsection: Before the first rep, tighten your core slightly. In addition, keep your ribs controlled so your lower back does not overarch.
- Set your head position: Finally, keep your neck neutral and your eyes forward or slightly downward. This helps prevent unnecessary neck tension.
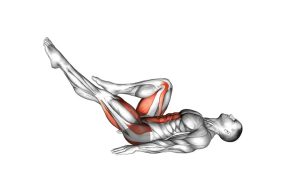
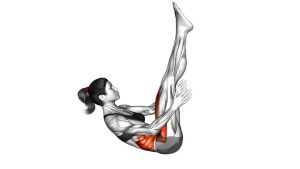
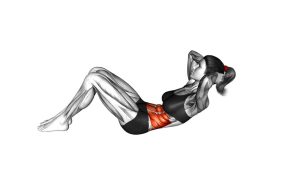
Execution (Step-by-Step)
- Begin from a stable bottom position: Start with your legs lowered and your torso supported. However, do not fully relax because the abs should stay lightly engaged.
- Brace before moving: Then, tighten your midsection and prepare to bring your ribs and hips closer together. This keeps the movement focused on the abs.
- Tuck the pelvis first: Next, gently roll the pelvis under as the lever begins to rise. As a result, the lower abs become more involved.
- Raise the lever smoothly: After the tuck begins, lift your knees upward through the machine path. Meanwhile, keep the movement controlled and avoid kicking the pad.
- Crunch the ribcage down: At the same time, flex your torso forward and bring the ribcage toward the pelvis. This creates the main abdominal contraction.
- Squeeze at the top: Once you reach the peak, pause for a short moment. Then, exhale fully and tighten the abs without pulling with the arms.
- Lower with control: After the squeeze, return slowly to the starting position. Instead of letting the plate pull you down, resist the weight through the full lowering phase.
- Reset with tension: Finally, stop before the weight fully unloads. Then begin the next rep from a braced and stable position.
Pro Tips & Common Mistakes
Pro Tips
- Use a complete crunch: Do not only raise the legs. Instead, finish every rep by pulling the ribcage down toward the pelvis.
- Pause briefly at the top: Although the pause is short, it improves control and reduces swinging.
- Control the lowering phase: Because the eccentric portion builds strength, lower the lever slowly instead of letting it drop.
- Keep the pelvis active: When you tuck the pelvis, the abs work harder. Therefore, avoid staying arched through the lower back.
- Use your breath: Exhale as you crunch. Then inhale slowly as you return to the starting position.
- Train with clean resistance: Add plates only when your tempo, range, and abdominal squeeze stay consistent.
Common Mistakes
- Using too much weight: Heavy loading often turns the exercise into a fast hip-flexor swing. Therefore, choose a weight you can control.
- Skipping the torso crunch: If the upper body does not flex, the movement becomes mostly a leg raise. Instead, crunch the ribs down as the knees rise.
- Letting the weight slam: A fast drop reduces tension and may irritate the lower back. Therefore, control the machine on every rep.
- Pulling with the arms: The handles are for stability. However, they should not create the movement.
- Overusing the neck: Forward head movement can create strain. Instead, keep the neck neutral and let the trunk flex.
- Relaxing at the bottom: When you fully unload the weight, tension drops. As a result, the next rep often becomes jerky.
FAQ
What muscles does the Lever Seated Leg Raise Crunch work?
The main muscle worked is the rectus abdominis. In addition, the hip flexors assist during the leg raise portion, while the obliques and deep core stabilizers help control the torso.
Is the Lever Seated Leg Raise Crunch good for lower abs?
Yes, it can strongly challenge the lower abdominal region because the pelvis tucks as the knees rise. However, the abs work as one long muscle. Therefore, focus on pelvic control rather than only lifting your legs.
Should I use heavy plates on this exercise?
You can use heavier plates once your form is stable. However, heavy loading should never cause swinging, lower-back discomfort, or rushed reps. For most lifters, moderate weight with a strong squeeze works best.
Why do I feel this more in my hip flexors?
This usually happens when the legs lift before the abs engage. To fix it, reduce the weight, tuck the pelvis first, and crunch the ribs downward. As a result, the abs should become more active.
How is this different from a regular machine crunch?
A regular machine crunch mainly uses torso flexion. In contrast, the Lever Seated Leg Raise Crunch combines torso flexion with a leg raise and pelvic tuck. Therefore, it creates a more complete folding motion through the core.
Can beginners do this exercise?
Beginners can use it if they start light and move slowly. However, they should first learn how to brace, tuck the pelvis, and crunch without swinging. Once control improves, they can gradually add resistance.
How often should I train the Lever Seated Leg Raise Crunch?
Most lifters can train this exercise 1–3 times per week. However, recovery still matters because weighted ab training can create soreness. Therefore, avoid heavy loading every day.
Recommended Equipment
- Olympic Weight Plates — useful for loading plate-loaded ab crunch machines and other lever strength equipment.
- Adjustable Ab Bench — helpful for decline crunches, weighted sit-ups, and machine-free abdominal training.
- Ab Mat — supports floor crunch variations and helps practice controlled spinal flexion.
- Cable Ankle Straps — useful for cable leg raises, resisted knee raises, and hip-flexion core drills.
- Thick Exercise Mat — provides comfort for warm-up drills, pelvic tilts, dead bugs, and floor-based ab work.
Tip: Equipment should improve control, comfort, and progression. However, it should not replace proper technique. Therefore, choose tools that help you feel the abs and maintain clean movement.