V-Up Exercise: Proper Form, Benefits, Sets, Tips & FAQ
Learn the V-Up exercise for stronger abs, core control, and hip flexor strength. Includes proper form, sets, mistakes, FAQs, and gear tips.
V-Up
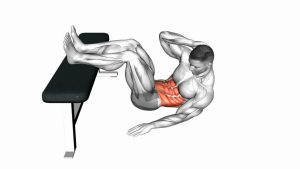
The V-Up is more demanding than a basic crunch because it combines trunk flexion, leg lifting, balance, and controlled lowering in one movement. It is commonly used in bodyweight workouts, home ab routines, athletic conditioning, and core-strength circuits. Although it looks simple, the exercise becomes effective only when the movement stays smooth and the lower back remains controlled.
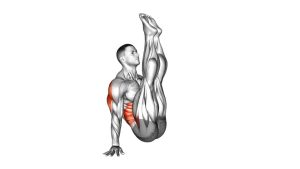
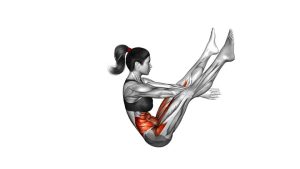
A good V-Up should not be a fast swing. Instead, the arms and legs should lift together while the abs pull the rib cage and pelvis toward each other. At the top, the body briefly forms a sharp “V” position. Then the body lowers with control until the arms and legs return close to the floor.
Quick Overview
| Body Part | Abs |
|---|---|
| Primary Muscle | Rectus abdominis |
| Secondary Muscle | Hip flexors, obliques, transverse abdominis, quadriceps, and lower-back stabilizers |
| Equipment | No equipment required; optional exercise mat |
| Difficulty | Intermediate |
Sets & Reps (By Goal)
- Core strength: 3–4 sets of 8–12 controlled reps with 60–90 seconds of rest.
- Muscle endurance: 2–4 sets of 12–20 reps with 45–75 seconds of rest.
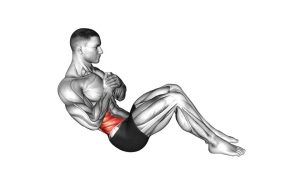
- Beginner progression: 2–3 sets of 6–10 bent-knee V-Ups or tuck-ups.
- Advanced core training: 3–5 sets of 10–15 slow reps with a 1–2 second pause at the top.
- Core circuit finisher: 30–45 seconds of clean reps, focusing on control instead of speed.
Progression rule: Master controlled reps before adding speed, pauses, ankle weights, or higher volume. If your lower back arches hard during the lowering phase, reduce the range of motion or switch to a bent-knee version.
Setup / Starting Position
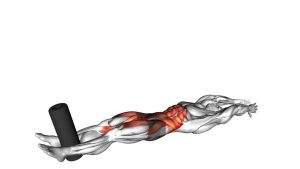
- Lie on your back: Start flat on an exercise mat with your legs extended and your arms reaching overhead.
- Lengthen your body: Keep your arms long, legs straight, and toes pointed or softly flexed.
- Brace your core: Gently tighten your abs before moving. Think about pulling your ribs down toward your pelvis.
- Keep the lower back controlled: Avoid starting with a big arch in the lower back. Use a smaller range if needed.
- Relax your neck: Keep your head in line with your spine. Do not yank the chin forward aggressively.
- Prepare to move together: Your arms, torso, and legs should lift at the same time, not in separate pieces.
A strong setup makes the exercise safer and cleaner. Before every rep, create abdominal tension first, then lift.
Execution (Step-by-Step)
- Start from the floor: Lie long with your arms overhead and legs extended. Keep your core lightly braced.
- Lift arms and legs together: Raise your upper body and legs at the same time as your abs contract.
- Reach toward your feet: Bring your hands toward your toes while your legs rise to meet your torso.
- Create the “V” shape: At the top, balance briefly on your hips or upper glutes. Keep the spine controlled and the legs active.
- Pause briefly: Hold the top for a short moment without collapsing your posture or swinging backward.
- Lower with control: Slowly return your upper body, arms, and legs toward the floor at the same time.
- Stop before losing tension: Touch down lightly or hover just above the floor if you can keep your lower back controlled.
- Repeat smoothly: Continue each rep with steady breathing and no bouncing.
Pro Tips & Common Mistakes
Pro Tips
- Move both halves together: Your arms and legs should rise at the same time for better coordination and core tension.
- Exhale as you lift: Breathing out during the upward phase helps the abs contract more effectively.
- Control the lowering phase: The way down builds strength and protects the lower back.
- Keep your legs active: Straight knees and engaged quads make the movement cleaner.
- Use a bent-knee version when needed: Bent-knee V-Ups reduce leverage and make the exercise easier to control.
- Pause at the top: A short pause removes momentum and makes the abs work harder.
Common Mistakes
- Swinging the legs: Momentum reduces abdominal work and can irritate the lower back.
- Arching the lower back: A large arch during the lowering phase usually means the variation is too hard.
- Pulling the neck forward: The neck should follow the torso naturally without aggressive strain.
- Bending the elbows too much: Keep the arms long so the movement stays consistent and controlled.
- Rushing reps: Fast reps often turn the exercise into a swing instead of a core-strength drill.
- Dropping hard to the floor: Control the descent and avoid slamming the heels or shoulders down.
FAQ
What muscles do V-Ups work?
V-Ups mainly work the rectus abdominis, which is the front abdominal muscle. They also train the hip flexors, obliques, transverse abdominis, quadriceps, and stabilizing muscles around the trunk.
Are V-Ups good for lower abs?
Yes. V-Ups challenge the lower portion of the abdominal wall because the legs lift and lower against gravity. However, the entire rectus abdominis works together during the movement.
Why does my lower back hurt during V-Ups?
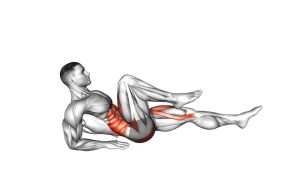
Lower-back discomfort often happens when the abs cannot control the legs during the lowering phase. Try bent-knee V-Ups, tuck-ups, or dead bugs until you can keep your pelvis and lower back stable.
Are V-Ups beginner-friendly?
The full straight-leg V-Up is usually intermediate. Beginners should start with tuck-ups, bent-knee V-Ups, reverse crunches, or dead bugs before progressing to the full movement.
Should I touch my toes during every rep?
Touching the toes is not required. The goal is to lift with control and create a strong V shape. If reaching the toes causes rounding, swinging, or strain, reach toward the shins instead.
How can I make V-Ups harder?
You can slow the tempo, pause at the top, hover at the bottom, hold a light medicine ball, or use ankle weights. Only progress when your form stays clean and your lower back remains controlled.
Recommended Equipment
- Thick Exercise Mat — adds comfort for the spine and hips during floor-based core training.
- Adjustable Ankle Weights — increases difficulty once bodyweight V-Ups are controlled and pain-free.
- Medicine Ball — useful for advanced V-Up variations and weighted core drills.
- Core Sliders — helpful for related ab exercises such as body saws, pikes, and plank variations.
- Resistance Bands Set — useful for warm-ups, hip flexor activation, and complete core training programs.
Equipment is optional for the V-Up. Start with bodyweight first, then add tools only when your control, breathing, and lower-back position are consistent.