Hanging Leg Hip Raise: Form, Benefits, Sets, Tips & FAQ
Learn the Hanging Leg Hip Raise for lower abs, hip flexors, and core control. Includes setup, steps, sets, mistakes, FAQs, and equipment.
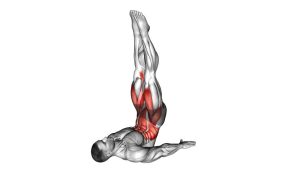
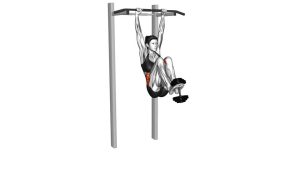
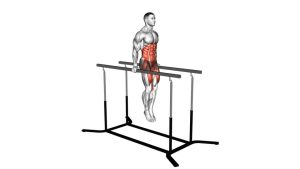
Hanging Leg Hip Raise
This exercise works best when the movement is strict and deliberate. First, the body hangs tall from a secure bar. Then, the legs rise under control while the hips begin to tuck. At the top, the pelvis curls upward slightly, which turns a basic leg raise into a true hip raise. Finally, the legs lower slowly without dropping or swinging forward. Although the movement looks simple, it requires strong abdominal control, stable shoulders, and enough grip strength to stay connected to the bar.
The most important detail is the difference between lifting the legs and curling the hips. A normal hanging leg raise mainly uses hip flexion. However, the hanging leg hip raise adds spinal flexion and pelvic control, so the lower abs work harder. Therefore, quality matters more than height. A clean rep with a small hip tuck is more effective than a high, fast, swinging rep.
Quick Overview
| Body Part | Core |
|---|---|
| Primary Muscle | Rectus abdominis, especially the lower abdominal region |
| Secondary Muscle | Hip flexors, obliques, deep core stabilizers, lats, forearms, and grip muscles |
| Equipment | Pull-up bar, captain’s chair, hanging station, or sturdy overhead bar |
| Difficulty | Intermediate to advanced |
Sets & Reps (By Goal)
- Core strength: 3–5 sets × 5–10 controlled reps with 60–120 seconds rest.
- Lower-ab hypertrophy: 3–4 sets × 8–12 reps with a slow lowering phase.
- Strict bodyweight control: 4–6 sets × 3–6 perfect reps with a brief top pause.
- Core endurance: 2–4 sets × 10–15 reps, only if you can prevent swinging.
- Skill progression: 3 sets × 4–8 reps after hanging knee raises become easy.
Progression rule: Add reps only when every repetition includes a controlled leg lift, visible hip tuck, and slow descent. If the body swings, reduce the reps or switch to hanging knee hip raises.
Setup / Starting Position
- Choose a secure bar: Use a pull-up bar, captain’s chair, or hanging station that can safely support your full bodyweight.
- Grip the bar firmly: Hold the bar around shoulder-width apart. Use an overhand grip and wrap your thumbs around the bar for security.
- Set your shoulders: Pull the shoulders slightly down and away from the ears. This active hang protects the shoulders and keeps the torso stable.
- Brace your core: Gently tighten the abs before moving. Keep the ribs from flaring and avoid arching the lower back excessively.
- Position the legs: Keep the legs together. They may stay straight for a harder version or slightly bent for better control.
- Control the body: Let the body become still before the first rep. Do not start while swinging forward or backward.
Setup tip: If your grip limits the exercise before your abs fatigue, use a captain’s chair or ab straps. However, keep the same strict hip-tuck mechanics.
Execution (Step-by-Step)
- Begin from a still hang: Start with your arms extended, shoulders active, legs together, and torso quiet.
- Brace before lifting: Exhale slightly and tighten the core so the lower back does not swing into an excessive arch.
- Raise the legs: Lift the legs forward with control. Keep them straight or slightly bent depending on your strength level.
- Reach hip height: Continue raising until the legs approach parallel with the floor or your highest clean range.
- Curl the hips upward: At the top, tuck the pelvis by pulling the hips slightly toward the ribs. This is the key hip raise portion.
- Pause briefly: Hold the top position for a short moment while keeping the shoulders packed and the body steady.
- Lower slowly: Reverse the movement with control. Let the pelvis untuck gradually as the legs descend.
- Return to the start: Finish in a still hanging position before beginning the next repetition.
Pro Tips & Common Mistakes
Pro Tips
- Think “ribs to pelvis”: The top of the rep should feel like your abs are compressing your rib cage and hips closer together.
- Use a slow eccentric: Lowering slowly keeps tension on the abs and prevents the next rep from becoming a swing.
- Keep the shoulders active: A passive hang makes the body unstable. Instead, lightly engage the lats and keep the shoulders away from the ears.
- Exhale near the top: A controlled exhale helps the pelvis tuck and improves abdominal contraction.
- Start with bent knees if needed: Slight knee bend is acceptable when it helps you control the hip raise portion.
- Use fewer clean reps: Five strict reps are better than fifteen momentum-based reps.
Common Mistakes
- Swinging the body: Swinging reduces abdominal tension and turns the movement into momentum work.
- Only lifting the legs: Without the hip curl, the exercise becomes more hip-flexor dominant and less lower-ab focused.
- Dropping the legs: A fast descent increases swing and reduces control.
- Overarching the lower back: Excessive arching at the bottom can irritate the lower back and weaken the core brace.
- Shrugging the shoulders: Shoulder elevation creates tension and makes the hang less stable.
- Training past grip failure: Once your grip starts slipping, stop the set safely instead of forcing extra reps.
FAQ
What is the Hanging Leg Hip Raise?
The Hanging Leg Hip Raise is a hanging core exercise where you lift the legs and then curl the hips upward near the top. This extra hip tuck increases abdominal involvement and makes the movement more demanding than a basic hanging leg raise.
Is the Hanging Leg Hip Raise good for lower abs?
Yes. It strongly challenges the lower portion of the rectus abdominis because the pelvis moves toward the ribs. However, the entire abdominal wall works during the exercise, especially when the descent is slow and controlled.
What is the difference between a hanging leg raise and a hanging leg hip raise?
A hanging leg raise focuses on lifting the legs. A hanging leg hip raise adds a pelvic curl at the top. As a result, the hip raise version creates more spinal flexion and stronger abdominal compression.
Should my legs stay straight?
Straight legs make the exercise harder because they create a longer lever. If straight legs cause swinging or lower-back strain, bend the knees slightly and prioritize control.
Why do I feel this mostly in my hip flexors?
You may be lifting the legs without curling the hips. To fix this, slow down near the top, exhale, and tuck the pelvis upward. Also, avoid kicking the feet or rushing the first half of the rep.
How can beginners progress to this exercise?
Start with dead hangs, hanging knee raises, captain’s chair knee raises, and hanging knee hip raises. Once you can control those without swinging, progress to the full hanging leg hip raise.
Can I do Hanging Leg Hip Raises every day?
Most people should not perform hard sets every day. Because the exercise is demanding on the abs, grip, shoulders, and hip flexors, training it two to four times per week is usually more effective.
Recommended Equipment
- Doorway Pull-Up Bar — useful for home-based hanging core exercises and strict hanging leg raise practice.
- Power Tower / Captain’s Chair Station — provides a stable station for hanging raises, knee raises, dips, and pull-up variations.
- Hanging Ab Straps — helpful when grip fatigue limits abdominal training before the core is fully challenged.
- Grip Chalk — improves hand security during hanging exercises, especially during longer core sets.
- Exercise Mat — useful for warm-up drills, hollow holds, lying leg raises, and core progressions before hanging work.
Equipment tip: Choose a bar or station that feels stable before training. If the setup shakes or your grip feels unsafe, switch to a more secure option.