Chest Lift with Rotation: Pilates Core Exercise for Abs & Obliques
Learn the Chest Lift with Rotation Pilates exercise to strengthen abs, obliques, and core control with safe form, sets, tips, FAQs, and gear.
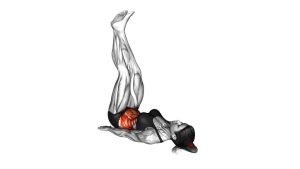
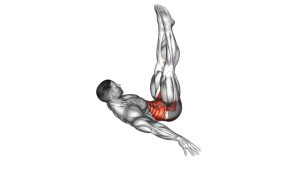
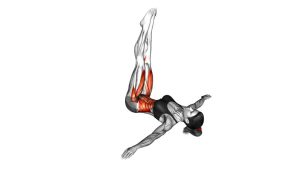
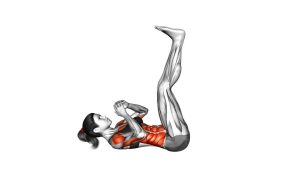
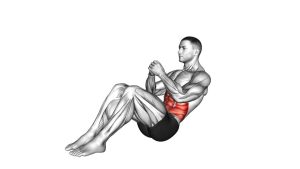
Chest Lift with Rotation (Pilates)
This Pilates movement works best when every repetition is slow, clean, and intentional. You should feel your abdominal wall draw inward and your waist muscles assist the rotation. Your hands support the head, but they should never pull the neck. Keep the elbows wide, the pelvis steady, and the lower back connected to the mat.
Quick Overview
| Body Part | Core |
|---|---|
| Primary Muscle | Rectus abdominis and obliques |
| Secondary Muscle | Deep core stabilizers, transverse abdominis, hip stabilizers, and cervical stabilizers |
| Equipment | Exercise mat only |
| Difficulty | Beginner to intermediate, depending on control and hold time |
Sets & Reps (By Goal)
- Beginner core control: 2 sets × 6–8 reps per side with slow breathing.
- Pilates technique practice: 2–3 sets × 8–10 reps per side with a controlled pause at the top.
- Oblique endurance: 3 sets × 10–14 reps per side using a smooth, even tempo.
- Warm-up activation: 1–2 sets × 6–10 reps per side before a core or Pilates session.
- Form-focused progression: 3 sets × 8 reps per side with a 2-second hold during rotation.
Progression rule: Add control before adding volume. Increase the hold time, slow the lowering phase, or add extra repetitions only when your pelvis stays stable and your neck remains relaxed.
Setup / Starting Position
- Lie on your back: Place your body on a comfortable mat with knees bent and feet flat on the floor.
- Set your feet: Keep your feet about hip-width apart. Press them gently into the mat without gripping the floor.
- Stack the pelvis: Keep the pelvis steady and neutral, or use a light imprint if that helps you control your lower back.
- Place the hands: Bring your hands behind the head. Let the fingers support the skull without pulling.
- Open the elbows: Keep the elbows wide enough that the chest can stay open, but not so wide that the shoulders tense.
- Prepare your breath: Inhale to prepare. As you exhale, gently draw the ribs down and connect the front of the core.
- Set the neck: Keep the chin slightly nodded, as if holding a small space between the chin and chest.
Good setup makes the rotation cleaner. If your pelvis rocks or your feet lift, make the movement smaller and focus on ribcage control.
Execution (Step-by-Step)
- Inhale to prepare: Stay relaxed through the shoulders. Keep the feet grounded and the pelvis quiet.
- Exhale and lift: Curl the head, neck, and shoulder blades slightly off the mat. Think of the breastbone sliding toward the ribs.
- Rotate from the ribs: Turn the upper body toward one side. Move one shoulder toward the opposite hip without pulling on the head.
- Hold the shape briefly: Pause at the top while keeping the elbows open, the neck long, and the abdominal wall engaged.
- Return to center: Bring the ribcage back to the middle before lowering down.
- Lower with control: Roll the upper back, shoulders, neck, and head back to the mat without dropping.
- Repeat to the other side: Perform the same chest lift and rotation in the opposite direction with equal control.
Pro Tips & Common Mistakes
- Lift before you rotate: First create the chest lift, then turn the ribcage. This keeps the movement organized.
- Keep the pelvis quiet: Do not let one hip lift as you rotate. The waist should twist while the hips stay steady.
- Avoid neck pulling: Your hands are only there for support. The abs should lift the chest, not the arms.
- Do not collapse the elbows: Closing the elbows often turns the exercise into a neck pull instead of a core drill.
- Use a small range first: A smaller controlled rotation is better than a large twist with poor alignment.
- Exhale during effort: Breathing out helps the ribs move down and makes the abdominal contraction stronger.
- Lower slowly: Dropping to the mat removes the control benefit. Return one section of the spine at a time.
- Do not rush side to side: Pause at center before rotating again. This prevents momentum from taking over.
FAQ
What muscles does the Chest Lift with Rotation work?
It mainly works the rectus abdominis and obliques. The deep core muscles also help stabilize the pelvis and spine during the lift and rotation.
Is Chest Lift with Rotation the same as a bicycle crunch?
No. A bicycle crunch usually involves alternating legs and faster rotation. The Pilates Chest Lift with Rotation is slower, smaller, and more focused on ribcage control.
Should my lower back stay on the mat?
Yes, your lower back should stay controlled. Use either a neutral pelvis or a light imprint, depending on which position helps you avoid arching or gripping.
Why do I feel this in my neck?
Neck tension usually happens when the hands pull the head, the chin tucks too hard, or the abs are not initiating the lift. Make the movement smaller and support the head gently.
Can beginners do this exercise?
Yes. Beginners can start with a basic chest lift first. Once the neck and pelvis stay stable, they can add a small rotation.
How can I make it harder?
Slow the tempo, hold the rotated position for 2–3 seconds, or increase reps. Do not increase difficulty by pulling harder on the head or twisting aggressively.
Recommended Equipment
- Pilates Exercise Mat — provides cushioning for the spine, shoulders, and head during floor-based core work.
- Pilates Head Support Pillow — useful for people who need extra neck comfort during chest lift variations.
- Pilates Ring — helpful for adding gentle inner-thigh activation and improving pelvic control in related drills.
- Mini Pilates Ball — can support modified core exercises and help beginners learn abdominal control.
- Pilates Resistance Bands — useful for pairing this movement with posture, shoulder stability, and upper-back exercises.
Tip: Choose supportive equipment that improves control. If a tool increases neck tension or lower-back discomfort, remove it and return to the basic version.