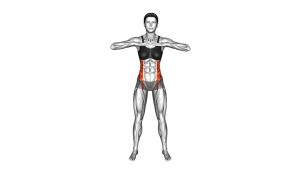
Seated Circle Leg Crunch: Core Form, Benefits, Sets, Tips & FAQ
Learn the Seated Circle Leg Crunch for abs, obliques, and hip flexor control. Get proper form, sets, mistakes, FAQs, and equipment tips.
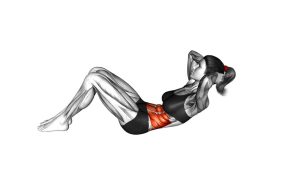
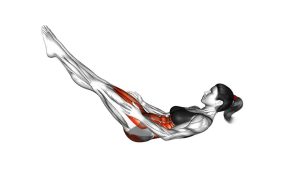
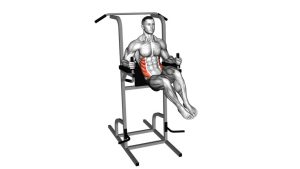
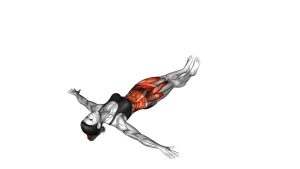
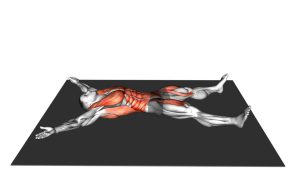
Seated Circle Leg Crunch
This exercise works best when the movement stays slow, smooth, and deliberate. Because the legs travel in a circular path, your abs must stabilize the pelvis while your obliques help guide the arc from side to side. In addition, your hands provide balance support, but they should not drive the motion. Keep your chest lifted, maintain a slight backward lean, and use your core to control every part of the circle.
Quick Overview
| Body Part | Core |
|---|---|
| Primary Muscle | Rectus abdominis, especially the lower-abdominal region |
| Secondary Muscle | Obliques, hip flexors, transverse abdominis, and deep core stabilizers |
| Equipment | No equipment required; optional exercise mat for comfort |
| Difficulty | Intermediate because it requires balance, hip control, and continuous abdominal tension |
Sets & Reps (By Goal)
- Core control: 2–3 sets × 6–10 slow circles per side, resting 45–60 seconds between sets.
- Muscle endurance: 3–4 sets × 10–16 total circles, using a steady rhythm and controlled breathing.
- Beginner practice: 2 sets × 5–8 smaller circles, keeping the knees slightly bent throughout.
- Advanced finisher: 3 sets × 20–30 seconds, focusing on clean circular motion instead of speed.
Progression rule: First, increase control and range of motion. Then, add more reps or longer time. However, do not progress by swinging faster because momentum reduces core tension.
Setup / Starting Position
- Sit on the floor: Place your hips on the mat and position your hands behind your body for balance.
- Lean back slightly: Keep your chest open while creating enough backward angle to load the abs.
- Lift the legs: Extend your legs forward and raise them slightly off the floor.
- Brace your core: Tighten your midsection before the legs begin moving.
- Keep the motion controlled: Avoid collapsing backward or pushing hard through the arms.
Tip: If straight legs feel too difficult, bend the knees slightly and make a smaller circle. This keeps the exercise safer and easier to control.
Execution (Step-by-Step)
- Start seated and supported: Keep your hands behind you, lean back slightly, and lift both legs off the floor.
- Begin the circle: Move your legs toward one side while keeping your torso as steady as possible.
- Draw the knees inward: As the legs continue around the circle, bend the knees and bring them toward your chest.
- Crunch with control: Briefly compress the abs as the knees come closer to the torso.
- Continue across the opposite side: Guide the legs around the other side of the circle without rushing.
- Extend the legs forward: Return to the starting position with the legs lifted and controlled.
- Repeat smoothly: Perform the next circle with the same steady tempo and abdominal tension.
Pro Tips & Common Mistakes
- Keep the circle smooth: Avoid jerky direction changes because the goal is continuous core control.
- Do not overuse the arms: Your hands support balance, but your abs should control the leg path.
- Control the lower back: If your lower back arches or strains, reduce the circle size and bend the knees.
- Avoid rushing: Fast reps usually shift work into the hip flexors and reduce abdominal tension.
- Stay lifted through the chest: A collapsed upper body makes the movement harder to control.
- Breathe steadily: Exhale during the knee tuck and inhale as the legs extend back out.
- Use a smaller range when needed: Quality matters more than making the biggest circle possible.
FAQ
What muscles does the Seated Circle Leg Crunch work?
The exercise mainly targets the rectus abdominis, especially during the crunch phase. In addition, the obliques help control the circular path, while the hip flexors assist with lifting and moving the legs.
Is the Seated Circle Leg Crunch good for lower abs?
Yes. Although the abs work as one muscle group, the lifted-leg position creates strong demand around the lower abdominal region. For better results, keep the legs controlled and avoid letting the lower back take over.
Should beginners do this exercise?
Beginners can practice a modified version with bent knees and a smaller circular path. However, if balance or lower-back control is difficult, start with basic seated knee tucks first.
Why do I feel this more in my hip flexors?
Some hip flexor work is normal because the legs stay lifted. However, if the hip flexors dominate, slow down, bend your knees, brace harder through the abs, and avoid extending the legs too far away from the body.
How can I make the Seated Circle Leg Crunch harder?
You can make it harder by increasing the circle size, straightening the legs more, slowing the tempo, or performing longer sets. Nevertheless, only progress when your lower back remains stable.
Recommended Equipment (Optional)
- Exercise Mat — adds cushioning for seated floor core exercises and improves comfort during longer sets.
- Non-Slip Yoga Mat — helps prevent sliding while you lean back and move the legs in a circular pattern.
- Core Sliders — useful for related core progressions and controlled floor-based ab drills.
- Adjustable Ankle Weights — optional advanced resistance once bodyweight reps are controlled and pain-free.
- Workout Interval Timer — helps track timed core sets, rest periods, and controlled training intervals.
Tip: Start with no added load. After your circles stay smooth and your lower back remains comfortable, you can use light ankle weights carefully.