Lying Leg Cross: Core Form, Benefits, Sets, Tips & FAQ
Learn the Lying Leg Cross for stronger abs, lower-core control, and oblique stability with step-by-step form, sets, tips, FAQs, and gear.
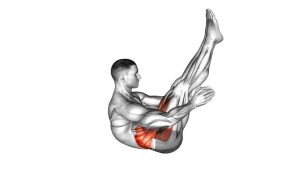
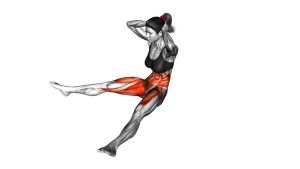
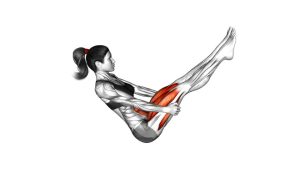
Lying Leg Cross
This exercise works best when the legs move smoothly and the lower back stays controlled against the floor. Because the movement includes alternating hip flexion and a slight cross-body action, it challenges the lower abs and obliques without requiring equipment. Additionally, the arms stay on the floor for balance, which helps you focus on core control rather than momentum.
Quick Overview
| Body Part | Core |
|---|---|
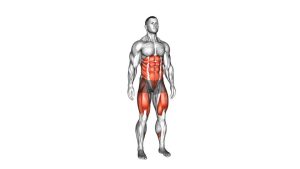
| Primary Muscle | Rectus abdominis, especially lower-ab control |
| Secondary Muscle | Obliques, hip flexors, deep core stabilizers |
| Equipment | No equipment required; optional exercise mat |
| Difficulty | Beginner to intermediate, depending on leg height and control |
Sets & Reps (By Goal)
- Core control: 2–3 sets × 8–12 reps per side with slow, clean movement
- Lower-ab endurance: 3–4 sets × 12–20 total reps with steady breathing
- Beginner practice: 2 sets × 6–8 reps per side with a smaller range of motion
- Core finisher: 2–3 rounds × 30–45 seconds, only if form stays controlled
Progression rule: First improve control and breathing. Then, lower the extended leg closer to the floor or add more reps.
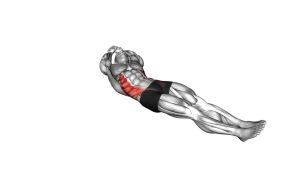
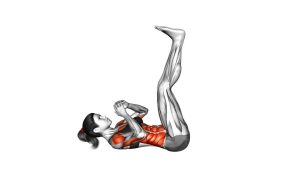
Setup / Starting Position
- Lie on your back: Place your body flat on the floor with your head relaxed and your spine long.
- Set your arms: Extend your arms out to the sides for balance, similar to the visible video position.
- Brace your core: Lightly tighten your abs and keep the lower back controlled against the floor.
- Position your legs: Start with both legs extended and slightly lifted if you can control your pelvis.
- Keep your neck neutral: Avoid lifting the head or pushing the chin forward.
If your lower back arches, raise the legs slightly higher or bend the knees more. This keeps the exercise safer and more effective.
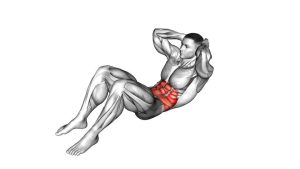
Execution (Step-by-Step)
- Start with control: Keep your arms planted, your abs braced, and both legs extended from the starting position.
- Bend one knee: Bring one leg upward by bending the knee toward your torso.
- Cross slightly inward: Move the bent leg slightly across the body without twisting the whole torso.
- Hold your trunk steady: Keep the opposite leg extended and avoid letting the hips roll aggressively.
- Return the leg: Extend the working leg back to the starting position with slow control.
- Switch sides: Repeat the same movement with the opposite leg.
- Continue alternating: Move side to side while keeping the abs active and the lower back stable.
Pro Tips & Common Mistakes
- Move slowly: A slower tempo increases core tension and reduces hip-flexor dominance.
- Do not yank the knee across: The cross-body motion should be small and controlled.
- Keep the arms relaxed: Use the arms for balance, not for pushing hard into the floor.
- Avoid lower-back arching: If the back lifts, bring the legs higher or bend the knees more.
- Do not rush the switch: Return to a stable position before changing sides.
- Breathe with control: Exhale as the knee comes in, then inhale as the leg extends back out.
- Keep the neck quiet: The head should stay relaxed on the floor throughout the exercise.
FAQ
What muscles does the Lying Leg Cross work?
The Lying Leg Cross mainly trains the abs, especially the lower-core region. Additionally, the slight cross-body leg path involves the obliques and hip flexors.
Is the Lying Leg Cross good for beginners?
Yes, it can be beginner-friendly when the knees stay slightly bent and the legs stay higher. However, beginners should avoid lowering the legs too close to the floor too soon.
Should my lower back stay on the floor?
Yes. Your lower back should stay controlled and stable. If it arches, shorten the range, slow down, or bend the knees more.
How is this different from a regular lying leg raise?
A regular lying leg raise usually moves both legs together. In contrast, the Lying Leg Cross uses an alternating pattern with a slight inward cross, which adds more oblique control.
Can I do this exercise every day?
You can practice it often if the volume is light and there is no back or hip discomfort. For harder sets, use it 2–4 times per week with recovery between sessions.
Recommended Equipment (Optional)
- Exercise Mat — adds comfort for your spine, hips, and shoulders during floor core training
- Thick Yoga Mat — useful if you need extra cushioning for lying ab exercises
- Mini Resistance Bands — optional tool for progressing hip and core control drills
- Adjustable Ankle Weights — advanced option only after you can control the movement without back arching
- Core Sliders — helpful for related floor-based core progressions and controlled leg movements
Tip: Equipment is optional. For this exercise, clean control is more important than added resistance.