Sitting Flutter Kick on a Padded Stool: Core Form, Sets, Tips & FAQ
Learn the Sitting Flutter Kick on a padded stool to train core control, hip flexors, and lower abs with step-by-step form, tips, sets, FAQ, and gear.
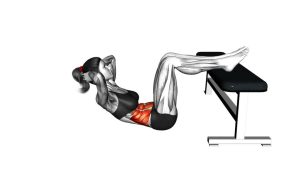
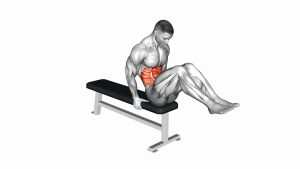
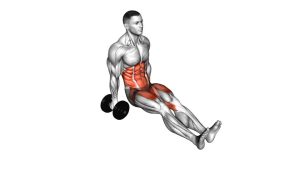
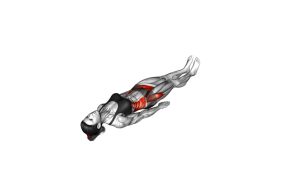
Sitting Flutter Kick on a Padded Stool
This exercise is useful when you want a simple bodyweight core drill that does not require lying on the floor. However, it still demands strong posture control. Therefore, your goal is to keep the torso steady while the legs alternate up and down in a flutter rhythm. Your hands should support balance, but they should not push your body into uncontrolled movement.
Quick Overview
| Body Part | Core |
|---|---|
| Primary Muscle | Lower abs / Rectus abdominis |
| Secondary Muscle | Hip flexors, deep core stabilizers, quadriceps |
| Equipment | Padded stool, padded bench, or stable seat |
| Difficulty | Beginner to Intermediate |
Sets & Reps (By Goal)
- Beginner control: 2–3 sets × 10–20 seconds, resting 45–60 seconds between sets.
- Core endurance: 3–4 sets × 20–40 seconds, using a steady flutter rhythm.
- Lower-ab focus: 3 sets × 12–20 alternating kicks per side with slow, controlled reps.
- Finisher option: 2 rounds × 30 seconds after your main core workout.
Progression rule: First, increase control and time under tension. Then, slightly extend the legs farther forward only if your lower back stays stable.
Setup / Starting Position
- Sit near the front of the padded stool: Choose a stable stool or bench that does not slide or wobble.
- Place your hands beside your hips: Grip or press lightly into the seat for balance and support.
- Lean your torso slightly back: Keep your chest lifted instead of rounding heavily through the upper back.
- Extend both legs forward: Lift both feet off the floor while keeping a slight bend in the knees.
- Brace gently: Tighten your midsection enough to keep your body steady before the kicking starts.
Your starting position should feel balanced. If you cannot keep both feet lifted, shorten the lever by bending the knees more.
Execution (Step-by-Step)
- Begin from the seated hold: Keep your hands planted, torso slightly leaned back, and feet hovering.
- Lift one leg slightly higher: At the same time, let the opposite leg lower slightly without touching the floor.
- Switch sides: Raise the lower leg as the higher leg lowers, creating a flutter-kick pattern.
- Keep the range compact: Move through a moderate distance instead of making large, swinging kicks.
- Control the torso: Keep your upper body steady and avoid bouncing on the stool.
- Continue for time or reps: Maintain a smooth alternating rhythm until the set is complete.
- Finish with control: Bring the legs down slowly instead of suddenly dropping the feet.
Pro Tips & Common Mistakes
- Keep both feet off the floor: Continuous hovering keeps tension on the core throughout the set.
- Do not kick too high: Large kicks can reduce core tension and turn the exercise into a loose leg swing.
- Avoid collapsing backward: Stay slightly leaned back, but keep the chest controlled and lifted.
- Use your hands for stability: They should help you balance, not push your body into momentum.
- Keep the knees softly bent: A small bend makes the movement easier to control and reduces strain.
- Slow down when form breaks: Faster is not better if the stool rocks or your torso starts bouncing.
- Breathe steadily: Exhale through effort and avoid holding your breath during longer sets.
FAQ
What muscles does the Sitting Flutter Kick on a Padded Stool work?
It mainly trains the core, especially the lower-ab region, while also involving the hip flexors and quadriceps. Additionally, your deep stabilizers help keep your torso steady while your legs move.
Is this exercise beginner-friendly?
Yes, it can be beginner-friendly when performed with bent knees and a short range of motion. However, it becomes more challenging when you straighten the legs farther and keep the feet hovering longer.
Should my feet touch the floor between kicks?
No. In the visible movement pattern, the feet remain off the floor during the working phase. Therefore, try to keep both feet hovering to maintain steady core tension.
Why do I feel this mostly in my hip flexors?
Some hip flexor involvement is normal because the legs stay lifted. However, if the hip flexors dominate completely, bend your knees more, reduce the range, and focus on bracing your abs before each set.
Can I do this exercise on a chair?
You can use a sturdy chair if it is stable and does not roll. Nevertheless, a padded stool or bench usually gives better hand placement and a smoother seated position.
Recommended Equipment
- Padded Workout Stool — provides a stable seated base for flutter kicks and other core drills.
- Flat Weight Bench — useful for seated core exercises, step-ups, presses, and general home training.
- Non-Slip Exercise Mat — helps prevent the stool or bench from sliding on smooth flooring.
- Adjustable Ankle Weights — optional progression for advanced users once bodyweight form is controlled.
- Core Sliders — useful for pairing this exercise with other lower-ab and core stability drills.
Tip: Choose stable equipment first. For this exercise, balance and control matter more than added resistance.