Standing Behind Sky Reach: Form, Core Benefits, Sets, Tips & FAQ
Learn the Standing Behind Sky Reach for core control, oblique mobility, posture, and overhead reach mechanics with form cues, sets, tips, FAQs.
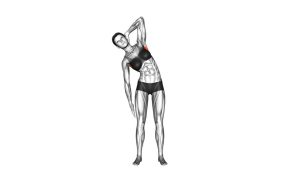
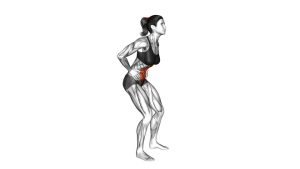
Standing Behind Sky Reach
This exercise is best performed with slow control and clean posture. Because the movement uses a standing position, it can work well as a warm-up, desk-break mobility drill, or low-impact core activation exercise. However, the reach should stay comfortable, and the torso should move only as far as you can control without twisting aggressively or losing balance.
Quick Overview
| Body Part | Core |
|---|---|
| Primary Muscle | Obliques |
| Secondary Muscle | Rectus abdominis, transverse abdominis, shoulders, upper back |
| Equipment | None |
| Difficulty | Beginner |
Sets & Reps (By Goal)
- Mobility warm-up: 2–3 sets × 8–12 reps per side with a slow, controlled reach.
- Core activation: 2–4 sets × 10–15 reps per side while keeping the ribs controlled.
- Posture reset: 1–2 sets × 6–10 reps per side during a short movement break.
- Cooldown stretch flow: 2 sets × 8–10 slow reps per side with relaxed breathing.
Progression rule: First improve reach quality and balance. Then, increase reps or slow the tempo before adding any extra challenge.
Setup / Starting Position
- Stand tall: Place your feet about hip-width to shoulder-width apart and distribute your weight evenly.
- Set your posture: Keep your chest open, shoulders relaxed, and spine long.
- Brace lightly: Engage your core enough to prevent excessive arching through the lower back.
- Keep the arms relaxed: Start with the arms near your sides before beginning the reach.
- Look forward: Maintain a calm head position before the arm moves upward.
Tip: Start with a smaller reach if your shoulders feel tight. A clean range is more useful than a forced overhead position.
Execution (Step-by-Step)
- Begin from neutral: Stand upright with your feet planted and your torso steady.
- Lift one arm: Reach the working arm upward in a smooth path without shrugging hard.
- Reach toward the sky: Extend the arm overhead and slightly behind or across the body only as far as comfortable.
- Control the torso: Allow a small natural side-body stretch, but avoid collapsing through the ribs or lower back.
- Pause briefly: Hold the top position for a moment while staying balanced.
- Return with control: Lower the arm back to the starting position without dropping quickly.
- Repeat evenly: Complete all reps on one side, or alternate sides if preferred.
Pro Tips & Common Mistakes
- Reach tall before reaching back: This keeps the movement cleaner and reduces shoulder strain.
- Keep the ribs controlled: Do not flare the ribs aggressively to create fake range.
- Avoid rushing: A slow reach improves body awareness and core control.
- Do not twist hard: The visible movement is mainly a reach with a slight torso stretch, not a fast rotational drill.
- Stay balanced: Keep both feet grounded throughout the full repetition.
- Relax the neck: Avoid lifting the shoulder toward the ear as the arm reaches overhead.
- Use a comfortable range: Stop before pinching, pulling, or joint discomfort appears.
FAQ
What muscles does the Standing Behind Sky Reach work?
It mainly targets the obliques and surrounding core muscles through controlled standing reach mechanics. Additionally, the shoulders and upper back assist as the arm moves overhead.
Is the Standing Behind Sky Reach good for beginners?
Yes. Since it uses bodyweight only and a standing position, it is beginner-friendly when performed slowly. However, beginners should keep the reach small until balance and shoulder comfort improve.
Should I feel this exercise in my lower back?
You may feel light trunk involvement, but you should not feel sharp lower-back pressure. If your lower back takes over, brace gently, reduce the overhead range, and keep the ribs from flaring.
Can I use this exercise as a warm-up?
Yes. It works well before core training, mobility sessions, shoulder workouts, and full-body bodyweight routines. Because it is low-impact, it can also be useful as a movement break during the day.
How slow should each repetition be?
Use a steady tempo. For example, reach up for about 2 seconds, pause briefly, then return for about 2 seconds. This helps keep the movement controlled instead of momentum-based.
Recommended Equipment (Optional)
- Exercise Mat — helpful for warm-ups, mobility flows, and floor-based core work paired with this drill
- Resistance Bands Set — useful for adding shoulder mobility and upper-back activation exercises
- Yoga Blocks — useful for mobility sessions and supported stretching variations
- Foam Roller — helpful for upper-back mobility before overhead reaching drills
- Mobility Stick — useful for practicing controlled overhead reach patterns and posture drills
Tip: Equipment is optional. The Standing Behind Sky Reach can be performed effectively with bodyweight only.