Resistance Band Lying Bent-Knee Raise: Form, Sets, Core Tips & FAQ
Learn the Resistance Band Lying Bent-Knee Raise for controlled core strength, hip flexor training, band tension, safe setup, reps, tips, and FAQs.
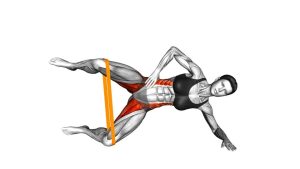
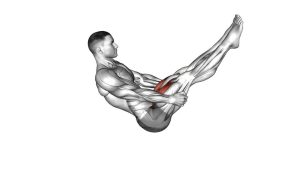
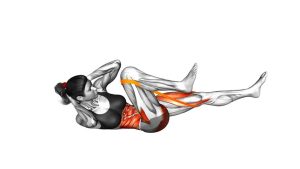
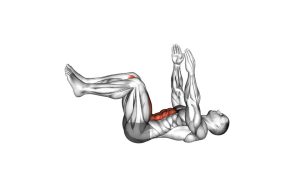
Resistance Band Lying Bent-Knee Raise
This exercise works best when the movement stays compact and deliberate. The knees travel toward the torso, then return slowly while the band tension changes under control. As a result, the core must resist arching, the hips must move smoothly, and the lower back should remain close to the floor.
Although the band makes the exercise more demanding, the movement should not become fast or jerky. Instead, use a range of motion that lets you keep your spine stable from the first rep to the last rep. Therefore, quality matters more than how far the knees travel.
Quick Overview
| Body Part | Core |
|---|---|
| Primary Muscle | Rectus abdominis and deep core stabilizers |
| Secondary Muscle | Hip flexors, lower abs emphasis, obliques for stabilization |
| Equipment | Resistance band and floor space; exercise mat optional |
| Difficulty | Beginner to Intermediate, depending on band tension |
Sets & Reps (By Goal)
- Core control: 2–3 sets × 8–12 reps with a slow return.
- Muscle endurance: 3–4 sets × 12–15 reps using light-to-moderate band tension.
- Strength focus: 3–5 sets × 6–10 reps with stronger band tension and strict form.
- Warm-up activation: 1–2 sets × 8–10 reps at an easy effort level.
Progression rule: First improve control and tempo. After that, increase band tension gradually instead of rushing the reps.
Setup / Starting Position
- Lie on your back: Position your body flat on the floor with enough space for your legs to move.
- Attach the band securely: Loop the resistance band around the feet or lower legs, depending on the band style and anchor setup.
- Bend the knees: Lift both feet from the floor while keeping the knees bent.
- Brace lightly: Keep the lower back close to the floor and place the arms beside the body for support.
- Set the tension: Start with mild band resistance so the movement feels smooth and controlled.
Tip: If the band pulls too aggressively, move closer to the anchor point or use a lighter band.
Execution (Step-by-Step)
- Begin with bent knees elevated: Keep both legs off the floor and maintain a controlled starting hold.
- Pull the knees toward the torso: Flex the hips and bring the knees inward while keeping the movement smooth.
- Maintain core tension: Keep the lower back close to the floor as the band stretches.
- Pause briefly: At the top, hold the compact position for a short moment without bouncing.
- Return slowly: Let the knees move away from the torso while resisting the band’s pull.
- Repeat with control: Begin the next rep only after you regain a stable position.
Pro Tips & Common Mistakes
- Move slowly: A slow return increases control and keeps the core engaged.
- Keep the knees bent: Do not turn the movement into a straight-leg raise unless that is the intended variation.
- Avoid lower-back arching: If the back lifts, shorten the range or reduce band tension.
- Do not swing: Momentum reduces the value of the exercise and makes the band harder to control.
- Use steady breathing: Exhale as the knees move in, then inhale lightly during the return.
- Control both directions: The return phase is just as important as the knee tuck.
- Check band security: Make sure the band is stable before every set.
FAQ
What muscles does the Resistance Band Lying Bent-Knee Raise work?
It mainly trains the core, especially the rectus abdominis and deep stabilizers. In addition, the hip flexors assist because the knees move toward the torso against band resistance.
Is this exercise good for lower abs?
Yes, it can emphasize the lower-ab region because the pelvis and legs move while the trunk stays stable. However, the key is keeping the lower back controlled instead of swinging the legs.
Should my lower back stay on the floor?
Ideally, the lower back should stay close to the floor throughout the rep. If it arches strongly, reduce the band tension, shorten the range, or slow the movement.
What band resistance should I use?
Start with a light band. Then, progress only when you can complete every rep without jerking, arching, or losing control during the return phase.
Can beginners do this exercise?
Beginners can perform it with a light resistance band and a short range of motion. However, bodyweight bent-knee raises may be better first if band tension causes poor control.
Recommended Equipment
- Resistance Bands Set — useful for choosing light, medium, or strong resistance levels.
- Loop Resistance Bands — practical for lower-body and core band variations.
- Thick Exercise Mat — adds comfort for the back and hips during floor exercises.
- Resistance Band Door Anchor — helps create a more secure band setup when used correctly.
- Ankle Straps for Resistance Bands — useful if you prefer a more stable lower-leg attachment point.
Tip: Choose equipment that allows smooth resistance. If the band slips or pulls unevenly, stop and reset before continuing.