Lying Twist Toe Touch Against Wall: Form, Oblique Benefits, Sets, Tips & FAQ
Learn the Lying Twist Toe Touch Against Wall to train abs and obliques with controlled rotation, better core stability, and safe wall-supported form.
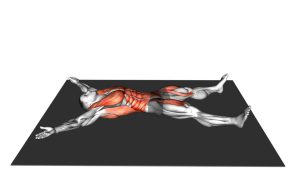
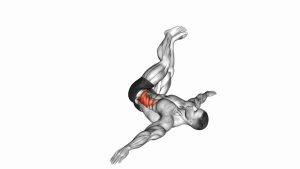
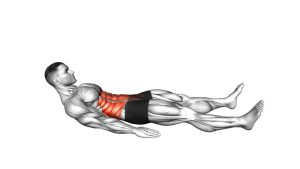
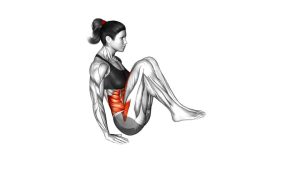
Lying Twist Toe Touch Against Wall
This exercise is useful for building oblique strength, improving core coordination, and learning how to rotate through the trunk while keeping the hips steady. Because the wall fixes the feet in place, it reduces lower-body momentum and makes the movement more focused on the abdominal muscles.
Quick Overview
| Body Part | Obliques |
|---|---|
| Primary Muscle | Obliques |
| Secondary Muscle | Rectus abdominis, transverse abdominis, hip flexors, deep core stabilizers |
| Equipment | Wall and exercise mat |
| Difficulty | Beginner to Intermediate |
Sets & Reps (By Goal)
- Core activation: 2 sets × 8–10 reps per side with slow control.
- Oblique strength: 3–4 sets × 10–14 reps per side with a 1-second squeeze at the top.
- Muscular endurance: 3 sets × 15–20 alternating reps while maintaining clean form.
- Beginner practice: 2 sets × 6–8 reps per side with a smaller reach and full control.
Progression rule: Add reps only when you can keep your feet steady, your lower back controlled, and your rotation smooth without using arm momentum.
Setup / Starting Position
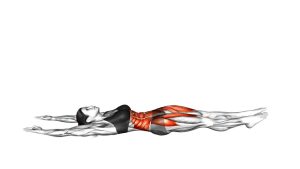
- Lie on your back: Position yourself on the floor with your hips close enough to the wall to place your feet flat against it.
- Set the legs: Bend your knees to about 90 degrees and press both feet lightly into the wall.
- Brace the core: Keep your ribs down and gently tighten your abs before lifting.
- Place the arms: Reach your arms toward your feet or prepare one hand to reach diagonally toward the opposite toes.
- Keep the neck neutral: Look slightly upward and avoid pulling your head forward.
Your lower body should stay quiet throughout the exercise. The wall is there to create stability, not to help you push aggressively.
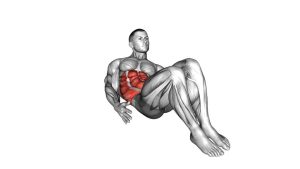
Execution (Step-by-Step)
- Start from the floor: Keep your feet on the wall, knees bent, and lower back controlled.
- Crunch upward: Lift your head and shoulder blades slightly off the floor using your abs.
- Rotate across the body: Turn your torso and reach one hand toward the opposite foot or toes.
- Squeeze briefly: Pause at the top and feel the obliques working on the reaching side.
- Lower with control: Return your shoulders and upper back to the floor without dropping suddenly.
- Alternate sides: Repeat the same movement toward the opposite foot, keeping the rhythm steady.
Pro Tips & Common Mistakes
- Do not yank the neck: Lift from the upper abs and keep the chin slightly tucked.
- Avoid swinging the arms: The arm reaches, but it should not create momentum.
- Keep the feet stable: If your feet slide or bounce on the wall, slow down and reduce the range.
- Rotate through the ribs: The twist should come from the trunk, not from forcing the shoulder forward.
- Control the lowering phase: Lower slowly to keep tension on the abs and protect the lower back.
- Use a smaller range if needed: You do not have to touch the toes. Reaching toward them is enough.
- Breathe properly: Exhale as you crunch and rotate, then inhale as you return to the floor.
FAQ
What muscles does the Lying Twist Toe Touch Against Wall work?
It mainly works the obliques, with help from the rectus abdominis, transverse abdominis, and deep core stabilizers. The wall helps keep the lower body stable so the trunk rotation becomes more focused.
Do I have to actually touch my toes?
No. The goal is not maximum reach. The goal is controlled rotation and abdominal contraction. If you can reach close to the toes while keeping good form, that is enough.
Is this exercise beginner-friendly?
Yes, but beginners should use a smaller range of motion and move slowly. If the neck or lower back takes over, reduce reps and focus on a gentle crunch with controlled rotation.
Why are the feet placed against the wall?
The wall helps stabilize the legs and hips. This reduces momentum and makes it easier to focus on the abs and obliques during the twisting crunch.
Can this exercise help with oblique definition?
It can help strengthen and develop the obliques, especially when combined with full-body strength training, proper nutrition, and consistent core work.
Recommended Equipment (Optional)
- Thick Exercise Mat — provides floor comfort for the spine, hips, and shoulders during crunch variations
- Non-Slip Yoga Mat — helps prevent sliding while keeping the feet and body position stable
- Ab Mat — optional support for controlled abdominal training and better floor comfort
- Mini Resistance Bands — useful for pairing with hip and core stability drills
- Core Sliders — helpful for progressing into more dynamic core and oblique exercises
Tip: This exercise does not require equipment beyond a wall, but a comfortable mat can improve consistency, reduce floor pressure, and make your core sessions easier to repeat.