Seated Foam Roller Hamstring Mobilization: Form, Benefits, Tips & FAQ
Learn seated foam roller hamstring mobilization for better posterior thigh mobility, recovery, and shoulder-supported control with form tips and FAQs.
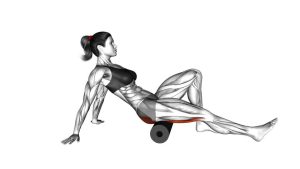
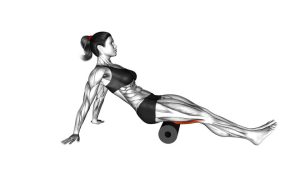
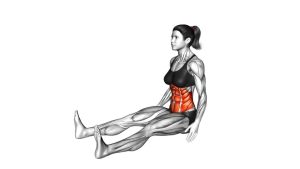
Seated Foam Roller Hamstring Mobilization
This exercise works best when the roller moves slowly from the upper hamstrings toward the mid and lower hamstrings. The hands stay planted behind the hips, the arms remain strong, and the shoulders stay depressed and retracted. This creates a stable base so the hamstrings can receive direct, controlled pressure without the torso collapsing.
Quick Overview
| Body Part | Hamstrings |
|---|---|
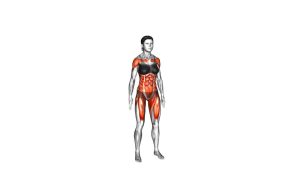
| Primary Muscle | Hamstrings: biceps femoris, semitendinosus, and semimembranosus |
| Secondary Muscle | Glutes, calves, triceps, posterior deltoids, lats, rhomboids, and lower traps for support |
| Equipment | Foam roller; optional exercise mat |
| Difficulty | Beginner-friendly recovery drill |
Sets & Reps (By Goal)
- Warm-up mobility: 1–2 sets × 30–45 seconds per leg or both legs together
- Post-workout recovery: 2–3 sets × 45–60 seconds with slow rolling pressure
- Hamstring tension management: 2 sets × 60 seconds, pausing briefly on tight areas
- Beginner tolerance: 1 set × 20–30 seconds with light pressure and short range
Progression rule: Increase time before increasing pressure. A smooth, controlled roll is more useful than aggressive pressure that causes guarding or discomfort.
Setup / Starting Position
- Sit on the floor: Extend your legs forward and place the foam roller under the back of your thighs.
- Place your hands behind you: Keep the palms on the floor with the fingers pointing backward or slightly outward.
- Lift the hips slightly: Support part of your body weight with your arms so the hamstrings rest on the roller.
- Set the shoulders: Pull the shoulders gently down and back without shrugging or locking the neck.
- Brace lightly: Keep the chest open, ribs controlled, and spine long before you begin rolling.
Tip: If the pressure feels too strong, keep more body weight through your hands or roll one hamstring at a time with lighter contact.
Execution (Step-by-Step)
- Start near the upper hamstrings: Position the roller below the glutes, not directly on the sitting bones.
- Push through the hands: Use your arms to move your body slowly so the roller travels along the hamstrings.
- Roll with control: Move from the upper hamstrings toward the mid-thigh and lower hamstrings.
- Avoid the knee crease: Stop before the roller reaches the back of the knee joint.
- Pause on tight areas: Hold gentle pressure for 2–5 seconds while breathing calmly.
- Return slowly: Pull your body back to the starting position and repeat with the same controlled tempo.
Pro Tips & Common Mistakes
- Move slowly: Fast rolling reduces control and makes it harder to manage pressure accurately.
- Keep the hips slightly lifted: Dropping the hips too low can reduce the rolling effect and overload the arms.
- Do not roll behind the knee: Stay on the muscular part of the hamstrings, not the joint area.
- Avoid shoulder shrugging: Keep the shoulders depressed and the chest open throughout the movement.
- Use pain-free pressure: Strong discomfort can cause the muscle to tighten instead of relax.
- Breathe steadily: Calm breathing helps reduce unnecessary tension in the legs, hips, and upper body.
- Change leg position: Turning the toes slightly inward or outward can help target different hamstring fibers.
FAQ
What muscles does the seated foam roller hamstring mobilization target?
It mainly targets the hamstrings on the back of the thigh. The glutes and calves may receive light secondary pressure, while the shoulders, triceps, and upper back help support the body.
Is this a strength exercise or a mobility exercise?
It is mainly a mobility and recovery exercise. The hamstrings receive rolling pressure, while the upper body works isometrically to stabilize the position.
Should I roll both legs together or one leg at a time?
Beginners can roll both legs together for moderate pressure. If you want more focused pressure, cross one leg over the other or roll one hamstring at a time.
How long should I foam roll my hamstrings?
Start with 30–45 seconds per side. Most people do well with 1–3 rounds depending on comfort, training goal, and recovery needs.
Why do my shoulders work during this exercise?
Your arms support your body weight while you roll. The shoulders stay in extension with scapular depression and retraction, which keeps the torso stable and prevents collapsing.
Should foam rolling hurt?
It may feel firm or slightly uncomfortable, but it should not feel sharp, burning, or nerve-like. Reduce pressure if your body starts to tense up.
Recommended Equipment
- High-Density Foam Roller — ideal for firm hamstring rolling and general lower-body recovery
- Medium-Density Foam Roller — better for beginners who need more comfort and lower pressure
- Textured Foam Roller — useful for deeper pressure and more focused soft tissue work
- Exercise Mat — improves comfort for seated floor mobility drills
- Massage Stick Roller — helpful alternative for lighter hamstring pressure without supporting body weight
Tip: Choose a roller density that matches your tolerance. Beginners usually do better with moderate pressure before progressing to firmer or textured rollers.