Seated Hamstring & Glute Foam Roll: Form, Benefits, Tips & FAQ
Learn the Seated Hamstring & Glute Foam Roll for recovery, mobility, and posterior-chain relief with setup, rolling cues, tips, FAQs, and gear.
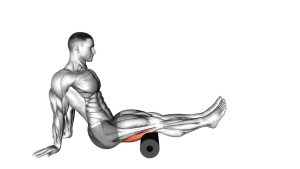
Seated Hamstring & Glute Foam Roll
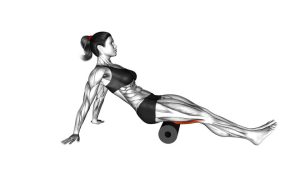
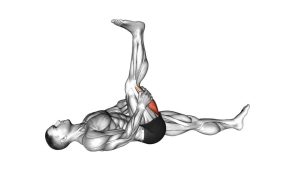
This drill works best when the body stays relaxed and the rolling pressure stays controlled. The hands support the torso, the non-working leg helps manage body weight, and the extended leg remains mostly passive. You should feel broad pressure through the hamstring and lower glute area, not sharp pain, nerve-like tingling, or aggressive joint discomfort.
Quick Overview
| Body Part | Hamstrings |
|---|---|
| Primary Muscle | Hamstrings, especially the upper hamstring region near the glute-hamstring tie-in |
| Secondary Muscle | Glutes, posterior hip tissue, adductors lightly depending on leg angle |
| Equipment | Foam roller; optional massage ball, yoga mat, or mobility pad |
| Difficulty | Beginner-friendly recovery drill; pressure can be adjusted easily |
Sets & Reps (By Goal)
- Warm-up preparation: 1–2 rounds × 20–40 seconds per side using light-to-moderate pressure.
- Post-workout recovery: 2–3 rounds × 30–60 seconds per side with slow, relaxed breathing.
- Mobility-focused tissue work: 2 rounds × 45–75 seconds per side, pausing briefly on tight spots.
- Desk-break or daily reset: 1 round × 20–30 seconds per side with gentle pressure only.
Progression rule: Increase time first, then slightly increase pressure. Do not make the drill more intense by rolling faster or forcing painful pressure into sensitive areas.
Setup / Starting Position
- Sit on the floor: Place both hands behind your body with your fingers angled outward or slightly backward for support.
- Position the roller: Place the foam roller under one upper hamstring, close to the lower glute area but not directly on the sit bone.
- Extend the working leg: Keep the target leg mostly straight and relaxed so the tissue can receive pressure without unnecessary tension.
- Bend the opposite leg: Plant the non-working foot on the floor to help control pressure, balance, and rolling speed.
- Lift slightly: Press through your hands and planted foot just enough to allow the hips and thigh to glide over the roller.
Tip: Start with lighter pressure. If the area feels too intense, keep more weight in your hands and opposite foot.
Execution (Step-by-Step)
- Set your pressure: Shift a comfortable amount of body weight onto the roller without bracing or holding your breath.
- Roll slowly forward: Use your arms and planted foot to move your body a few inches so the roller travels along the upper hamstring.
- Keep the range short: Focus on the glute-hamstring tie-in and upper hamstring area rather than rolling aggressively across the whole leg.
- Pause on tight spots: If you find a tender area, hold gentle pressure for 5–15 seconds while breathing calmly.
- Roll back with control: Reverse the movement slowly and avoid bouncing, jerking, or dropping your weight onto the roller.
- Adjust the angle: Slightly rotate the thigh inward or outward to reach different hamstring fibers, but keep the pressure comfortable.
- Switch sides: After completing the chosen time, move the roller to the opposite leg and repeat with the same control.
Pro Tips & Common Mistakes
- Use slow rolling speed: Move gradually so the tissue has time to respond to pressure.
- Avoid the back of the knee: Stay on the hamstring muscle belly and upper hamstring area, not the knee joint.
- Do not chase pain: Mild-to-moderate tenderness is acceptable, but sharp pain is not productive.
- Keep the working leg relaxed: If the hamstring is strongly flexed, the roller may feel harsher and less effective.
- Control pressure with your support leg: The planted foot should help you reduce or increase body weight on the roller.
- Do not roll too fast: Fast rolling often turns the drill into movement without meaningful pressure control.
- Pair with active mobility: After rolling, add gentle hamstring stretches, hip hinges, or glute activation drills for better carryover.
FAQ
What muscles does the Seated Hamstring & Glute Foam Roll target?
It mainly targets the upper hamstrings and the glute-hamstring tie-in. Depending on your leg angle and roller placement, it may also lightly affect the glutes and nearby posterior hip tissue.
Is this a strength exercise?
No. This is a mobility and recovery drill. The goal is to apply controlled pressure to soft tissue, not to build strength through resistance or heavy loading.
How hard should I press into the foam roller?
Use a pressure level around 4–7 out of 10. It can feel tender, but it should not create sharp pain, numbness, tingling, or symptoms that travel down the leg.
Should I roll the entire hamstring?
You can, but this version focuses more on the upper hamstring and lower glute area. Avoid rolling directly behind the knee, and use shorter, slower passes where tightness is most noticeable.
When should I do this exercise?
It can be used before training as a light preparation drill, after training as a recovery tool, or during mobility sessions. For warm-ups, keep pressure lighter and follow it with active movement.
Can beginners do the Seated Hamstring & Glute Foam Roll?
Yes. Beginners can start with a softer foam roller, shorter time, and more support through the hands and opposite foot. The key is to control pressure instead of forcing discomfort.
Recommended Equipment (Optional)
- Foam Roller — the main tool for hamstring and glute rolling
- Soft Foam Roller — better for beginners or sensitive hamstrings
- Massage Ball — useful for smaller glute trigger points and focused pressure
- Exercise / Yoga Mat — adds comfort for the hands, hips, and floor setup
- Stretching Strap — helpful for gentle hamstring stretching after foam rolling
Tip: Choose a softer roller if you are new to foam rolling. A very firm roller can feel too aggressive on the hamstrings and may cause unnecessary guarding.