Barbell Full Squat: Proper Form, Muscles Worked, Sets, Tips & FAQ
Learn how to perform the Barbell Full Squat with safe form, full-depth technique, muscle activation, sets by goal, mistakes, FAQs, and equipment tips.
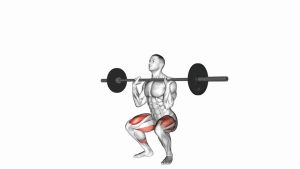
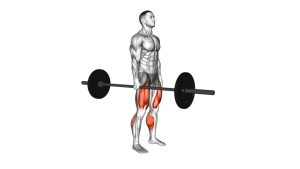
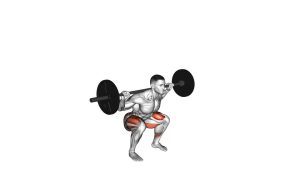
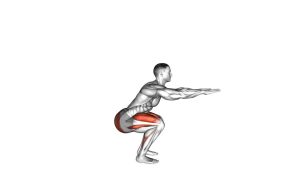
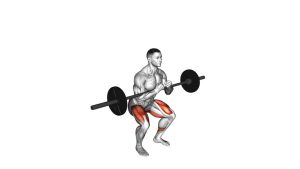
Barbell Full Squat
This exercise works best when the lifter combines bracing, stable foot pressure, and smooth knee tracking. In the full squat position, the hips travel below knee level while the torso stays controlled and the heels remain grounded. A clean rep should feel strong, balanced, and repeatable, not rushed or collapsed.
Quick Overview
| Body Part | Legs |
|---|---|
| Primary Muscle | Quadriceps, glutes |
| Secondary Muscle | Hamstrings, adductors, calves, spinal erectors, abdominals, upper back |
| Equipment | Barbell, weight plates, squat rack, optional lifting belt |
| Difficulty | Intermediate; beginner-friendly only after learning bodyweight squat mechanics first |
Sets & Reps (By Goal)
- Strength: 3–5 sets × 3–6 reps with heavier loads and 2–4 minutes rest.
- Muscle growth: 3–5 sets × 6–12 reps with moderate loads and 90–150 seconds rest.
- Technique practice: 3–4 sets × 5–8 controlled reps with light-to-moderate weight.
- Lower-body endurance: 2–4 sets × 12–20 reps with lighter loads and strict form.
- Power development: 4–6 sets × 2–4 fast reps using a lighter explosive load.
Progression rule: Add weight only when you can hit full depth with a neutral spine, stable feet, and consistent bar path for every rep.
Setup / Starting Position
- Set the rack height: Position the bar slightly below shoulder height so you can unrack it without standing on your toes.
- Place the bar: Rest the bar across the upper traps for a high-bar squat position. Keep it centered and stable.
- Grip the bar: Use a firm grip just outside shoulder width or slightly wider, depending on shoulder comfort.
- Brace your torso: Take a controlled breath, tighten the abs, and create full-body tension before unracking.
- Step back carefully: Take one or two short steps back, then set your feet roughly shoulder-width apart.
- Turn the toes slightly out: Point the toes outward around 10–30 degrees based on hip comfort.
- Set the eyes and chest: Look forward or slightly down in front of you while keeping the chest lifted and ribs controlled.
The setup should feel stable before the first rep begins. If you are still adjusting your feet or losing balance, reset before descending.
Execution (Step-by-Step)
- Brace before moving: Inhale, tighten your core, and keep the bar locked into your upper back.
- Start the descent: Bend the knees and hips together while keeping pressure through the mid-foot.
- Track the knees: Let the knees move in line with the toes. Do not allow them to collapse inward.
- Control the torso: Maintain a strong neutral spine as the torso leans slightly forward naturally.
- Reach full depth: Descend until the hips are below the knees, as long as you can keep control and heel contact.
- Pause briefly if needed: Keep tension at the bottom without relaxing into the joints.
- Drive upward: Push through the mid-foot and extend the knees and hips together.
- Keep the bar path vertical: The bar should travel over the mid-foot, not drift forward or backward.
- Finish tall: Stand fully upright with hips and knees extended, then reset your breath before the next rep.
Pro Tips & Common Mistakes
- Keep pressure through the mid-foot: Avoid shifting completely onto the toes or rocking back onto the heels.
- Do not rush the descent: Lower with control so your knees, hips, and torso stay organized.
- Avoid knee collapse: Drive the knees in the same direction as the toes, especially when leaving the bottom position.
- Do not relax at the bottom: Stay tight through the core, hips, and upper back.
- Keep the bar over the mid-foot: If the bar drifts forward, the lift becomes harder and can stress the lower back.
- Do not turn it into a good morning: The hips and chest should rise together during the ascent.
- Use a depth you can control: Full depth is valuable only when your spine, knees, and feet remain stable.
- Brace every rep: Treat each repetition like a separate lift, especially when using heavier loads.
FAQ
What muscles does the Barbell Full Squat work?
The Barbell Full Squat primarily trains the quadriceps and glutes. It also works the hamstrings, adductors, calves, core, spinal erectors, and upper back as stabilizers.
Is the Barbell Full Squat better than a half squat?
A full squat uses a larger range of motion and usually creates more demand through the hips, quads, and glutes. However, the best squat depth is the deepest range you can control with good posture and stable joints.
Should my knees go past my toes during a full squat?
Yes, the knees may naturally travel past the toes, especially in a full-depth squat. The main priority is that the heels stay grounded, the knees track with the toes, and the bar remains balanced over the mid-foot.
Why do my heels lift during the squat?
Heel lift may come from limited ankle mobility, poor foot pressure, stance issues, or descending too fast. Try a slightly wider stance, controlled tempo, ankle mobility work, or weightlifting shoes with an elevated heel.
How heavy should I go on Barbell Full Squats?
Start with a load you can control for clean, full-depth reps. Add weight gradually only when your bar path, bracing, knee tracking, and bottom position stay consistent.
Recommended Equipment
- Olympic Barbell — the main tool for loading and progressing the squat safely.
- Squat Rack with Safety Arms — essential for safer unracking, reracking, and heavy squat training.
- Weight Lifting Belt — helps support stronger bracing during heavier sets.
- Weightlifting Shoes — elevated heel support can improve squat depth and upright posture.
- Barbell Collars — keeps plates secure and prevents shifting during the lift.
Choose equipment that improves safety and consistency first. A stable rack, secure barbell, and controlled loading matter more than chasing heavier weight too soon.