Kettlebell Goblet Squat: Proper Form, Muscles Worked, Sets & Tips
Learn how to do the Kettlebell Goblet Squat with proper form, full-depth control, muscle focus, sets, common mistakes, FAQs, and equipment tips.
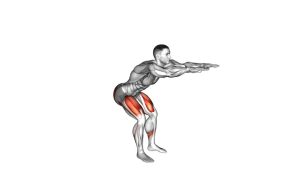
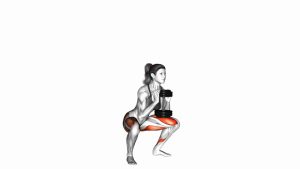
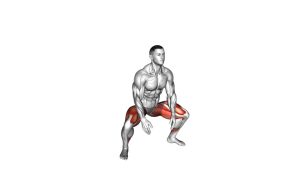
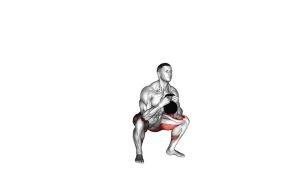
Kettlebell Goblet Squat
This exercise is one of the best squat variations for learning proper lower-body mechanics because the front-loaded kettlebell position encourages balance, posture, and controlled depth. It can be used for strength, muscle building, warm-ups, mobility work, conditioning circuits, or beginner squat education. The goal is to move smoothly from a tall standing position into a deep squat while keeping the kettlebell stable, the chest lifted, and the feet fully grounded.
Quick Overview
| Body Part | Legs |
|---|---|
| Primary Muscle | Quadriceps |
| Secondary Muscle | Glutes, hamstrings, adductors, calves, core, upper back |
| Equipment | Kettlebell |
| Difficulty | Beginner to intermediate |
Sets & Reps (By Goal)
- Beginner technique practice: 2–3 sets × 8–10 reps with a light kettlebell and slow control.
- Muscle growth: 3–4 sets × 8–15 reps with a moderate load and full range of motion.
- Strength focus: 4–5 sets × 5–8 reps with a heavier kettlebell while maintaining perfect posture.
- Conditioning: 3–5 rounds × 12–20 reps using controlled rhythm and short rest periods.
- Mobility warm-up: 2–3 sets × 6–10 slow reps with a pause at the bottom.
Progression rule: First improve depth, balance, and knee tracking. Then increase reps, add tempo, add pauses, or use a heavier kettlebell only when every repetition stays clean.
Setup / Starting Position
- Stand tall: Place your feet about shoulder-width apart or slightly wider, with toes turned out naturally.
- Hold the kettlebell in goblet position: Grip the horns or sides of the handle and keep the bell close to your upper chest.
- Set your posture: Lift the chest, pull the shoulders slightly back and down, and keep the spine neutral.
- Brace your core: Create light abdominal tension before each rep so the torso stays stable.
- Prepare the lower body: Keep the feet flat, spread pressure through the midfoot and heel, and point the knees in line with the toes.
A good goblet squat setup should feel balanced before you move. If the kettlebell pulls you forward, use a lighter weight or hold it closer to your body.
Execution (Step-by-Step)
- Start from a tall position: Stand upright with the kettlebell close to your chest and your elbows pointing down.
- Begin the descent: Bend the knees and hips together, allowing the hips to move down while the knees track over the toes.
- Keep the torso upright: Let the kettlebell act as a counterbalance while your chest stays lifted and your spine stays neutral.
- Reach your best depth: Lower until your thighs are at least near parallel, or deeper if you can maintain control and flat feet.
- Control the bottom: Avoid bouncing. Keep the knees out, elbows inside or near the knees, and the kettlebell steady.
- Drive upward: Push through the midfoot and heels while extending the knees and hips at the same time.
- Finish tall: Stand fully upright without leaning back or overextending the lower back.
Pro Tips & Common Mistakes
- Keep the kettlebell close: If the weight drifts away from your chest, your torso may lean forward and your lower back may work too hard.
- Do not rush the descent: Lower under control so your hips, knees, and ankles stay coordinated.
- Avoid knee collapse: Push the knees gently outward so they stay aligned with your toes.
- Keep your heels planted: If your heels rise, reduce depth, widen your stance slightly, or improve ankle mobility.
- Do not round the lower back: Stop the descent before your pelvis tucks under if you lose spinal position.
- Use your elbows as a guide: At the bottom, your elbows can travel inside the knees to help reinforce an open, stable squat position.
- Control the lockout: Finish tall by squeezing the glutes lightly, not by leaning backward.
FAQ
What muscles does the kettlebell goblet squat work?
The kettlebell goblet squat mainly works the quadriceps. It also trains the glutes, hamstrings, adductors, calves, core, and upper back because you must stabilize the weight and maintain an upright posture.
Is the kettlebell goblet squat good for beginners?
Yes. It is one of the best beginner squat variations because the kettlebell provides a counterbalance. This often makes it easier to sit deeper, keep the chest up, and learn proper knee tracking.
How deep should I squat?
Squat as deep as you can while keeping your feet flat, knees aligned, chest lifted, and spine neutral. Full depth is useful if you can control it, but clean movement is more important than forcing range.
Why do my heels lift during goblet squats?
Heel lift usually comes from limited ankle mobility, stance issues, or shifting too far forward. Try a slightly wider stance, turn the toes out naturally, reduce depth, or practice slow paused reps.
Can I build muscle with kettlebell goblet squats?
Yes. Goblet squats can build lower-body muscle when performed with enough load, controlled reps, full range of motion, and progressive overload over time.
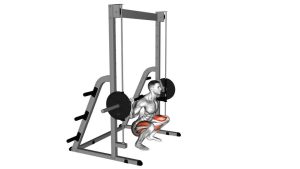
Recommended Equipment
- Cast Iron Kettlebell — the main tool for goblet squats, strength training, and lower-body workouts.
- Adjustable Kettlebell — useful if you want multiple weight options without buying several kettlebells.
- Weightlifting Shoes — can help improve squat depth and stability by supporting a strong foot position.
- Exercise Mat — provides floor protection and a clear workout area for home training.
- Hip Resistance Bands — helpful for glute activation and teaching better knee tracking before squats.
Choose equipment based on your current strength level and training goal. A lighter kettlebell is best for learning form, while a heavier kettlebell is better for strength and muscle-building work.