Bent-Knee Crunch Against Wall: Form, Sets, Tips & FAQ
Learn the Bent-Knee Crunch Against Wall to isolate abs with stable foot support. Includes step-by-step form, sets, mistakes, FAQs, and gear tips.
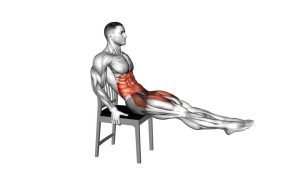
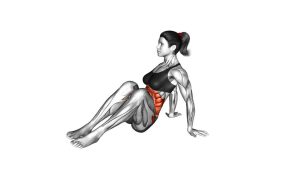
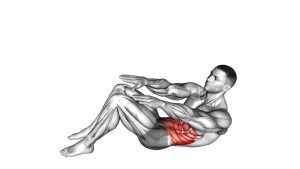
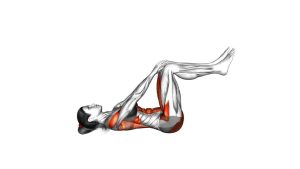
Bent-Knee Crunch Against Wall
This movement is ideal for beginners who want a stricter crunch variation. Because the feet are supported against the wall, the lower body stays fixed, making it easier to feel the abdominal muscles working. Keep the movement short, controlled, and focused on curling the upper spine rather than pulling the neck or driving through the legs.
Quick Overview
| Body Part | Abs |
|---|---|
| Primary Muscle | Rectus abdominis |
| Secondary Muscle | Transverse abdominis, obliques, deep core stabilizers |
| Equipment | Wall and exercise mat recommended |
| Difficulty | Beginner |
Sets & Reps (By Goal)
- Beginner core control: 2–3 sets × 8–12 reps with slow, clean form.
- Ab endurance: 3–4 sets × 12–20 reps using a steady tempo and short rest periods.
- Warm-up activation: 1–2 sets × 8–10 reps before a core or full-body workout.
- Technique practice: 2 sets × 6–8 reps with a 2-second pause at the top of each crunch.
Progression rule: Add reps first, then add a longer pause at the top. Do not increase speed just to complete more repetitions.
Setup / Starting Position
- Lie on your back: Position yourself on an exercise mat close enough to a wall so your feet can press comfortably against it.
- Bend your knees: Keep the knees bent around 90 degrees, with the feet flat against the wall.
- Set your hips: Keep the pelvis stable and avoid arching the lower back excessively.
- Choose your arm position: Place your hands lightly behind the head, across the chest, or near the sides depending on comfort.
- Brace gently: Draw the ribs down and lightly tighten the abs before starting the first rep.
Tip: Keep foot pressure light and steady. The wall is there for support, not for pushing your body upward.
Execution (Step-by-Step)
- Start from a stable position: Keep your feet against the wall, knees bent, and lower back controlled on the floor.
- Exhale and crunch upward: Curl the upper spine and lift the shoulder blades off the floor.
- Keep the range short: Stop when the abs are strongly contracted. Do not turn the exercise into a full sit-up.
- Pause briefly: Hold the top position for 1–2 seconds while keeping the neck relaxed.
- Lower with control: Slowly return the upper back and shoulders to the floor without dropping or bouncing.
- Reset and repeat: Rebuild tension before each rep instead of rushing through the set.
Pro Tips & Common Mistakes
- Think ribs to pelvis: Crunch by shortening the front of the torso, not by yanking the head forward.
- Keep your chin slightly tucked: Maintain space between chin and chest to reduce neck strain.
- Do not overuse the wall: The feet should stay supported, but the abs should create the crunch.
- Avoid momentum: Slow reps build better control than fast bouncing reps.
- Keep the lower body still: Knees, hips, and feet should stay stable throughout the set.
- Do not chase height: A small, clean shoulder-blade lift is enough for strong abdominal activation.
- Exhale on the way up: Breathing out helps the ribs come down and improves the contraction.
FAQ
What muscles does the Bent-Knee Crunch Against Wall work?
It mainly targets the rectus abdominis, the front abdominal muscle responsible for spinal flexion. The obliques and deep core muscles also assist with stability.
Is this exercise better than a regular crunch?
It is not always better, but it can be easier to control. The wall support helps keep the legs stable, which may make it simpler to focus on abdominal contraction instead of swinging or using momentum.
Should my lower back stay flat on the floor?
Your lower back should stay controlled and comfortable. Avoid excessive arching, but do not force the spine aggressively into the floor. Keep the ribs down and the pelvis stable.
Why do I feel this in my neck?
Neck tension usually happens when you pull with the hands or lead the movement with the head. Keep the hands light, look slightly upward, and lift through the ribs and shoulders instead.
Can beginners do this exercise?
Yes. This is a beginner-friendly ab exercise when performed slowly. Start with fewer reps and focus on clean technique before adding volume.
Can I make this exercise harder?
Yes. You can slow the lowering phase, pause longer at the top, or hold a light weight across the chest. Only progress when you can complete every rep without neck pulling or lower-body movement.
Recommended Equipment
- Exercise Mat — provides cushioning for the spine and improves comfort during floor-based crunches.
- Thick Yoga Mat — useful if you need extra padding under the lower back and shoulders.
- Ab Mat — supports spinal positioning and can help improve comfort during crunch variations.
- Non-Slip Workout Socks — help keep the feet stable against the wall without sliding.
- Light Dumbbell Set — optional progression tool for advanced users who want to add light resistance.
Tip: Start with bodyweight only. Add equipment only when your crunch stays smooth, controlled, and neck-friendly.