Lying Rectus Abdominis Activation Crunch: Form, Sets, Tips & FAQ
Learn the lying rectus abdominis activation crunch for stronger abs, better core control, safe form, sets, common mistakes, FAQs, and gear.
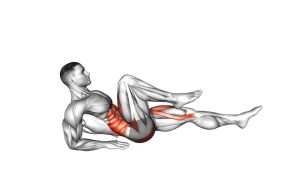
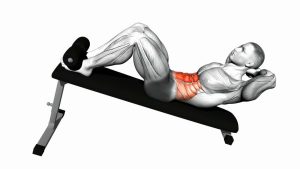
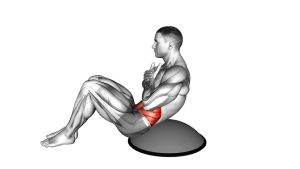
Lying Rectus Abdominis Activation Crunch
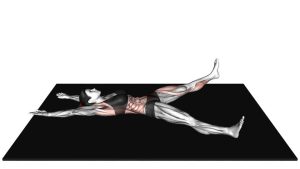
This exercise works best when every rep is slow, compact, and intentional. First, the body starts lying on the back with the knees bent and the feet flat. Then, the abs initiate the lift as the shoulder blades peel slightly away from the floor. As a result, the rectus abdominis shortens without needing a large range of motion. However, the hands should only support the head; they should not pull the neck forward.
Quick Overview
| Body Part | Abs |
|---|---|
| Primary Muscle | Rectus abdominis |
| Secondary Muscle | Obliques and deep core stabilizers |
| Equipment | No equipment required; optional exercise mat for comfort |
| Difficulty | Beginner |
Sets & Reps (By Goal)
- Core activation: 2–3 sets × 10–15 controlled reps with 30–45 seconds rest.
- Beginner ab strength: 3 sets × 8–12 reps with a brief squeeze at the top.
- Warm-up before core training: 1–2 sets × 8–10 slow reps to wake up the abs.
- Muscle control focus: 2–4 sets × 6–10 reps using a 2-second lift and 3-second lower.
Progression rule: Add reps slowly before adding difficulty. Once the movement stays smooth, increase the pause at the top instead of rushing into higher volume.
Setup / Starting Position
- Lie on your back: Position yourself on the floor with your torso flat and your knees bent.
- Plant your feet: Keep both feet flat and stable so the lower body does not rock during the crunch.
- Support your head: Place your hands behind your head with the elbows slightly open.
- Relax your neck: Keep the head supported, but avoid pulling the chin toward the chest with your hands.
- Brace lightly: Before lifting, gently tighten the abs as if preparing for a small curl.
Tip: If the neck feels tense, reduce the height of the crunch and focus on lifting through the ribs and shoulder blades rather than pulling the head.
Execution (Step-by-Step)
- Start from the floor: Keep your back on the ground, knees bent, feet planted, and hands lightly supporting your head.
- Engage your abs: Exhale gently and begin curling the upper torso upward.
- Lift the shoulder blades: Raise the head and shoulders slightly while keeping the lower back close to the floor.
- Squeeze at the top: Pause briefly when the abs are fully engaged, without turning the movement into a sit-up.
- Lower with control: Slowly return the shoulder blades and head to the floor.
- Reset your position: Keep the feet stable, relax the neck, and repeat with the same compact range.
Pro Tips & Common Mistakes
- Use the abs first: Begin each rep by contracting the rectus abdominis, not by yanking the head upward.
- Keep the range short: A crunch only needs the shoulder blades to lift slightly; therefore, a higher lift is not always better.
- Control the lowering phase: Lower slowly so the abs stay active instead of relaxing suddenly.
- Avoid neck pulling: Your hands support the head, but they should not drag the neck into flexion.
- Keep the feet grounded: Stable feet help keep the movement focused on the abs rather than the hips.
- Do not rush reps: Momentum reduces abdominal tension and often shifts stress into the neck or hip flexors.
- Exhale as you curl: Breathing out during the lift can help the ribs move down and improve ab contraction.
FAQ
What muscle does the lying rectus abdominis activation crunch work?
It primarily works the rectus abdominis, which is the front abdominal muscle responsible for trunk flexion. Additionally, the obliques and deep core muscles assist with stability during the movement.
Is this exercise the same as a sit-up?
No. A sit-up uses a larger range of motion and often involves more hip flexor contribution. In contrast, this crunch stays small and focuses on lifting the shoulder blades while keeping the lower back close to the floor.
Should I pull on my head during the crunch?
No. Your hands should support the head only. If you pull on the head, the neck may take over and the abs may work less effectively.
Where should I feel this exercise?
You should feel it mainly in the front of your abs. If you feel it mostly in your neck, reduce the range, relax your grip, and focus on curling the ribs toward the pelvis.
Is this good for beginners?
Yes. Because it uses a small range of motion and no equipment, it is beginner-friendly when performed slowly and without neck pulling.
Recommended Equipment (Optional)
- Exercise Mat — adds comfort for your back, shoulders, and head during floor crunches.
- Thick Yoga Mat — useful if you need extra cushioning on hard floors.
- Ab Exercise Mat — helps support consistent floor-based abdominal training.
- Core Sliders — optional tool for progressing into more advanced core drills later.
- Resistance Bands Set — useful for pairing crunch work with anti-rotation and full-core stability exercises.
Equipment is optional for this exercise. However, a comfortable mat can improve consistency, especially if you train on a firm floor.