Weighted Hanging Leg Hip Raise: Form, Core Benefits, Sets & Tips
Learn the weighted hanging leg hip raise for stronger abs and hip control. Includes setup, steps, sets, mistakes, FAQs, and gear tips.
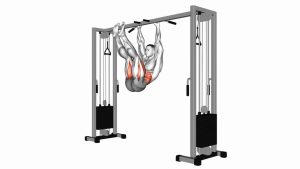
Weighted Hanging Leg Hip Raise
This exercise targets the abdominals through a demanding range of motion. First, the legs lift upward from the hanging position. Then, the hips curl toward the ribs to create the key contraction. As a result, the movement trains lower-ab control, pelvic positioning, grip strength, and full-body stability at the same time.
Quick Overview
| Body Part | Abs |
|---|---|
| Primary Muscle | Rectus abdominis, especially lower-ab-focused hip curl control |
| Secondary Muscle | Hip flexors, obliques, deep core stabilizers, forearms, lats, and shoulder stabilizers |
| Equipment | Pull-up bar and dumbbell held between the feet |
| Difficulty | Advanced |
Sets & Reps (By Goal)
- Core strength: 3–5 sets × 4–8 controlled reps, resting 90–150 seconds between sets.
- Muscle building: 3–4 sets × 8–12 reps with a light-to-moderate dumbbell and strict tempo.
- Control and technique: 2–3 sets × 4–6 slow reps, using a lighter dumbbell or bodyweight only.
- Advanced finisher: 2–3 sets × 6–10 reps after heavier core work, only if form stays clean.
Progression rule: Add reps before adding load. Once every rep is smooth, swing-free, and controlled on the way down, increase the dumbbell weight slightly.
Setup / Starting Position
- Choose a stable pull-up bar: Use a bar high enough that your feet can hang freely without touching the floor.
- Secure the dumbbell: Place a light dumbbell between your feet and squeeze it firmly before hanging.
- Grip the bar: Hold the bar with both hands slightly wider than shoulder width.
- Set your shoulders: Keep the shoulders active and avoid hanging loosely through the joints.
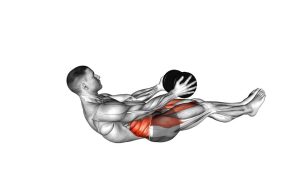
- Start vertical: Let the legs hang straight down while keeping the dumbbell controlled between the feet.
- Brace before lifting: Tighten the abs gently so the first movement comes from the core, not from swinging.
Tip: Start with a very light dumbbell. Since the weight is far from the hips, even a small load can make the exercise much harder.
Execution (Step-by-Step)
- Begin from a dead-hang position: Keep your arms extended, legs together, and dumbbell steady between the feet.
- Lift the legs forward: Raise both legs together while keeping the movement smooth and controlled.
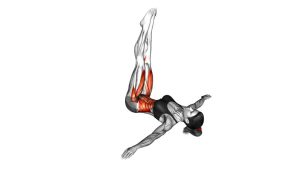
- Reach the high position: Continue lifting until the legs are near hip height or higher, depending on your mobility and control.
- Curl the hips upward: At the top, tilt the pelvis back and lift the hips slightly toward the ribs.
- Squeeze the abs: Pause briefly in the top position without jerking the weight upward.
- Lower slowly: Return the hips and legs downward under control while resisting gravity.
- Reset at the bottom: Let the body become still before starting the next rep.
Pro Tips & Common Mistakes
- Use a light dumbbell first: A heavy weight can quickly create swinging, lower-back stress, or poor control.
- Control the descent: Lowering too fast removes tension from the abs and increases momentum.
- Do not swing: If your body rocks before each rep, reset and reduce the load.
- Lift the hips, not only the legs: The hip raise finish makes this more than a basic hanging leg raise.
- Keep the dumbbell secure: Squeeze the feet together throughout the full rep to prevent slipping.
- Avoid excessive arching: If your lower back extends hard at the bottom, brace more and reduce range.
- Stay smooth at the top: Do not kick the dumbbell upward. Instead, curl the pelvis with control.
- Progress gradually: Better range, slower tempo, and cleaner reps matter more than heavier weight.
FAQ
What muscles does the weighted hanging leg hip raise work?
It primarily works the rectus abdominis, especially during the hip curl at the top. Additionally, the hip flexors, obliques, deep core muscles, forearms, lats, and shoulder stabilizers assist with control.
Is the weighted hanging leg hip raise good for lower abs?
Yes. While the abs work as one muscle group, the hip lift and posterior pelvic tilt make this exercise especially useful for lower-ab-focused control and strength.
Should beginners do this exercise?
Most beginners should start with hanging knee raises, captain’s chair knee raises, or bodyweight hanging leg raises first. After that, adding a light dumbbell becomes safer and more productive.
How heavy should the dumbbell be?
Start very light. The dumbbell sits far from the hips, so it creates a long lever. Therefore, a small weight can feel much harder than expected during the top half of the movement.
Why do I swing during hanging leg hip raises?
Swinging usually happens when the rep starts too fast, the dumbbell is too heavy, or the bottom position is not reset. To fix it, pause between reps, brace first, and lower the legs more slowly.
Can I do this without a dumbbell?
Yes. A bodyweight hanging leg hip raise is a strong progression by itself. Once you can perform clean reps without swinging, you can add external load.
Recommended Equipment
- Doorway Pull-Up Bar — useful for hanging core exercises at home if the doorway and bar setup are secure.
- Adjustable Dumbbell — allows small weight increases as your hanging leg raise strength improves.
- Hanging Ab Straps — can reduce grip limitation during hanging core work, although this exercise is shown with hands on the bar.
- Weightlifting Chalk — improves grip security during hanging exercises.
- Exercise Mat — useful for warm-up drills, hollow holds, and bodyweight core progressions before hanging work.
Tip: For this exercise, safety depends on both grip security and dumbbell control. Choose equipment that stays stable before adding intensity.