Straight-Arm Crunch: Proper Form, Core Benefits, Sets, Tips & FAQ
Learn the straight-arm crunch for stronger abs with step-by-step form, sets by goal, common mistakes, FAQs, and useful equipment tips.
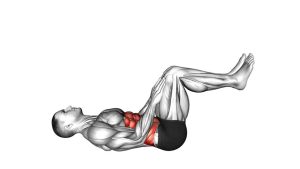
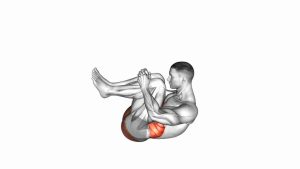
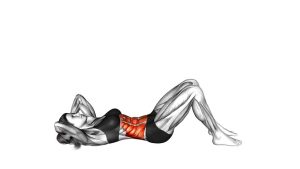
Straight-Arm Crunch
This exercise is best performed with a slow, controlled crunch rather than a fast sit-up. First, the head and shoulders lift from the floor. Then, the arms travel forward with the torso while staying straight. Finally, the upper back lowers with control until the arms return overhead. Therefore, the goal is clean abdominal flexion, not momentum.
Quick Overview
| Body Part | Core |
|---|---|
| Primary Muscle | Rectus abdominis |
| Secondary Muscle | Obliques, deep core stabilizers, hip flexors lightly as stabilizers |
| Equipment | None; optional exercise mat for comfort |
| Difficulty | Beginner to Intermediate because the long-arm position increases core demand |
Sets & Reps (By Goal)
- Beginner control: 2–3 sets × 8–12 reps with a slow tempo
- Core strength: 3–4 sets × 10–15 reps with a 1-second squeeze at the top
- Muscle endurance: 3 sets × 15–20 reps while keeping every rep smooth
- Warm-up activation: 1–2 sets × 8–10 reps before a core or full-body workout
Progression rule: Add reps first. After that, slow the lowering phase or pause longer at the top. However, do not increase difficulty if your neck pulls forward or your feet start lifting.
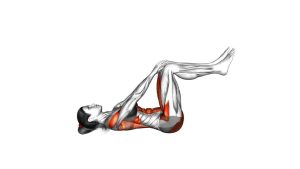
Setup / Starting Position
- Lie on your back: Place your body flat on the floor or on an exercise mat.
- Bend your knees: Keep both feet planted and stable throughout the movement.
- Extend your arms overhead: Reach the arms long behind your head while keeping them straight.
- Set your ribcage: Keep the ribs controlled so the lower back does not aggressively arch.
- Relax your neck: Keep the head in line with the spine before starting the crunch.
Tip: If the overhead arm position feels too difficult, shorten the lever by reaching the arms slightly forward before starting.
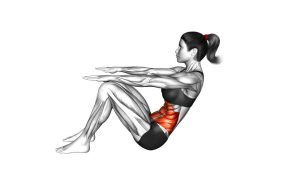
Execution (Step-by-Step)
- Brace gently: Tighten your abs as if preparing to curl the ribs toward the pelvis.
- Lift the head and shoulders: Begin the crunch by raising the upper back from the floor.
- Keep the arms straight: Let the arms travel forward with the torso without swinging them aggressively.
- Crunch to the top: Stop when the upper back is lifted and the abs feel fully shortened.
- Pause briefly: Hold the top position for a moment while keeping the feet grounded.
- Lower with control: Return the upper back to the floor slowly as the arms move back overhead.
- Reset before the next rep: Avoid bouncing from the floor and repeat with the same controlled rhythm.
Pro Tips & Common Mistakes
- Use the abs first: Start the movement by curling the ribs upward, not by throwing the arms.
- Keep the arms long: Straight arms make the exercise harder, so avoid bending them to cheat the rep.
- Do not yank the neck: Let the head follow the torso naturally instead of forcing the chin down.
- Control the descent: Lower slowly because the eccentric phase helps build better core control.
- Avoid foot lifting: If your feet come off the floor, reduce range or slow the movement.
- Do not over-arch the back: Keep the ribs controlled when the arms return overhead.
- Pause at the top: A brief squeeze improves abdominal tension and reduces momentum.
FAQ
What muscles does the straight-arm crunch work?
The straight-arm crunch mainly targets the rectus abdominis. In addition, the obliques and deeper core muscles help stabilize the torso while the arms stay extended.
Is the straight-arm crunch harder than a regular crunch?
Yes. Because the arms are extended overhead, the lever is longer. As a result, the abs must work harder than they do during a standard crunch with the hands near the chest or head.
Should my lower back leave the floor?
The upper back should lift during the crunch, but the movement should not become a full sit-up. Therefore, avoid using momentum to roll the entire spine aggressively off the floor.
Why do I feel this in my neck?
Neck tension usually happens when you lead with the head instead of the abs. To fix it, slow down, keep the chin relaxed, and think about lifting the shoulders with abdominal control.
Can beginners do straight-arm crunches?
Beginners can use this exercise if they control the range and tempo. However, if the long-arm position feels too hard, start with a regular crunch and progress gradually.
Recommended Equipment
- Exercise Mat — adds comfort for the spine, hips, and shoulders during floor crunches
- Thick Yoga Mat — useful if you need extra cushioning during repeated core work
- Ab Mat — supports controlled spinal flexion and helps improve crunch positioning
- Non-Slip Workout Mat — helps keep the body stable when performing bodyweight ab exercises
- Ankle Weights — optional for advanced users who want extra lower-body stability challenge
Tip: Equipment should improve comfort and control. However, the straight-arm crunch can be performed effectively with only your bodyweight.