Standing Wall Side Knee Crunch: Form, Oblique Benefits, Sets & Tips
Learn the Standing Wall Side Knee Crunch to train obliques, abs, and hip control with wall support. Includes form, sets, tips, FAQs, and equipment.
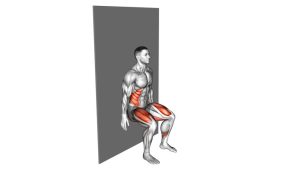
Standing Wall Side Knee Crunch
This exercise works best when the knee lift is controlled and the torso stays supported. Instead of swinging the leg or collapsing into the wall, you should brace your midsection, keep the shoulders stable, and lift the knee toward the side of the ribs. Therefore, the main goal is not speed. The goal is a clean oblique squeeze with steady balance and smooth breathing.
Quick Overview
| Body Part | Obliques |
|---|---|
| Primary Muscle | Obliques |
| Secondary Muscle | Rectus abdominis, hip flexors, transverse abdominis, shoulders, glutes, and calves |
| Equipment | Wall only; optional mat, training shoes, or resistance bands for related core work |
| Difficulty | Beginner-friendly; suitable for standing core training and low-impact oblique activation |
Sets & Reps (By Goal)
- Beginner oblique practice: 2–3 sets × 8–10 reps per side with a slow controlled tempo.
- Core warm-up: 2–4 sets × 10–12 reps per side, resting 30–45 seconds between sets.
- Low-impact conditioning: 3–5 sets × 20–30 alternating reps while keeping the torso stable.
- Balance and control: 2–3 sets × 6–8 reps per side with a short pause at the top.
Progression rule: First, improve your balance and oblique squeeze. Then, add reps, increase the pause, or step slightly farther from the wall. However, reduce the difficulty if your hips twist or your lower back arches.
Setup / Starting Position
- Face the wall: Stand close enough to place both palms on the wall at about chest or shoulder height.
- Create a supported lean: Step your feet back slightly so your body forms a strong angled line.
- Set your core: Keep your ribs down, pelvis level, and abs lightly braced before lifting the knee.
- Relax your neck: Look toward the wall and keep your shoulders away from your ears.
- Prepare the side crunch path: Think about lifting the knee upward and slightly outward toward the same-side ribs.
Tip: A smaller lean makes the exercise easier. Meanwhile, a deeper lean increases the core and shoulder stability demand.
Execution (Step-by-Step)
- Press into the wall: Create steady support through both palms without locking the shoulders aggressively.
- Brace your midsection: Tighten your core gently so your hips do not sway before the knee moves.
- Lift one knee to the side: Drive the knee upward and slightly toward the same-side elbow or rib cage.
- Squeeze the obliques: Pause briefly at the top while keeping the movement controlled and compact.
- Return with control: Lower the foot back to the floor without dropping the hip or twisting the torso.
- Repeat on the other side: Alternate sides or complete all reps on one side before switching.
Pro Tips & Common Mistakes
- Lead with the knee: Lift the knee toward the same-side ribs instead of kicking the foot backward or outward.
- Control the torso: A small side crunch is useful, but excessive twisting reduces the quality of the rep.
- Keep your hands active: Press gently into the wall so your upper body stays stable.
- Avoid shoulder shrugging: Keep the neck long and shoulders down while maintaining wall contact.
- Do not arch the lower back: Brace the abs and keep the ribs stacked over the pelvis.
- Use your breath: Exhale as the knee rises, then inhale as the foot returns to the floor.
- Start slow: Faster reps can work for conditioning, but clean control should come first.
FAQ
Is the Standing Wall Side Knee Crunch good for beginners?
Yes. The wall gives support, which makes the movement easier to balance and control. Because of that, beginners can train the obliques without needing to lie on the floor or hold a difficult side plank.
What muscles does this exercise target?
The main target is the obliques. In addition, the rectus abdominis, hip flexors, deep core muscles, shoulders, glutes, and calves help stabilize the body during each knee lift.
Is this different from a regular Standing Wall Knee Crunch?
Yes. A regular wall knee crunch usually drives the knee straight forward. In contrast, the side version brings the knee slightly toward the same-side ribs, which increases oblique involvement.
Should I do this exercise fast or slow?
Start slow. A controlled tempo helps you feel the obliques and prevents hip swinging. Later, you can increase the pace for conditioning as long as your form stays stable.
Can this exercise help reduce waist fat?
This movement strengthens and activates the side abs, but it does not directly burn fat from one area. For visible fat loss, combine core training with full-body workouts, nutrition control, and consistent daily activity.
How can I make the Standing Wall Side Knee Crunch harder?
Step farther from the wall, pause longer at the top, increase reps, or slow the lowering phase. However, only progress when your hips stay controlled and your lower back stays comfortable.
Recommended Equipment (Optional)
- Exercise Mat — useful for pairing this standing oblique drill with floor-based core exercises
- Training Shoes — helps improve grip, comfort, and stability during standing core movements
- Mini Loop Resistance Bands — useful for hip activation drills that support better knee control
- Resistance Bands Set — helpful for building a complete core, glute, and upper-body home workout
- Fitness Interval Timer — ideal for timed oblique circuits, warm-ups, and low-impact conditioning rounds
Tip: The wall is the only required support. However, simple accessories can help you build a more complete core routine around this exercise.