Suspender Biceps Clutch: Proper Form, Sets, Muscles Worked & FAQ
Learn how to do the Suspender Biceps Clutch with proper form. Discover muscles worked, setup, execution steps, sets and reps by goal, common mistakes, FAQs, and recommended equipment.
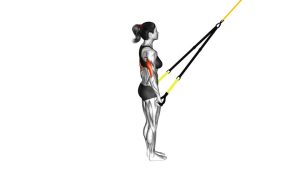
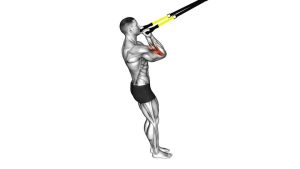
Suspender Biceps Clutch
This exercise works best when you maintain a strong plank-like body line and focus on bending at the elbows rather than pulling with the shoulders. The farther your feet are placed forward under the anchor point, the more challenging the movement becomes. A controlled tempo and full extension at the bottom make the exercise much more effective.
Quick Overview
| Body Part | Biceps |
|---|---|
| Primary Muscle | Biceps brachii |
| Secondary Muscle | Brachialis, brachioradialis, forearms, core stabilizers, rear delts |
| Equipment | Suspension trainer / suspension straps |
| Difficulty | Beginner to Intermediate, depending on body angle |
Sets & Reps (By Goal)
- Muscle growth: 3–4 sets × 8–15 reps with controlled tempo and 60–90 sec rest
- Strength emphasis: 4–5 sets × 6–10 reps using a steeper body angle and 90–120 sec rest
- Endurance / toning: 2–4 sets × 12–20 reps with smooth form and 45–75 sec rest
- Beginner practice: 2–3 sets × 8–12 reps with a more upright body position
Progression rule: First increase control and range of motion, then make the movement harder by walking the feet farther forward or lowering the body angle.
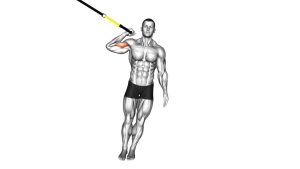
Setup / Starting Position
- Adjust the straps: Set the suspension handles around mid-torso height or slightly higher.
- Grip the handles: Use a neutral or underhand-friendly grip depending on the handle position and exercise style.
- Lean back: Walk the feet forward and lean your body backward under control.
- Set body alignment: Keep your head, torso, hips, and legs in one straight line like a plank.
- Start extended: Arms should be mostly straight with tension already on the straps.
Tip: A more upright position makes the movement easier, while a lower body angle increases the load on the biceps.
Execution (Step-by-Step)
- Brace first: Tighten your core and glutes so your body stays rigid from shoulders to heels.
- Bend the elbows: Pull your body toward the handles by flexing at the elbows, keeping upper arms relatively stable.
- Bring hands toward the head: Continue curling until the handles come close to the sides of your forehead or upper face area.
- Squeeze at the top: Briefly contract the biceps without shrugging the shoulders forward.
- Lower slowly: Extend the arms under control until you return to the starting position with full tension.
- Repeat smoothly: Keep every rep strict, avoiding swinging, hip sagging, or turning the exercise into a row.
Pro Tips & Common Mistakes
- Keep the body stiff: Think of the movement as a bodyweight curl, not a loose hanging pull.
- Lead with the elbows: The biceps should initiate the rep, not the upper back.
- Do not row the handles: If elbows travel too far back, the movement shifts away from the biceps.
- Use full extension: Straighten the arms at the bottom to train the muscle through a fuller range.
- Control the eccentric: Lowering too fast reduces tension and makes the exercise less effective.
- Adjust intensity with foot position: This is one of the easiest ways to scale the exercise up or down.
- Keep wrists neutral: Avoid excessive wrist bending that can create discomfort or reduce force output.
FAQ
What muscles does the Suspender Biceps Clutch work?
It mainly targets the biceps brachii, while also involving the brachialis, brachioradialis, forearms, and core stabilizers to keep the body aligned.
Is this exercise better than dumbbell curls?
It is not necessarily better, but it offers a different training stimulus. Suspension curls challenge the biceps while also requiring body control and stability, making them a great complement to free-weight curls.
How can I make the exercise harder?
Walk your feet farther forward, lower your body angle, slow down the tempo, add a pause at peak contraction, or increase total reps and sets while keeping strict form.
Can beginners do the Suspender Biceps Clutch?
Yes. Beginners can simply stand more upright to reduce the resistance and learn the motion with better control.
Why do I feel it in my shoulders more than my biceps?
That usually happens when the movement turns into a row. Focus on bending through the elbows, keeping the body rigid, and preventing the shoulders from dominating the pull.
Recommended Equipment
- Suspension Trainer System — the main tool for performing suspension curls, rows, presses, and full-body bodyweight training
- Door Anchor for Suspension Trainer — useful for setting up suspension straps securely at home without a permanent mount
- Exercise Mat — helps provide better footing and comfort when training indoors on hard floors
- Grip Strengthener — can improve handle control and forearm endurance for suspension-based upper-body work
- Resistance Bands Set — useful for warm-ups, arm pump finishers, and supplementing biceps training volume
Tip: Choose a sturdy anchor point and inspect your suspension straps regularly before training.