Suspension Arm Curl: Proper Form, Muscles Worked, Sets, Tips & FAQ
Learn how to do the Suspension Arm Curl with proper form to build stronger biceps, forearms, and upper-arm control. Includes muscles worked, sets and reps by goal, technique tips, common mistakes, FAQs, and recommended Amazon equipment.
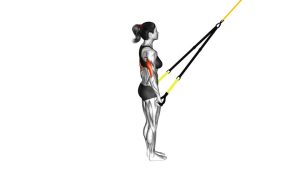
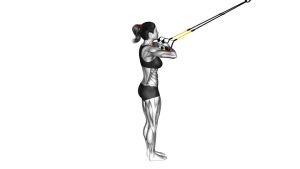
Suspension Arm Curl
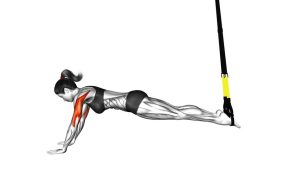
This exercise works best when you treat your body like a moving plank and let the elbows do most of the work. A good rep feels like a strong squeeze through the front of the upper arms with steady forearm tension and very little body swing. The more you lean back, the more resistance you create, so technique matters more than chasing difficulty too soon.
Quick Overview
| Body Part | Biceps |
|---|---|
| Primary Muscle | Biceps brachii |
| Secondary Muscle | Brachialis, brachioradialis, forearm flexors, anterior delts, core stabilizers |
| Equipment | Suspension trainer / suspension straps with anchor point |
| Difficulty | Beginner to Intermediate (depends on body angle and control) |
Sets & Reps (By Goal)
- Muscle growth: 3–4 sets × 8–15 reps, 60–90 sec rest
- Strength-focused control: 4–5 sets × 5–8 reps, 90–120 sec rest
- General fitness: 2–4 sets × 10–15 reps, 45–75 sec rest
- Beginner technique practice: 2–3 sets × 6–10 reps with a more upright body angle
Progression rule: First increase rep quality and range of motion, then lean farther back to raise resistance. You can also slow the lowering phase to make each rep more demanding without changing the setup.
Setup / Starting Position
- Anchor the straps securely: Set the suspension trainer to about mid-length and confirm the anchor point is stable.
- Grab the handles: Use a neutral grip with palms facing each other and wrists straight.
- Walk your feet forward: Lean your body backward until the straps are taut and your body angle matches your strength level.
- Lock in full-body tension: Brace the core, squeeze the glutes, and keep your body in a straight line from head to heels.
- Start with arms extended: Elbows nearly straight, shoulders packed down, chest open, and eyes forward.
Tip: The more horizontal your body becomes, the harder the exercise gets. Beginners should start more upright and progress gradually.
Execution (Step-by-Step)
- Begin from a rigid body line: Keep the hips from sagging and avoid shrugging the shoulders.
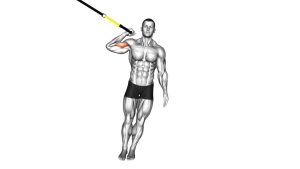
- Flex at the elbows: Curl your body toward the handles by bending the elbows and bringing the handles toward your forehead or temples.
- Keep upper arms controlled: Let the elbows stay pointed forward and avoid turning it into a row.
- Squeeze at the top: Pause briefly when the biceps are fully contracted without losing body alignment.
- Lower with control: Extend the elbows slowly until the arms are straight again, maintaining tension through the straps.
- Repeat smoothly: Use a steady tempo and keep every rep clean instead of swinging for momentum.
Pro Tips & Common Mistakes
- Keep the body stiff: Think of the torso as a plank moving through space.
- Lead with the elbows: This is a curl, not a row. Avoid pulling with the upper back.
- Use full extension: Straighten the arms at the bottom for a complete range of motion.
- Don’t over-bend the wrists: Neutral wrists keep tension on the biceps and reduce strain.
- Control the eccentric: The lowering phase is where a lot of muscle-building stimulus happens.
- Adjust difficulty intelligently: Step backward to make it easier and walk forward to make it harder.
- Avoid shoulder shrugging: Keep the neck relaxed and shoulders away from the ears.
FAQ
What muscles does the Suspension Arm Curl work?
The main target is the biceps brachii. It also trains the brachialis, brachioradialis, forearms, and core stabilizers because your body must stay rigid while you curl.
How do I make Suspension Arm Curls harder?
Walk your feet farther forward so your body becomes more horizontal, slow the lowering phase, or add a pause at peak contraction. Each of these increases the challenge without changing equipment.
Is this better than dumbbell curls?
It is not automatically better, but it is different. Suspension Arm Curls combine direct arm work with bodyweight control and stability, while dumbbell curls usually allow more isolated loading.
Should I feel this in my forearms too?
Yes. The grip and strap control create noticeable forearm involvement, especially if you keep your wrists neutral and maintain tension throughout the full rep.
Can beginners do Suspension Arm Curls?
Yes. Start with a more upright angle and focus on clean reps. As strength improves, increase the lean gradually instead of rushing into a steeper position.
Recommended Equipment
- Suspension Trainer Straps — the main tool for performing Suspension Arm Curls at home or in a gym
- Suspension Trainer Door Anchor — useful when you do not have a ceiling, beam, or rack anchor point
- Exercise Mat — adds comfort and grip under your feet during setup and training
- Resistance Bands Set — great for warm-ups, pump finishers, and extra biceps or shoulder work
- Grip Strength Trainer — helps improve handle control and forearm endurance for suspension training
Tip: Choose a stable anchor setup first. For suspension training, safety and strap quality matter more than collecting extra accessories.