Sideways Lifts Vertical Turn: Form, Core Benefits, Sets & Tips
Learn Sideways Lifts Vertical Turn with straight legs to train abs, obliques, and core control. Includes form steps, sets, mistakes, FAQs, and equipment.
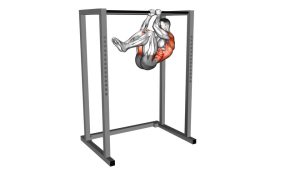
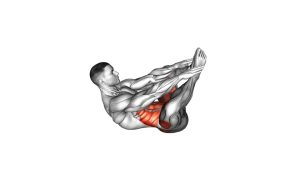
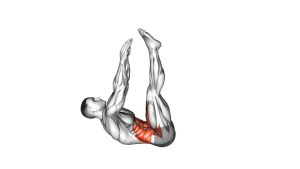
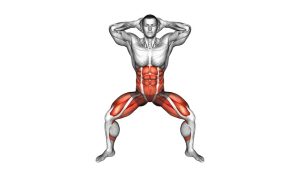
Sideways Lifts Vertical Turn (Straight Legs)
This exercise is best used when you already have enough core strength to hold both legs straight above your hips without arching your lower back. Because the legs stay long, the movement creates a strong lever against the core. As a result, even a small turn can feel intense. Keep the range short at first, especially if your lower back starts to lift or your hips begin to swing.
The Sideways Lifts Vertical Turn is not a traditional leg raise where the legs travel up and down. Instead, the legs remain mostly vertical while the pelvis performs a controlled rotational lift. This makes the movement especially useful for building oblique control, lower-ab stability, and anti-rotation strength.
Quick Overview
| Body Part | Core |
|---|---|
| Primary Muscle | Rectus abdominis and obliques |
| Secondary Muscle | Deep core stabilizers, hip flexors, transverse abdominis |
| Equipment | No equipment required; optional exercise mat |
| Difficulty | Intermediate; advanced if performed with slow tempo and strict straight legs |
Sets & Reps (By Goal)
- Core control: 2–3 sets × 6–8 turns per side with a slow, steady tempo.
- Oblique strength: 3–4 sets × 8–10 turns per side, resting 45–75 seconds between sets.
- Lower-ab endurance: 2–3 sets × 10–14 total controlled turns while keeping the lower back stable.
- Beginner progression: 2 sets × 4–6 turns per side with slightly bent knees and a shorter range.
- Advanced control: 3 sets × 8–12 turns per side with a 1–2 second pause at each rotated position.
Progression rule: Increase control before increasing range. Add reps only when your legs stay together, your shoulders remain flat, and your lower back does not arch away from the floor.
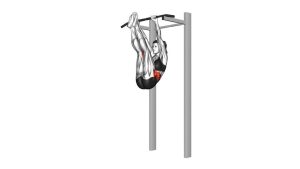
Setup / Starting Position
- Lie on your back: Start on a flat surface with your head, upper back, and hips supported by the floor.
- Place your arms beside you: Keep both arms flat on the floor with your palms down. Use them as light support, not as the main driver of the movement.
- Raise both legs vertically: Extend your legs upward until they are close to a 90-degree angle from your hips. Keep your knees straight without locking them aggressively.
- Bring your legs together: Keep your thighs, knees, and ankles aligned so the movement stays clean and symmetrical.
- Brace your core: Gently press your lower back toward the floor. Avoid flaring your ribs or letting your pelvis tilt forward.
- Relax your neck and shoulders: Keep your head resting down. Your face, jaw, and upper traps should stay relaxed throughout the set.
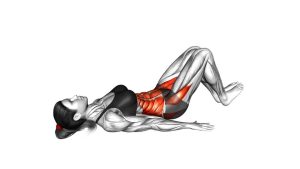
Execution (Step-by-Step)
- Start in a vertical hold: Keep both legs straight above your hips. Brace your abs and press your arms lightly into the floor for stability.
- Begin the sideways turn: Rotate your pelvis slightly to one side while keeping your legs long and together. The motion should come from the core, not from kicking or swinging.
- Lift through the obliques: As the hips turn, allow one side of the pelvis to lift slightly. Keep the movement small, controlled, and smooth.
- Pause briefly: Hold the rotated position for a moment. Keep your ribs down and avoid twisting your shoulders off the floor.
- Return to center: Use your abs to bring your legs and pelvis back to the vertical starting position. Do not let the legs drop or bounce.
- Repeat to the other side: Rotate in the opposite direction with the same range and speed. Keep each repetition even on both sides.
- Control the final rep: Finish by returning to the center position, then lower your legs carefully if the set is complete.
Pro Tips & Common Mistakes
Pro Tips
- Keep the range small: A short, controlled turn trains the obliques better than a large, sloppy swing.
- Use the floor for feedback: Your shoulders should stay grounded. If they lift, the rotation is too aggressive.
- Move slowly: Use a 2–3 second turn, a short pause, and a 2–3 second return to center.
- Keep your legs stacked: The knees and ankles should move together as one unit.
- Breathe with control: Exhale during the turn and inhale as you return to center.
- Shorten the lever if needed: Slightly bend the knees to make the exercise easier without losing the core pattern.
Common Mistakes
- Swinging the legs: Momentum reduces core tension and increases stress on the lower back.
- Arching the lower back: This usually means the legs are too heavy for your current control level.
- Turning too far: Large rotation can pull the spine out of position and shift tension away from the target muscles.
- Pushing too hard with the arms: Your arms should stabilize, not perform the repetition.
- Bending and straightening the knees: Keep the legs consistent so the core controls the movement.
- Holding your breath: Breath-holding often creates unnecessary pressure and makes the movement harder to control.
FAQ
What muscles does the Sideways Lifts Vertical Turn work?
The exercise mainly works the rectus abdominis and obliques. The deep core stabilizers also work hard to keep the pelvis controlled while the legs remain elevated.
Is this exercise good for lower abs?
Yes. The vertical leg position challenges the lower-ab region because your core must prevent the pelvis from tipping forward. However, the obliques also play a major role during the side-to-side turn.
Should my legs stay completely straight?
Ideally, yes. Straight legs create the full version of the movement. If your lower back arches or your hips swing, bend your knees slightly until your control improves.
How far should I rotate my legs?
Keep the rotation small to moderate. You only need enough movement to feel the obliques working. If your shoulders lift or your back twists too much, reduce the range.
Can beginners do this exercise?
Beginners can use a modified version with bent knees and a smaller turn. The straight-leg version is better for people who already have solid basic core control.
Why do I feel this in my hip flexors?
Some hip flexor activity is normal because your legs are elevated. Still, your abs should be the main stabilizer. If the hip flexors dominate, reduce the range, bend the knees, or rest longer between sets.
Can this exercise hurt my lower back?
It can irritate the lower back if performed with too much range, poor bracing, or uncontrolled swinging. Keep the lower back stable, move slowly, and stop if you feel pain instead of muscular effort.
Recommended Equipment
- Exercise Mat — provides comfort and support for your back during floor-based core exercises.
- Thick Yoga Mat — useful if you need extra cushioning for your spine, hips, or tailbone.
- Adjustable Ankle Weights — optional advanced progression once you can control the movement without back arching.
- Pilates Ring — can be placed lightly between the legs to improve inner-thigh engagement and leg alignment.
- Core Sliders — useful for pairing this exercise with other core stability drills and controlled floor movements.
Choose equipment that improves comfort and control. Do not add ankle weights until your bodyweight reps are slow, stable, and pain-free.