Long-Arm Crunch: Proper Form, Abs Benefits, Sets, Tips & FAQ
Learn the Long-Arm Crunch for stronger abs with clear form cues, sets by goal, setup tips, common mistakes, FAQs, and home equipment.
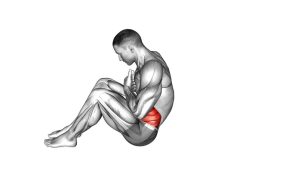
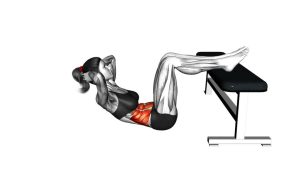
Long-Arm Crunch
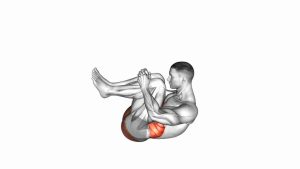
This exercise works best when each repetition is slow, compact, and deliberate. Because the arms remain long and vertical, the upper abs must create the lift without swinging momentum. Therefore, focus on curling the shoulders off the floor, pausing briefly, and lowering with control. The goal is not to sit all the way up; instead, it is to create a clean abdominal crunch while keeping the lower body quiet.
Quick Overview
| Body Part | Abs |
|---|---|
| Primary Muscle | Rectus abdominis |
| Secondary Muscle | Deep core stabilizers, obliques, and hip flexors lightly for position support |
| Equipment | None; optional exercise mat for comfort |
| Difficulty | Beginner to intermediate, depending on tempo and control |
Sets & Reps (By Goal)
- Beginner core control: 2–3 sets × 8–12 reps with a slow, clean lift.
- Ab endurance: 3–4 sets × 12–20 reps while keeping the arms steady.
- Muscle activation warm-up: 1–2 sets × 10–15 reps before a larger core workout.
- Tempo-focused strength: 3 sets × 8–10 reps with a 2-second lift and 3-second lowering phase.
Progression rule: First improve your control and pause at the top. After that, add reps, slow the lowering phase, or extend the set length without using momentum.
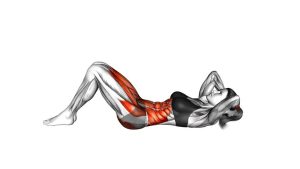
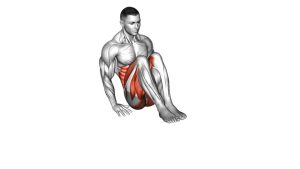
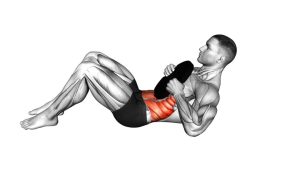
Setup / Starting Position
- Lie on your back: Start supine on the floor with your knees bent and feet flat.
- Set the arms: Extend both arms straight upward so your hands are above your chest.
- Keep the lower body still: Let the feet stay planted and avoid rocking through the hips.
- Prepare the neck: Keep the head relaxed and avoid pulling it forward aggressively.
- Brace gently: Exhale slightly and tighten the abs before lifting your shoulders.
The starting position should feel stable. If your neck tenses before the first rep, reduce the effort and focus on lifting from the ribs and upper abs.
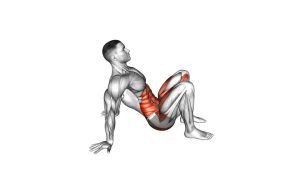
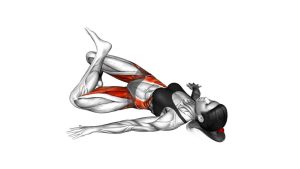
Execution (Step-by-Step)
- Start flat: Keep your head, shoulders, and upper back on the floor while the arms point upward.
- Exhale and curl: Lift the head and shoulders by contracting the abs, not by swinging the arms.
- Keep the arms long: Maintain the arms in a vertical position as the upper body rises.
- Pause briefly: Stop at the top when the shoulder blades are lifted and the abs are contracted.
- Lower under control: Return the upper back, shoulders, and head to the floor without dropping quickly.
- Reset fully: Re-establish the starting position before beginning the next repetition.
Pro Tips & Common Mistakes
- Keep the arms steady: The arms should stay extended upward instead of swinging forward for momentum.
- Use a short range: Lift the shoulder blades, then stop before the movement becomes a sit-up.
- Exhale as you lift: This helps the abs contract more strongly and reduces unnecessary neck tension.
- Lower slowly: The descent matters because it keeps the core working through the full rep.
- Avoid neck pulling: Since the hands are not behind the head, let the abs create the lift.
- Do not rush: Fast reps often turn into momentum. Instead, move smoothly and reset each time.
- Keep the feet grounded: If the feet lift or slide, the range is likely too large.
FAQ
What muscles does the Long-Arm Crunch work?
The Long-Arm Crunch mainly trains the rectus abdominis, especially through the upper-crunching motion. Additionally, the deep core muscles help stabilize the trunk while the arms stay extended.
Is the Long-Arm Crunch good for beginners?
Yes. It can be beginner-friendly because it uses body weight and a short range of motion. However, beginners should move slowly and avoid lifting too high.
Should my arms move during the exercise?
No. Based on the visible movement, the arms stay extended upward and do not swing. This keeps the focus on the abs rather than using momentum.
How high should I lift during a Long-Arm Crunch?
Lift only until your head, shoulders, and shoulder blades come slightly off the floor. The movement should remain compact, controlled, and clearly different from a full sit-up.
Why does my neck feel tired during crunches?
Neck fatigue usually happens when you lead with the head instead of curling from the ribs and abs. To fix it, slow down, exhale as you lift, and keep the range smaller.
Recommended Equipment (Optional)
- Exercise Mat — adds comfort for the spine, shoulders, and hips during floor crunches.
- Thick Yoga Mat — useful if you need extra cushioning on hard floors.
- Ab Mat — supports comfortable floor-based core training and controlled crunch variations.
- Non-Slip Workout Mat — helps keep your body stable while your knees stay bent and feet remain planted.
- Core Sliders — optional tool for progressing into other controlled core exercises after mastering crunch form.
Choose equipment that improves comfort and control. However, the Long-Arm Crunch itself does not require equipment, so clean technique should always come first.