Supported Side Plank Rotation: Core Form, Sets, Tips & FAQ
Learn the Supported Side Plank Rotation to train obliques, core stability, and shoulder control with elevated support. Includes form, sets, tips, FAQ, and gear.
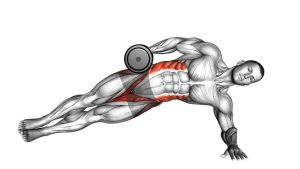
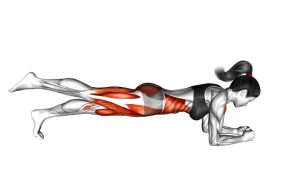
Supported Side Plank Rotation on a Padded Stool
This exercise works best when the rotation stays smooth and the body does not collapse. First, the forearm creates a stable base on the padded stool. Then, the top arm opens upward as the chest rotates away from the floor. Finally, the torso returns toward the starting position with steady control. As a result, the movement trains the obliques, shoulder stabilizers, and deep core muscles together.
Quick Overview
| Body Part | Core |
|---|---|
| Primary Muscle | Obliques |
| Secondary Muscle | Transverse abdominis, rectus abdominis, shoulders, serratus anterior, glutes, spinal stabilizers |
| Equipment | Padded stool, padded box, or stable elevated bench |
| Difficulty | Beginner to Intermediate |
Sets & Reps (By Goal)
- Technique practice: 2–3 sets × 5–8 reps per side, using slow and controlled motion.
- Core stability: 3–4 sets × 8–12 reps per side, resting 45–75 seconds between sets.
- Oblique endurance: 2–3 sets × 10–15 reps per side, keeping the hips lifted throughout.
- Warm-up activation: 1–2 sets × 5–6 reps per side before rotational or core training.
Progression rule: Add reps only when your hips stay high and your rotation stays controlled. After that, progress by lowering the support height or slowing the tempo.
Setup / Starting Position
- Place the support: Set a padded stool, box, or bench on a stable surface so it does not move.
- Position the bottom forearm: Place your forearm on the padded surface with the elbow under or slightly below the shoulder line.
- Extend the legs: Straighten the legs and stack the feet, or use a slightly staggered stance if you need more balance.
- Lift the hips: Create a straight line from your head through your hips to your feet.
- Set the top arm: Keep the top arm ready to rotate upward while the torso stays braced.
Tip: Before rotating, pause for one breath and confirm that the hips are lifted, the shoulder is stable, and the support feels secure.
Execution (Step-by-Step)
- Brace first: Tighten the core gently and keep your body long from head to feet.
- Open the chest: Rotate the torso upward while the top arm reaches toward the ceiling.
- Control the peak: Pause briefly when the chest is open and the top arm is near vertical.
- Return slowly: Rotate the chest back toward the starting position without dropping the hips.
- Repeat with rhythm: Continue each rep using a smooth open-and-close pattern.
Pro Tips & Common Mistakes
- Keep the support stable: A moving stool or slippery surface makes the exercise unsafe and reduces control.
- Avoid hip sagging: If the hips drop, shorten the set or use a higher support.
- Rotate with control: Do not swing the top arm quickly just to create momentum.
- Stack the shoulder carefully: Keep the bottom shoulder strong without shrugging it toward the ear.
- Use a smaller range if needed: A clean partial rotation is better than a large unstable twist.
- Breathe through the rep: Exhale as you rotate, then inhale as you return to the starting position.
- Train both sides evenly: Since this is a unilateral core drill, match reps and quality on each side.
FAQ
What muscles does the Supported Side Plank Rotation work?
It mainly works the obliques. Additionally, it trains the transverse abdominis, shoulders, serratus anterior, glutes, and spinal stabilizers because the body must resist collapsing while rotating.
Is this easier than a regular side plank rotation?
Yes. Since the forearm is elevated on a padded stool or box, the body angle reduces the load. Therefore, it can be a useful variation for learning side plank rotation before moving to the floor.
Should my hips move during the rotation?
The hips may shift slightly as you balance, but they should not drop or twist aggressively. Instead, keep them lifted while the chest rotates open and returns with control.
Can beginners do this exercise?
Many beginners can use this variation because the elevated support makes the side plank easier. However, beginners should start with fewer reps and focus on stable alignment before increasing volume.
What should I do if my shoulder feels uncomfortable?
Stop the set and check your support height, elbow position, and shoulder control. Also, reduce the range of rotation. If discomfort continues, choose a simpler side plank variation.
Recommended Equipment
- Padded Workout Bench — provides a stable elevated surface for supported plank variations.
- Soft Plyometric Box — useful for elevated forearm support and beginner-friendly core drills.
- Thick Exercise Mat — helps protect the knees, feet, and floor during core training.
- Non-Slip Workout Mat — improves traction so the feet and support area stay more secure.
- Core Sliders — useful for adding controlled core variations once basic stability improves.
Tip: Choose equipment that feels stable, supportive, and non-slip. For this movement, control matters more than using a difficult setup.