Lying Knee Tuck: Proper Form, Core Benefits, Sets, Tips & FAQ
Learn the Lying Knee Tuck for stronger abs and better core control. Includes form steps, sets by goal, common mistakes, FAQs, and equipment tips.
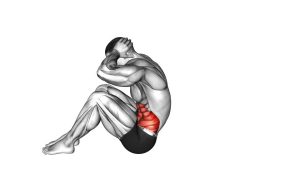
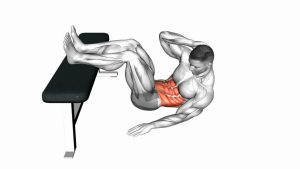
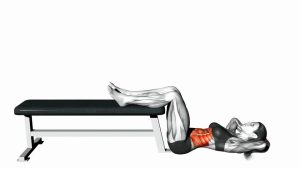
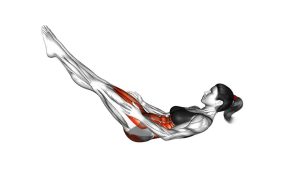
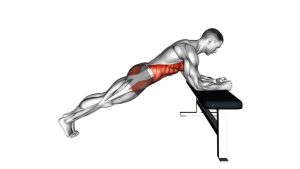
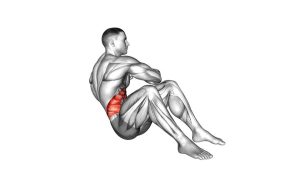
Lying Knee Tuck
This exercise works best when each repetition looks controlled from start to finish. First, the legs extend away from the body while hovering close to the floor. Then, the knees bend and travel toward the chest. At the top, the hips may curl slightly as the abdominals contract. Finally, the legs extend again without dropping heavily or losing control.
Because the Lying Knee Tuck is performed on the floor, it is easy to practice at home, in the gym, or during a bodyweight core session. However, the exercise still requires good control. Therefore, beginners should start with a smaller range of motion and only extend the legs as far as they can without arching the lower back.
Quick Overview
| Body Part | Abs |
|---|---|
| Primary Muscle | Rectus abdominis |
| Secondary Muscle | Hip flexors, transverse abdominis, obliques, deep core stabilizers |
| Equipment | No equipment required; optional exercise mat for comfort |
| Difficulty | Beginner to intermediate, depending on leg extension range and tempo |
Sets & Reps (By Goal)
- Beginner core control: 2–3 sets × 8–10 reps with a short range of motion and slow tempo.
- Abdominal endurance: 3–4 sets × 12–18 reps with steady breathing and minimal rest.
- Core strength: 3–5 sets × 8–12 reps using a slower lowering phase and a strong top contraction.
- Home workout finisher: 2–3 rounds × 20–30 seconds of continuous controlled reps.
- Warm-up activation: 1–2 sets × 8–12 reps before leg raises, planks, or other ab exercises.
Progression rule: Increase control before increasing reps. Once your lower back stays stable and your legs return smoothly, extend the legs slightly farther away from your torso or slow down the lowering phase.
Setup / Starting Position
- Lie on your back: Start flat on the floor with your head, upper back, and hips supported.
- Place your arms for support: Keep your arms beside your body and press them lightly into the floor for balance.
- Set your core: Brace your midsection gently and keep your ribs from flaring upward.
- Position your legs: Extend your legs outward so they hover slightly above the floor, or keep them a little higher if your lower back needs more support.
- Keep your neck relaxed: Let your head stay down and avoid pulling the chin aggressively toward the chest.
Tip: If your lower back arches during the start position, bend your knees more or begin with your legs higher. This adjustment makes the exercise easier to control.
Execution (Step-by-Step)
- Begin from the extended position: Keep your legs hovering and your torso steady on the floor.
- Draw the knees inward: Bend your knees and bring them toward your chest in a smooth, controlled motion.
- Contract at the top: Allow a small hip curl if it happens naturally, but avoid using momentum to yank the legs in.
- Pause briefly: Hold the tucked position for a moment while keeping your abs engaged.
- Extend with control: Slowly move your legs away from your torso until they return to the starting position.
- Repeat smoothly: Continue the cycle without dropping the feet, swinging the legs, or relaxing the core between reps.
Pro Tips & Common Mistakes
- Control the extension: The return phase is where many people lose tension. Therefore, extend slowly instead of letting the legs fall.
- Avoid lower-back arching: If your back lifts away from the floor, reduce the range of motion immediately.
- Do not swing the knees: Momentum reduces core tension and makes the exercise less effective.
- Keep the upper body grounded: Your head, shoulders, and upper back should stay calm unless you are intentionally using a harder variation.
- Use your arms lightly: Your hands can help stabilize you, but they should not push so hard that they replace core control.
- Breathe steadily: Exhale as the knees tuck in, then inhale as the legs extend with control.
- Keep reps consistent: Each repetition should follow the same path, range, and tempo.
- Modify when needed: If the full version feels too hard, keep the knees bent throughout the exercise and use a smaller leg extension.
FAQ
What muscles does the Lying Knee Tuck work?
The Lying Knee Tuck mainly trains the rectus abdominis, especially through the knee-to-chest motion and controlled leg extension. In addition, the hip flexors, transverse abdominis, and obliques help stabilize the pelvis and trunk.
Is the Lying Knee Tuck good for beginners?
Yes, it can be beginner-friendly when performed with a short range of motion. However, beginners should avoid extending the legs too low if that causes the lower back to arch.
Should my feet touch the floor between reps?
They do not need to touch the floor. In fact, keeping the feet hovering can maintain more abdominal tension. However, if you are still learning the movement, lightly touching down between reps can help you reset.
Why do I feel this exercise in my hip flexors?
Some hip flexor involvement is normal because the knees move toward the torso. Nevertheless, your abs should still control the pelvis and lower back. If the hip flexors dominate, slow down, bend the knees more, and reduce the leg extension range.
How can I make the Lying Knee Tuck harder?
You can make it harder by extending the legs farther from the body, slowing the lowering phase, pausing longer at the top, or keeping the feet hovering throughout the full set. However, only progress when your lower back stays controlled.
Recommended Equipment (Optional)
- Exercise Mat — adds comfort for your spine, hips, and shoulders during floor-based core exercises.
- Thick Yoga Mat — useful if you need extra cushioning while lying on a hard surface.
- Adjustable Ankle Weights — an advanced option for increasing resistance once bodyweight reps are easy.
- Mini Resistance Bands — helpful for adding light hip and core activation to related floor exercises.
- Core Sliders — useful for progressing into sliding knee tucks and other dynamic core variations.
Tip: The Lying Knee Tuck does not require equipment. Still, a supportive mat can make the exercise more comfortable and help you stay consistent with your core training.