Rolling Plank: Core Rotation Exercise for Obliques, Stability & Control
Learn the Rolling Plank to build core strength, oblique control, shoulder stability, and full-body balance with proper form, sets, tips, and FAQs.
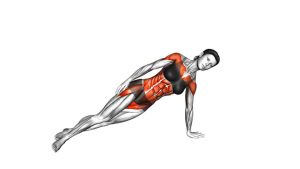
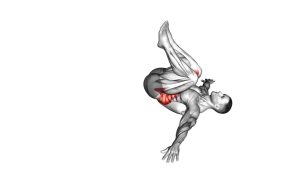
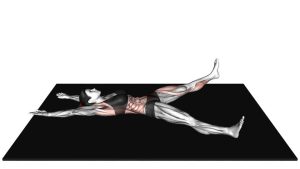
Rolling Plank
This exercise works best when every transition stays controlled. First, the body starts in a stable high plank. Then, the torso rotates into a side plank while the feet pivot naturally. After that, the body returns to center before rolling to the other side. As a result, the Rolling Plank builds rotational control, anti-rotation strength, and shoulder endurance in one simple movement pattern.
Quick Overview
| Body Part | Core |
|---|---|
| Primary Muscle | Obliques and rectus abdominis |
| Secondary Muscle | Transverse abdominis, shoulders, chest, glutes, hip stabilizers, and lower back stabilizers |
| Equipment | Bodyweight only; exercise mat optional |
| Difficulty | Intermediate because it requires plank strength, rotation control, and shoulder stability |
Sets & Reps (By Goal)
- Core control: 2–3 sets × 6–8 rolls per side with a slow, steady tempo.
- Oblique strength: 3–4 sets × 8–12 rolls per side with a brief side-plank pause.
- Core endurance: 2–3 sets × 30–45 seconds while keeping every rotation clean.
- Warm-up activation: 1–2 sets × 5–6 rolls per side at an easy effort.
Progression rule: Add reps before adding speed. Once your hips stay lifted and your shoulders remain stacked, increase the side-plank hold by 1–2 seconds.
Setup / Starting Position
- Start in a high plank: Place your hands under your shoulders and extend both legs behind you.
- Set your feet: Keep the feet slightly wider than hip-width so the rotation feels stable.
- Brace your core: Pull the ribs down slightly and keep the pelvis from sagging toward the floor.
- Lengthen the body: Maintain a straight line from head to heels before you begin moving.
- Look down: Keep the neck neutral rather than lifting the chin forward.
Tip: A wider foot position usually makes the exercise easier. A narrower foot position increases the balance challenge.
Execution (Step-by-Step)
- Begin in high plank: Press the floor away with both hands and keep your shoulders active.
- Rotate to one side: Shift your weight into one hand while turning your chest and hips sideways.
- Pivot the feet: Let the feet rotate naturally so the side-plank position feels controlled.
- Stack the body: Align the top shoulder over the bottom shoulder and keep the hips lifted.
- Pause briefly: Hold the side plank for a moment without letting the waist drop.
- Return to center: Lower the top side back toward the floor and place both hands in high plank again.
- Switch sides: Rotate to the opposite side with the same slow and controlled motion.
- Repeat evenly: Continue alternating sides while keeping each roll smooth and balanced.
Pro Tips & Common Mistakes
- Move slowly first: Controlled rotation builds better core strength than fast, loose rolling.
- Keep the hips high: Dropping the hips reduces oblique tension and can stress the lower back.
- Stack the shoulders: In the side plank, keep the top shoulder directly above the bottom shoulder.
- Do not over-arch: Brace the abs so the lower back does not dip during the center plank.
- Use your feet wisely: Pivot through the feet instead of twisting the knees aggressively.
- Control the landing: When returning to high plank, place the hand down softly and reset before switching sides.
- Breathe through the movement: Exhale as you rotate, then inhale as you stabilize.
FAQ
What muscles does the Rolling Plank work?
The Rolling Plank mainly works the obliques, rectus abdominis, and deeper core stabilizers. It also challenges the shoulders, chest, glutes, hips, and lower back stabilizers because the body must stay aligned while rotating.
Is the Rolling Plank good for obliques?
Yes. Because the movement rotates from high plank to side plank, the obliques must control the turn and hold the side position. Therefore, it is a strong choice for rotational core training and side-waist stability.
Is this exercise beginner-friendly?
It is better for late beginners or intermediate trainees. If a full high plank or side plank feels too difficult, start with regular planks, knee side planks, or shorter ranges before using the full Rolling Plank.
Why do my hips drop during the Rolling Plank?
Hip dropping usually happens when the obliques, glutes, or shoulder stabilizers fatigue. To fix it, widen your feet, slow the rotation, and pause only as long as you can keep the waist lifted.
Should I do Rolling Planks fast or slow?
Slow is usually better. A controlled pace helps you feel the core working, protect the shoulders, and keep the side-plank position clean. Speed should only increase after your form stays stable.
Recommended Equipment
- Thick Exercise Mat — adds wrist, hand, and floor comfort during plank transitions.
- Non-Slip Yoga Mat — helps prevent the hands and feet from sliding during rotation.
- Push-Up Handles — optional tool for users who need a more neutral wrist position.
- Core Sliders — useful for advanced plank variations and controlled core training.
- Resistance Bands Set — helpful for pairing Rolling Planks with shoulder stability and upper-back work.
Tip: Equipment is optional for this exercise. However, a non-slip surface can make the rotation safer and more controlled.