Air Bike on a Chair: Seated Core Exercise for Abs & Obliques
Learn Air Bike on a Chair for seated abs, obliques, and hip-flexor control. Includes form, sets, tips, mistakes, FAQs, and equipment.
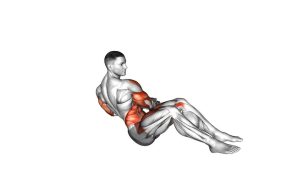
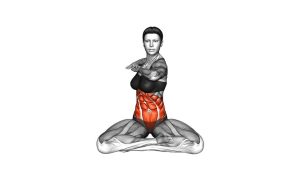
Air Bike on a Chair
This exercise is useful for beginners, home workouts, desk-break routines, and anyone who wants a chair-based core drill. Because the movement uses rotation and knee lifting together, it improves abdominal control, coordination, and seated trunk stability. Additionally, it can be performed without floor space, which makes it practical for small rooms, office workouts, and low-impact training sessions.
Quick Overview
| Body Part | Core |
|---|---|
| Primary Muscle | Rectus abdominis and obliques |
| Secondary Muscle | Hip flexors, transverse abdominis, spinal stabilizers |
| Equipment | Chair |
| Difficulty | Beginner to Intermediate |
Sets & Reps (By Goal)
- Beginner core activation: 2–3 sets × 8–10 reps per side, resting 45–60 seconds between sets.
- General core endurance: 3–4 sets × 12–16 total alternating reps, using a smooth and steady tempo.
- Oblique control: 3 sets × 8–12 reps per side with a short pause at the top of each rotation.
- Low-impact conditioning: 2–4 rounds × 30–45 seconds, keeping the torso tall and the breathing consistent.
Progression rule: First, increase control and range of motion. After that, add reps or time. However, do not speed up the exercise if your posture starts to collapse.
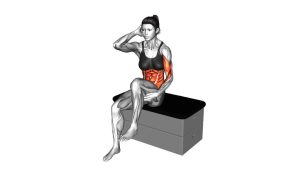
Setup / Starting Position
- Choose a stable chair: Sit on a firm chair that does not roll or slide.
- Sit near the front edge: Keep enough space behind your back so your torso can rotate freely.
- Place your feet flat: Start with both feet on the floor, roughly hip-width apart.
- Set your upper body: Lift your chest, lengthen your spine, and lightly brace your core.
- Position your hands: Place your fingertips behind your head with elbows open, but avoid pulling the head forward.
Tip: A taller seated posture helps the abs and obliques work more effectively. Therefore, avoid slouching before you begin.
Execution (Step-by-Step)
- Brace gently: Tighten your core as if preparing for a light cough while keeping your breathing relaxed.
- Lift one knee: Raise one knee toward your torso without leaning backward excessively.
- Rotate across: Turn your torso so the opposite elbow moves toward the lifted knee.
- Pause briefly: Hold the top position for a moment and feel the obliques contract.
- Return to center: Lower the foot back to the floor while bringing your torso upright again.
- Switch sides: Repeat the same pattern with the opposite knee and opposite elbow.
- Continue alternating: Move side to side with control, rhythm, and steady breathing.
Pro Tips & Common Mistakes
Pro Tips
- Rotate from the ribs: Turn your upper body instead of only moving your elbow.
- Keep the chest lifted: This improves core engagement and reduces lower-back rounding.
- Use a controlled tempo: Move smoothly rather than bouncing through each repetition.
- Exhale as you rotate: This helps the abs contract more naturally.
- Keep the neck relaxed: Let your hands support the head lightly without pulling.
Common Mistakes
- Pulling the head forward: This can create neck strain and reduce core focus.
- Leaning too far back: This shifts tension away from the abs and may stress the lower back.
- Rushing the reps: Fast movement often reduces oblique activation and control.
- Lifting the knee without rotating: This turns the drill into mostly hip-flexor work.
- Using an unstable chair: A moving chair makes the exercise less safe and less effective.
FAQ
What muscles does Air Bike on a Chair work?
Air Bike on a Chair mainly works the abs and obliques. Additionally, the hip flexors help lift the knees, while the deep core muscles support posture and balance.
Is Air Bike on a Chair good for beginners?
Yes. This exercise is beginner-friendly because it is seated and low impact. However, beginners should move slowly, use a small range of motion, and focus on clean opposite elbow-to-knee coordination.
Should my elbow touch my knee?
Not necessarily. Touching is not required. Instead, aim to rotate your torso toward the lifted knee while keeping the spine controlled and the neck relaxed.
Can I do this exercise every day?
You can perform it frequently at a low to moderate effort. Still, if your hip flexors or lower back feel irritated, reduce the volume and allow more recovery between sessions.
How can I make Air Bike on a Chair harder?
To make it harder, slow down each rep, pause at the top, increase total reps, or slightly lift the foot higher. However, only progress when your posture remains stable.
Recommended Equipment
- Stable Workout Chair — provides a firm base for seated core exercises.
- Non-Slip Exercise Mat — helps keep the chair and feet more secure during movement.
- Light Ankle Weights — optional progression for stronger hip-flexor and core demand.
- Mini Resistance Bands — useful for seated warm-ups and lower-body activation work.
- Fitness Interval Timer — helps track timed chair core circuits and rest periods.
Tip: Start with only a chair. Then, add tools gradually if your form stays clean and your lower back remains comfortable.