Resistance Band Standing Leg Curl: Form, Sets, Tips & FAQ
Learn the Resistance Band Standing Leg Curl to strengthen hamstrings with controlled knee flexion, proper setup, sets, tips, FAQs, and equipment.
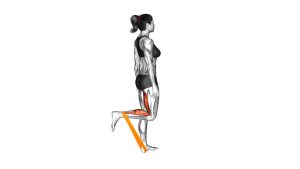
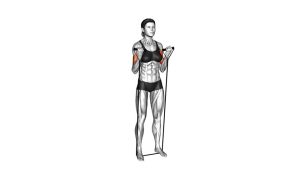
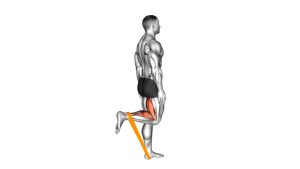
Resistance Band Standing Leg Curl
This movement works best when the rep is performed with strict control, not momentum. The band should be anchored low behind the working leg, and the athlete should hold a stable support for balance. As the heel travels upward, the hamstrings contract to bend the knee while the hips, torso, and supporting leg stay steady.
Quick Overview
| Body Part | Hamstrings |
|---|---|
| Primary Muscle | Hamstrings — biceps femoris, semitendinosus, semimembranosus |
| Secondary Muscle | Glutes, calves, core stabilizers, supporting leg muscles |
| Equipment | Resistance band, low anchor point, optional ankle strap, stable support for balance |
| Difficulty | Beginner to Intermediate |
Sets & Reps (By Goal)
- Hamstring activation: 2–3 sets × 12–15 reps per leg with light-to-moderate band tension.
- Muscle growth: 3–4 sets × 10–15 reps per leg with a controlled 2–3 second lowering phase.
- Strength endurance: 3–5 sets × 15–20 reps per leg using smooth, repeatable form.
- Warm-up or rehab-style control: 2–3 sets × 8–12 reps per leg with a slow tempo and short top hold.
Progression rule: First improve control, top-position squeeze, and eccentric tempo. Then increase band resistance or move farther from the anchor to create more tension.
Setup / Starting Position
- Anchor the band low: Secure the resistance band near floor level behind the working leg.
- Attach the band: Loop the band around the ankle or connect it to an ankle strap for a cleaner pull.
- Stand tall: Face a stable support such as a rack, wall bar, chair, or post.
- Hold for balance: Place both hands lightly on the support without pulling your body forward.
- Set the working leg: Keep the working thigh close to vertical and the knee pointing down toward the floor.
- Brace lightly: Keep the ribs stacked, core engaged, shoulders relaxed, and hips square.
The band should already have light tension at the start. If the band is loose at the bottom, step slightly farther forward until you feel a gentle pull.
Execution (Step-by-Step)
- Start from control: Stand tall with the working leg extended and the band pulling from behind.
- Curl the heel upward: Bend the knee and bring the heel toward the glutes without swinging the thigh.
- Keep the hips still: Do not rotate the pelvis, lean excessively forward, or let the working hip drift backward.
- Squeeze at the top: Pause briefly when the knee is flexed and the hamstrings are fully contracted.
- Lower slowly: Extend the knee with control and resist the band as the foot returns toward the start position.
- Reset before the next rep: Regain balance, keep posture tall, and repeat with the same clean path.
Pro Tips & Common Mistakes
- Keep the knee pointing down: Avoid letting the knee flare outward or drift too far behind the body.
- Use a slow lowering phase: The eccentric portion builds control and keeps tension on the hamstrings.
- Do not kick the leg up: Momentum reduces hamstring isolation and makes the rep less effective.
- Control the hips: Keep both hip bones facing forward throughout the full repetition.
- Choose the right band: Use a band that allows full range without forcing compensation.
- Add a top hold: A 1–2 second squeeze at peak contraction improves hamstring awareness.
- Stay tall but relaxed: Hold the support lightly; do not turn the exercise into an upper-body brace.
- Train both sides evenly: Complete the same reps and tempo on each leg to reduce strength imbalance.
FAQ
What muscles does the Resistance Band Standing Leg Curl work?
It primarily works the hamstrings, especially the biceps femoris, semitendinosus, and semimembranosus. The glutes, calves, core, and standing leg also help stabilize the body.
Is the standing band leg curl good for beginners?
Yes. It is beginner-friendly when performed with a light band and a stable support. Beginners should focus on slow reps, balance, and keeping the thigh still.
Where should I feel this exercise?
You should feel the back of the thigh working as the heel curls toward the glutes. If you feel mostly lower back, hip flexor tension, or knee discomfort, reduce band resistance and improve setup.
Can I use this exercise instead of a machine leg curl?
It can be a useful home-friendly alternative. A machine leg curl may offer more stable loading, but the band version is excellent for activation, control, warm-ups, and high-rep hamstring work.
How can I make the Resistance Band Standing Leg Curl harder?
Use a stronger band, step farther from the anchor, slow down the lowering phase, add a 1–2 second top hold, or increase total reps while maintaining strict form.
Why does my hip move during the curl?
Hip movement usually means the band is too heavy, the rep is too fast, or the body is trying to create momentum. Reduce the resistance and focus on bending only at the knee.
Recommended Equipment
- Resistance Bands with Door Anchor — useful for setting a low anchor point at home.
- Ankle Straps for Resistance Bands — improves comfort and keeps the band secure around the ankle.
- Loop Resistance Bands Set — offers different resistance levels for progressive hamstring training.
- Portable Exercise Anchor Strap — helps secure the band safely to a stable low anchor.
- Non-Slip Exercise Mat — improves foot grip and balance during standing band exercises.
Tip: Choose equipment that allows stable anchoring and smooth band tension. A secure setup makes the exercise safer and improves hamstring isolation.