Sliding Floor Bridge Curl on Towel: Form, Benefits, Sets, Tips & FAQ
Learn the Sliding Floor Bridge Curl on Towel to strengthen hamstrings and glutes with safe form, sets, tips, mistakes, FAQs, and equipment.
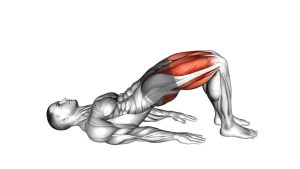
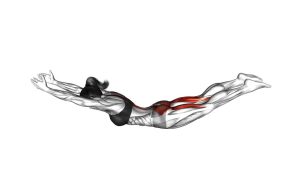
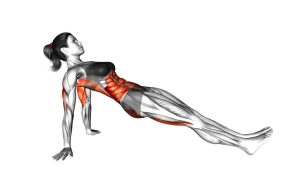
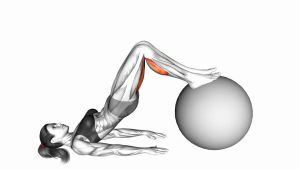
Sliding Floor Bridge Curl on Towel
This exercise is more challenging than a normal glute bridge because the hamstrings work through a moving range while the hips remain elevated. The goal is to pull the heels in smoothly, keep the pelvis stable, and slide the legs back out with control. A slow eccentric phase is especially valuable because the hamstrings must resist the legs extending away from the body.
Quick Overview
| Body Part | Hamstrings |
|---|---|
| Primary Muscle | Hamstrings |
| Secondary Muscle | Glutes, calves, core, hip stabilizers |
| Equipment | Towel, sliders, smooth floor, or slide discs |
| Difficulty | Intermediate |
Sets & Reps (By Goal)
- Beginner control: 2–3 sets × 5–8 reps with short range and slow tempo.
- Hamstring strength: 3–4 sets × 6–10 reps with a strong bridge position.
- Muscle growth: 3–4 sets × 8–12 reps using a controlled 2–3 second slide-out.
- Eccentric focus: 3 sets × 5–8 reps with a 4–5 second return phase.
- Posterior-chain finisher: 2–3 sets × 10–15 controlled reps near the end of a leg workout.
Progression rule: First improve control and hip height. Then increase reps, slow the eccentric, or progress from bent-knee partial reps to longer-range full reps.
Setup / Starting Position
- Choose the right surface: Use a smooth floor where a towel or sliders can move easily.
- Lie on your back: Place your arms on the floor beside your body for balance.
- Set your heels: Put both heels on the towel or sliders with feet about hip-width apart.
- Brace gently: Keep your ribs down and core lightly engaged before lifting your hips.
- Bridge up: Squeeze your glutes and lift your hips until your body forms a strong line from shoulders to knees or heels.
- Start long: Begin with the legs extended or nearly extended, depending on your strength level.
If the full long-leg start is too hard, begin with the heels closer to your body and use a shorter sliding range.
Execution (Step-by-Step)
- Lift and lock the bridge: Drive through your heels and squeeze your glutes to raise your hips.
- Pull the heels in: Slide your heels toward your glutes by bending your knees and contracting your hamstrings.
- Keep the hips high: Do not let the pelvis drop as the heels come closer to your body.
- Pause briefly: Hold the top position for a moment when your knees are bent and hamstrings are contracted.
- Slide out slowly: Extend your legs by sliding the heels away from your body under control.
- Maintain tension: Keep your hips lifted as long as possible during the return.
- Reset with control: Stop the rep when your legs are nearly straight, then repeat without relaxing completely.
Pro Tips & Common Mistakes
- Keep your hips lifted: The bridge position is what makes this more effective than a simple floor curl.
- Control the slide-out: The eccentric return builds strong hamstrings, so do not rush it.
- Do not overarch your back: Keep the ribs down and pelvis controlled to avoid lumbar compensation.
- Use your heels, not your toes: Driving through the heels helps recruit the hamstrings more effectively.
- Avoid excessive speed: Fast reps reduce tension and increase the chance of losing control.
- Shorten the range if needed: Partial reps are useful if full-range reps make your hips collapse.
- Keep knees aligned: Do not let the knees cave inward or drift far apart during the curl.
- Progress slowly: This exercise can create strong hamstring soreness, especially when performed with a slow eccentric.
FAQ
What muscles does the Sliding Floor Bridge Curl on Towel work?
It mainly targets the hamstrings. The glutes work strongly to keep the hips elevated, while the core and hip stabilizers help control the pelvis.
Is this exercise good for hamstring strength?
Yes. It is especially useful because the hamstrings must curl the heels inward and control the legs as they slide back out. This makes it effective for strength, coordination, and eccentric hamstring development.
Why do my hips drop during the movement?
Hips usually drop because the hamstrings and glutes cannot maintain tension through the full range. Use a shorter range, perform fewer reps, or begin with the heels closer to your body.
Can beginners do this exercise?
Beginners can use a modified version. Start with partial reps, keep the slide short, and focus on holding the bridge. If it is still too hard, practice regular glute bridges first.
Should I feel this in my lower back?
No. You may feel your core working, but the main effort should be in the hamstrings and glutes. If your lower back takes over, reduce the range, lower the reps, and keep your ribs down.
Is a towel better than sliders?
A towel works well on smooth floors and is easy to use at home. Sliders or slide discs may feel smoother and more consistent, especially on gym flooring or carpet.
Recommended Equipment
- Exercise Sliders — ideal for smooth sliding hamstring curls and core exercises.
- Workout Towel — useful for towel-based floor curls on smooth surfaces.
- Non-Slip Yoga Mat — supports the upper back and shoulders during bridge work.
- Hamstring Curl Sliders — designed for controlled leg curl variations at home or in the gym.
- Resistance Bands Set — useful for warm-ups, glute activation, and posterior-chain accessory work.
Tip: Choose equipment that allows smooth sliding without forcing speed. The goal is controlled tension, not fast movement.