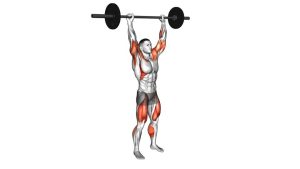
Kipping Handstand Push-Up: Form, Muscles Worked, Sets, Tips & FAQ
Learn how to do the Kipping Handstand Push-Up with proper form, setup, progressions, sets by goal, common mistakes, FAQs, and recommended equipment for safer wall-supported training.
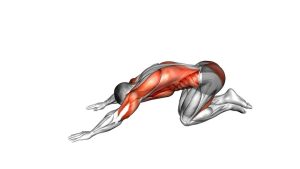
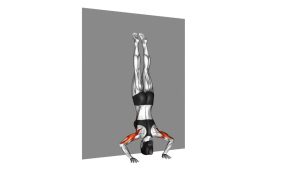
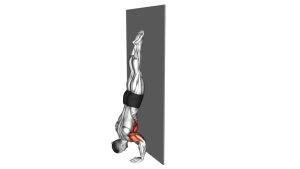
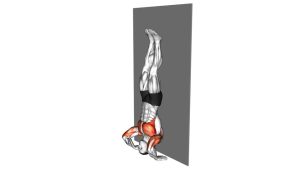
Kipping Handstand Push-Up
This movement is popular in high-level bodyweight training and CrossFit-style conditioning because it allows experienced trainees to perform more handstand push-up reps once they have developed the balance, shoulder tolerance, and positional awareness required for safe inverted pressing. The kip should assist the rep—not replace shoulder control. A clean rep still requires strong lockout mechanics, a braced midline, and good timing against the wall.
Quick Overview
| Body Part | Shoulders |
|---|---|
| Primary Muscle | Deltoids (especially front delts) and triceps |
| Secondary Muscle | Upper chest, traps, core, glutes, and hip flexors during the kip phase |
| Equipment | Bodyweight, wall, and optional ab mat or handstand push-up pad |
| Difficulty | Advanced |
Sets & Reps (By Goal)
- Skill practice: 3–5 sets × 2–5 reps with full rest and crisp technique
- Strength endurance: 3–5 sets × 4–8 reps with 90–150 sec rest
- Conditioning / metcon use: 2–4 rounds of low-to-moderate rep sets performed before form breaks down
- Progression work: 3–4 sets × 3–6 reps using reduced range or an ab mat target
Progression rule: Build consistency with strict wall handstand holds, pike presses, and controlled negatives first. Increase reps only when you can keep the descent controlled and the kip timed cleanly.
Setup / Starting Position
- Set your station: Place an ab mat or soft handstand push-up pad under your head if needed, then face the wall and kick into a wall-supported handstand.
- Hand placement: Put your hands slightly wider than shoulder width with fingers spread for grip and balance.
- Stack the body: Lock the elbows, brace the core, and keep the heels lightly connected to the wall.
- Find your line: Keep the ribs controlled and avoid excessive lower-back arching before the rep even begins.
- Prepare to load: Start from a stable top position so the descent stays controlled, not rushed.
Tip: Most athletes perform better when the hands are planted firmly and the head descends slightly in front of the hands to create a stable tripod-style bottom position.
Execution (Step-by-Step)
- Lower under control: Bend the elbows and bring the head toward the mat while maintaining tension through the shoulders and midline.
- Tuck the knees: As you approach the bottom, bring the knees toward the chest to load the kip.
- Hit the bottom position: Lightly touch the head to the pad or target without crashing into it.
- Drive explosively: Extend the hips and legs upward with force while pressing hard through the hands.
- Finish the press: Let the shoulder and triceps strength complete the rep until the elbows lock out overhead.
- Re-stack at the top: Return to a stable wall-supported handstand before beginning the next repetition.
Pro Tips & Common Mistakes
- Control the negative: Fast, uncontrolled descents often ruin timing and overload the head or neck.
- Use the legs at the right time: Kip too early and you lose position; kip too late and the rep stalls.
- Keep the core braced: Avoid banana-back arching that throws force into the lower back instead of vertically through the press.
- Don’t rely only on momentum: A good kipping rep still needs active shoulders and strong triceps through lockout.
- Protect the neck: Touch the target lightly—do not bounce your head off the floor or collapse at the bottom.
- Use sensible volume: Fatigue can quickly degrade inverted mechanics, especially in high-rep training.
FAQ
What is the difference between a strict and a kipping handstand push-up?
A strict handstand push-up uses pressing strength only, while the kipping version uses a coordinated knee tuck and hip drive to help accelerate the body upward. The kipping version usually allows more reps once technique is learned.
What muscles does the kipping handstand push-up work most?
The main movers are the deltoids and triceps. The upper chest, traps, core, glutes, and hip flexors also contribute by stabilizing the inverted position and assisting the kip.
Is this exercise good for beginners?
No. This is an advanced exercise. Beginners should first build strength with pike push-ups, wall walks, strict handstand holds, and controlled handstand push-up progressions.
Should my head hit the floor hard at the bottom?
No. Your head should make only a light, controlled contact with a pad or target. Crashing into the floor increases neck risk and usually means the descent was not controlled properly.
How do I know if I’m ready for kipping handstand push-ups?
You should already be comfortable upside down against a wall, have pain-free shoulder and wrist loading, and show control in strict progression drills. If you cannot control the negative, you are not ready to kip safely.
Recommended Equipment (Optional)
- Handstand Push-Up Mat / Ab Mat — adds a softer head contact point and can reduce range slightly while learning the movement
- Parallettes Bars — useful for handstand strength practice, wrist-angle variation, and pressing progressions
- Push-Up Handles / Low Parallettes — can help with shoulder pressing accessories and bodyweight support drills
- Resistance Bands Set — great for shoulder warm-ups, triceps activation, scapular drills, and accessory work
- Wrist Wraps — optional support for athletes who need extra wrist comfort during inverted pressing sessions
Tip: The most useful setup for most athletes is a wall + handstand push-up mat + solid warm-up routine. Accessories should support technique, not replace shoulder strength and control.