Decline Pike Press (Between Benches): Proper Form, Sets, Tips & FAQ
Learn the Decline Pike Press (Between Benches) to build shoulder strength, improve vertical pressing mechanics, and progress toward handstand push-ups. Includes setup, execution, sets by goal, common mistakes, FAQs, and recommended equipment.
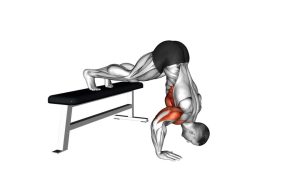
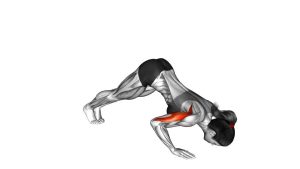
Decline Pike Press (Between Benches)
This variation trains the shoulders through a more vertical pressing path than a standard push-up, while still challenging the triceps, upper chest, and core. Because the feet are elevated, the exercise becomes more demanding and requires better body control, shoulder mobility, and pressing strength. Focus on smooth reps, stable shoulder positioning, and a strong pike shape throughout.
Quick Overview
| Body Part | Shoulders |
|---|---|
| Primary Muscle | Anterior deltoids (front shoulders) |
| Secondary Muscle | Triceps, upper chest, serratus anterior, core |
| Equipment | Bodyweight, 2 flat benches or similarly stable elevated surfaces |
| Difficulty | Intermediate to advanced |
Sets & Reps (By Goal)
- Shoulder strength: 3–5 sets × 4–8 reps, 90–150 sec rest
- Muscle building: 3–4 sets × 8–12 reps, 60–90 sec rest
- Handstand push-up progression: 4–5 sets × 3–6 controlled reps, 90–150 sec rest
- Bodyweight pressing endurance: 2–4 sets × 10–15 reps, 45–75 sec rest
Progression rule: First improve control, depth, and body position. Then increase reps, slow the tempo, or gradually use a steeper setup before moving to harder overhead pressing variations.
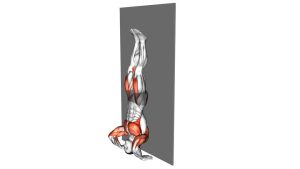
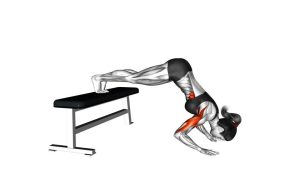
Setup / Starting Position
- Position the benches: Place two sturdy benches parallel or aligned so your hands can go on one bench and your feet on the other.
- Set your hands: Place your palms about shoulder-width apart on the front bench with fingers spread for stability.
- Elevate the feet: Put both feet on the rear bench and walk your hands/feet into a strong pike position.
- Lift the hips: Raise the hips high so your torso becomes more vertical and the load shifts into the shoulders.
- Brace the body: Keep the core tight, legs steady, and head neutral with eyes looking slightly back toward the bench.
Tip: The higher your hips stay, the more the movement resembles a true overhead press.
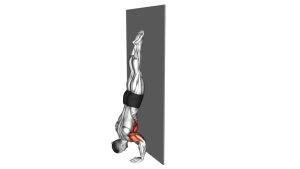
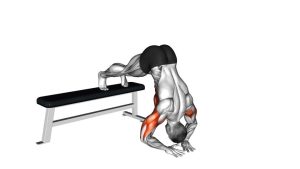
Execution (Step-by-Step)
- Start locked in: Begin with arms straight, feet elevated, hips high, and shoulders stacked as much as possible over the hands.
- Lower under control: Bend the elbows and lower your head down between your hands in a controlled arc.
- Keep the pike shape: Do not let the hips drop or turn the movement into a flat push-up.
- Reach proper depth: Lower until your head comes close to the bench level or as far as you can while maintaining good control.
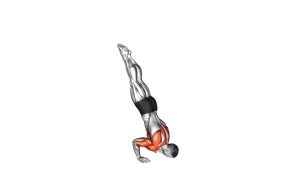
- Press back up: Drive through the palms, extend the elbows, and push your body back to the start while keeping the shoulders active.
- Reset each rep: Re-establish your balance and pike position before starting the next repetition.
Pro Tips & Common Mistakes
- Keep hips high: Dropping the hips shifts tension away from the shoulders and changes the exercise.
- Lower the head between the hands: This creates a better pressing line and improves shoulder emphasis.
- Use controlled reps: Fast reps reduce stability and can make the setup unsafe on benches.
- Do not flare the elbows excessively: Let them travel at a natural angle to protect the shoulders.
- Brace the core: A tight midsection helps maintain the correct inverted position.
- Check bench stability first: The surfaces must not slide, wobble, or shift during the movement.
- Avoid shallow reps: Partial range limits the strength carryover to overhead pressing and handstand work.
FAQ
What muscles does the Decline Pike Press work most?
The exercise mainly targets the front deltoids. It also trains the triceps, upper chest, and several stabilizers, including the core and serratus anterior.
Is this better than a regular pike push-up?
It is usually more difficult because elevating the feet shifts more bodyweight into the shoulders. That makes it a stronger progression for vertical pressing strength and handstand push-up development.
Is this exercise good for handstand push-up progression?
Yes. The elevated setup creates a more vertical pressing angle, which helps bridge the gap between pike push-ups and more advanced inverted pressing exercises.
How high should my hips be?
As high as you can keep them while staying stable and maintaining good pressing mechanics. Higher hips generally increase shoulder involvement and make the movement more effective.
What if I feel too much pressure in my wrists?
Warm up the wrists first, spread the fingers, and press evenly through the whole hand. You can also reduce range, use push-up handles, or regress to a less demanding pike press variation.
Recommended Equipment
- Flat Weight Bench — sturdy support for hands or feet during decline pike pressing variations
- Push-Up Handles — can reduce wrist strain and improve pressing comfort
- Parallettes — useful for bodyweight shoulder training and progression work
- Resistance Bands Set — helpful for warm-ups, shoulder activation, and accessory work
- Wrist Wraps — optional support if wrist extension becomes limiting during pressing practice
Tip: Prioritize stable support surfaces first. A good setup matters just as much as strength in this exercise.