Handstand Push-Up (Wall-Supported Strict): Form, Muscles Worked, Sets, Tips & FAQ
Learn how to perform the wall-supported strict Handstand Push-Up with proper form. Discover muscles worked, setup, execution steps, sets by goal, mistakes to avoid, FAQs, and recommended equipment.
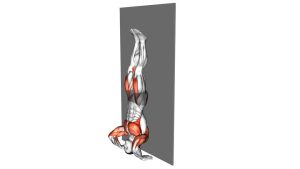
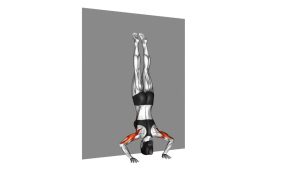
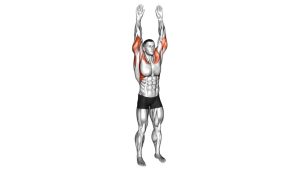
Handstand Push-Up (Wall-Supported Strict)
This exercise is best suited for experienced trainees who already have strong overhead pressing ability, shoulder mobility, and confidence in inverted positions. A good strict handstand push-up should look smooth, controlled, and stacked from hands to feet. The wall provides balance support, but the shoulders, triceps, upper chest, and core do the real work.
Quick Overview
| Body Part | Shoulders |
|---|---|
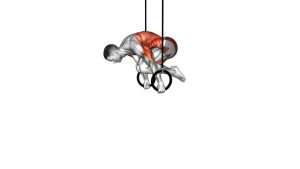
| Primary Muscle | Anterior deltoids, lateral deltoids |
| Secondary Muscle | Triceps, upper chest, upper traps, serratus anterior, core stabilizers |
| Equipment | Bodyweight, wall, optional abmat or padded surface |
| Difficulty | Advanced |
Sets & Reps (By Goal)
- Max strength: 3–5 sets × 1–5 reps, 2–3 minutes rest
- Muscle building: 3–4 sets × 4–8 reps, 90–150 seconds rest
- Skill practice: 4–6 sets × 1–3 clean reps, full focus on control and body line
- Progression work: 3–5 sets × 5–10 reps using pike push-ups or partial-range handstand push-ups
Progression rule: Increase range of motion, control, and rep quality before chasing higher volume. A strict rep with clean body alignment is more valuable than extra reps done with arching or bouncing.
Setup / Starting Position
- Place your hands: Set your palms on the floor about shoulder-width apart, fingers spread for grip and control.
- Face the wall or kick up carefully: Get into a stable handstand with your heels lightly touching the wall for support.
- Stack your body: Keep wrists, elbows, shoulders, hips, and feet aligned as much as possible.
- Brace the core: Squeeze your glutes, tighten your abs, and avoid excessive lower-back arching.
- Set the head path: Look slightly between your hands so the head can move naturally between them during the descent.
Tip: If you are still developing strength, place an abmat, folded towel, or small pad under your head to shorten the range slightly and build confidence.
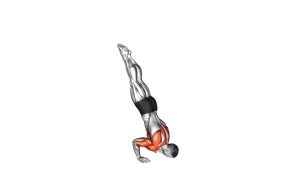
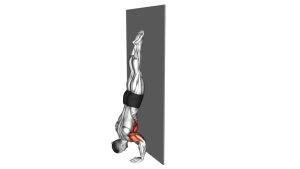
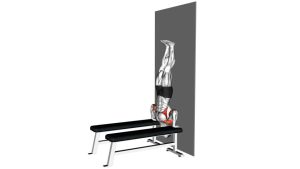
Execution (Step-by-Step)
- Start locked out: Begin in a strong handstand with elbows straight, shoulders elevated, and the body tight.
- Lower under control: Bend your elbows and slowly bring your head toward the floor while keeping the core braced.
- Guide the head between the hands: Let the elbows track naturally at a moderate angle rather than flaring excessively wide.
- Reach the bottom position: Lightly touch the head to the floor or approach your target depth without collapsing.
- Press forcefully upward: Drive through the palms, extend the elbows, and push the body back to full lockout.
- Finish stacked: Return to a straight handstand with shoulders active and feet lightly connected to the wall.
Pro Tips & Common Mistakes
- Keep a rigid body line: Squeeze glutes and abs to avoid the “banana back” position.
- Lower slowly: Controlled eccentrics build strength and protect the neck and shoulders.
- Push tall at the top: Actively elevate the shoulders instead of hanging passively in the lockout.
- Use your hands: Spread the fingers and grip the floor to improve balance and pressure control.
- Do not slam the head down: The bottom should be touched softly and intentionally.
- Avoid excessive elbow flare: Keep the pressing path strong and efficient.
- Do not rely on momentum: A strict handstand push-up should come from pressing strength, not a kip.
- Build prerequisites first: Pike push-ups, wall walks, overhead pressing, and handstand holds make this exercise safer and stronger.
FAQ
What muscles does the handstand push-up work most?
The strict wall-supported handstand push-up mainly targets the front and side deltoids. The triceps, upper chest, traps, and core stabilizers also work hard to control the movement and maintain body position.
Is this better than a regular overhead press?
It is not automatically better, but it is a powerful bodyweight alternative for advanced trainees. It challenges overhead pressing strength while adding more demands on inversion control, core tension, and shoulder stability.
Who should avoid strict handstand push-ups?
Beginners, people with poor overhead mobility, and anyone with wrist, neck, or shoulder issues should avoid jumping straight into this exercise. Build up with easier progressions before attempting full reps.
How can I progress toward my first handstand push-up?
Start with pike push-ups, elevated pike push-ups, wall walks, handstand holds, and partial-range negatives. These build the strength and control needed for a full strict rep.
Should my head touch the floor every rep?
In a full-range strict handstand push-up, yes, the head usually lightly touches the floor or a target. However, partial range can be useful during progressions as long as you continue working toward safe, controlled full depth.
Recommended Equipment
- AbMat for Handstand Push-Up Training — useful for reducing fear at the bottom and adding a safer target depth
- Parallettes — can improve wrist comfort and increase range of motion for advanced pressing work
- Gymnastics Chalk — helps improve hand grip and floor confidence during inverted work
- Wrist Wraps for Training — extra support for heavy pressing and long handstand practice sessions
- Thick Exercise Mat — adds comfort and protection during wall drills, kick-ups, and controlled descents
Tip: The best equipment for this movement is anything that improves control, wrist comfort, and safe range of motion without encouraging sloppy reps.