Ring Tuck Planche: Form, Sets, Tips & Progressions
Learn the Ring Tuck Planche with safe setup, straight-arm form, core control, sets by goal, common mistakes, FAQs, and equipment tips.
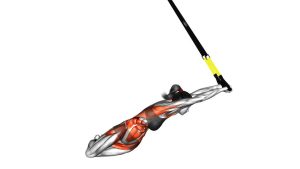
Ring Tuck Planche
This movement is harder than a floor tuck planche because the rings move independently. Your shoulders, chest, arms, wrists, and core must work together to prevent swinging, shaking, or collapsing. The best reps are slow, compact, and controlled.
Quick Overview
| Body Part | Front Shoulders |
|---|---|
| Primary Muscle | Anterior deltoids, chest, serratus anterior, straight-arm shoulder stabilizers |
| Secondary Muscle | Core, hip flexors, triceps, forearms, wrists, upper back stabilizers |
| Equipment | Gymnastic rings, stable anchor point, optional chalk, mat, resistance band |
| Difficulty | Advanced |
Sets & Reps (By Goal)
- Skill practice: 4–6 sets × 5–10 second holds
- Straight-arm strength: 3–5 sets × 3–6 controlled tuck entries
- Planche progression: 4–8 sets × short high-quality holds with full rest
- Ring stability: 3–4 sets × 8–15 second support-to-tuck transitions
Progression rule: Increase hold time before increasing lean. When your elbows bend, shoulders collapse, or rings shake heavily, reduce intensity and return to an easier progression.
Setup / Starting Position
- Set the rings low enough so you can safely enter and exit without losing control.
- Grip the rings firmly with the wrists stacked and the arms fully straight.
- Start in a strong ring support with shoulders depressed, elbows locked, and rings close to the hips.
- Brace your core before leaning forward. Keep the ribs down and pelvis slightly tucked.
- Prepare the tuck by drawing the knees toward the chest without swinging the legs.
Execution (Step-by-Step)
- Begin in ring support: Lock the elbows, press down into the rings, and keep the shoulders active.
- Lean forward slowly: Move your shoulders in front of the rings while keeping the arms straight.
- Protract the shoulder blades: Push the upper back slightly upward and forward to create a strong planche shape.
- Tuck the knees tightly: Pull the knees toward the chest and keep the hips compact.
- Hold the position: Maintain locked elbows, steady rings, rounded upper back, and strong core tension.
- Exit with control: Slowly reduce the forward lean, lower the legs, and return to a stable ring support.
Pro Tips & Common Mistakes
- Keep the elbows locked: Bending the arms turns the skill into a different movement and reduces straight-arm strength development.
- Push the rings down: Active shoulder depression helps prevent shrugging and instability.
- Protract strongly: A rounded upper back supports the planche position better than a collapsed chest.
- Do not let the rings drift wide: Keep them close enough to control the shoulder line.
- Avoid swinging into position: Use slow strength, not momentum.
- Keep the tuck compact: The closer the knees are to the chest, the easier it is to control the hold.
- Train fresh: Practice this skill early in your workout before heavy fatigue affects shoulder stability.
FAQ
Is the Ring Tuck Planche beginner-friendly?
No. This is an advanced ring strength exercise. Beginners should first build ring support holds, push-up strength, scapular control, hollow body strength, and floor tuck planche progressions.
What muscles does the Ring Tuck Planche work?
It mainly works the front shoulders, chest, serratus anterior, triceps, core, hip flexors, forearms, and deep shoulder stabilizers.
Why is the ring version harder than the floor tuck planche?
Rings are unstable and move independently. This increases the demand on the shoulders, wrists, forearms, chest, and core to keep the body balanced.
How long should I hold a Ring Tuck Planche?
Start with short holds of 3–5 seconds. Build toward 8–12 seconds only when your elbows stay locked, your shoulders stay protracted, and the rings remain stable.
What is the best progression before this exercise?
Good progressions include ring support holds, planche leans, tuck planche on parallettes, band-assisted tuck planche, and pseudo planche push-ups.
Recommended Equipment
- Wooden Gymnastic Rings — essential for ring tuck planche practice and ring support strength
- Heavy-Duty Ring Straps — helps secure the rings to a pull-up bar, beam, or outdoor anchor
- Workout Chalk — improves grip and reduces slipping during advanced ring holds
- Exercise Mat — provides safer landing support during failed attempts or exits
- Resistance Bands for Calisthenics — useful for assisted planche progressions and shoulder warm-ups
Tip: Use equipment that feels stable and secure. Ring skills require full confidence in your setup before loading advanced positions.