Incline Elbow Plank: Proper Form, Benefits, Sets, Tips & FAQ
Learn the Incline Elbow Plank to build core stability, shoulder control, and beginner-friendly plank strength with proper form, tips, sets, and equipment.
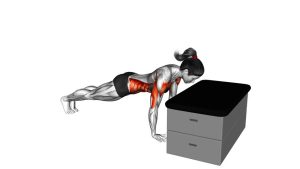
Incline Elbow Plank
This exercise works well for beginners, warm-ups, core endurance training, and people who need a controlled plank variation before progressing to the floor. Additionally, the elevated angle helps you focus on breathing, bracing, and posture without excessive pressure on the lower back. Keep the elbows under the shoulders, press gently through the forearms, and maintain a long neutral spine.
Quick Overview
| Body Part | Core |
|---|---|
| Primary Muscle | Rectus abdominis and transverse abdominis |
| Secondary Muscle | Obliques, glutes, anterior deltoids, serratus anterior, quadriceps |
| Equipment | Bench, plyo box, step platform, or another stable elevated surface |
| Difficulty | Beginner |
Sets & Reps (By Goal)
- Beginner core control: 2–3 sets × 15–25 seconds, resting 45–75 seconds between sets.
- Core endurance: 3–4 sets × 25–45 seconds, keeping every hold clean and steady.
- Warm-up activation: 1–2 sets × 15–30 seconds before push-ups, planks, rows, or full-body training.
- Rehab-style stability: 2–3 sets × 10–20 seconds with slow breathing and perfect spinal alignment.
Progression rule: First, increase hold time. Next, lower the incline slightly. Finally, progress toward a standard floor elbow plank only when your hips, ribs, and shoulders stay stable.
Setup / Starting Position
- Choose a stable surface: Use a bench, box, or platform that does not slide or wobble.
- Place your forearms down: Rest both forearms on the surface with elbows roughly under your shoulders.
- Step your feet back: Extend both legs until your body forms a long straight line from head to heels.
- Set your brace: Gently tighten your abs as if preparing for a light punch to the stomach.
- Align your posture: Keep your head neutral, ribs down, hips level, glutes lightly engaged, and legs straight.
A higher incline makes the exercise easier. Therefore, use a taller surface if you are still learning proper plank alignment.
Execution (Step-by-Step)
- Start in the incline elbow plank position: Forearms stay planted, shoulders remain stable, and feet stay behind you.
- Brace your core: Pull the ribs slightly down and keep the pelvis neutral without rounding the lower back.
- Hold the line: Maintain a straight body position from ears to ankles while breathing calmly.
- Press lightly through the forearms: This helps keep the chest lifted and prevents the shoulders from collapsing.
- Keep the hips still: Avoid sagging, piking, twisting, or shifting side to side.
- Finish with control: Step forward or lower your knees when the hold ends instead of dropping out of position.
Pro Tips & Common Mistakes
- Keep elbows under shoulders: This improves shoulder comfort and creates a stronger support base.
- Avoid hip sagging: When the hips drop, the lower back takes over instead of the core.
- Do not pike the hips too high: A high hip position reduces abdominal demand and changes the exercise.
- Use slow breathing: Breathe through the hold instead of bracing so hard that you hold your breath.
- Engage the glutes lightly: This helps control the pelvis and protect the lower back.
- Choose the right incline: A taller surface is better for learning, while a lower surface increases difficulty.
- Keep the neck neutral: Look slightly down toward the bench rather than lifting the chin forward.
FAQ
What is the Incline Elbow Plank good for?
The Incline Elbow Plank is excellent for building beginner core strength, improving plank posture, and training anti-extension control. Additionally, it strengthens the shoulders and teaches full-body tension in a lower-impact position.
Is the Incline Elbow Plank easier than a regular plank?
Yes. Since your forearms are elevated, your body carries less direct load than it would during a floor plank. As a result, this variation is ideal for beginners or anyone improving plank technique.
Where should I feel this exercise?
You should mainly feel your abs working. You may also feel light tension in your shoulders, glutes, and thighs. However, you should not feel sharp pain in your lower back or shoulders.
How long should I hold an Incline Elbow Plank?
Start with 15–25 seconds per set. Then, gradually build toward 30–45 seconds while keeping your body line stable. If your hips sag, end the set early.
How can I make the Incline Elbow Plank harder?
Lower the incline, increase hold time, slow your breathing, or progress to a standard floor elbow plank. For more challenge, you can also use a longer body position, but only if your form stays clean.
Who should use this plank variation?
Beginners, heavier trainees, older adults, rehab-focused exercisers, and anyone rebuilding core strength can benefit from this variation. Still, if pain appears, reduce the difficulty or ask a qualified professional for guidance.
Recommended Equipment
- Adjustable Workout Bench — provides a stable elevated surface for incline planks and many other strength exercises.
- Plyo Box — useful for incline plank variations, step-ups, elevated push-ups, and conditioning drills.
- Exercise Mat — adds comfort under the feet or knees during setup, warm-ups, and floor progressions.
- Forearm Plank Pads — helps reduce elbow pressure during longer plank holds.
- Resistance Bands Set — useful for pairing planks with shoulder stability, glute activation, and core warm-up drills.
Tip: Choose equipment that feels stable and does not slide. For safety, avoid soft furniture or unstable surfaces when performing incline plank holds.