Ring Kneeling Ab Rollout: Core Form, Sets, Tips & FAQ
Learn the Ring Kneeling Ab Rollout for stronger abs, core control, and anti-extension strength with step-by-step form, sets, tips, FAQs, and gear.
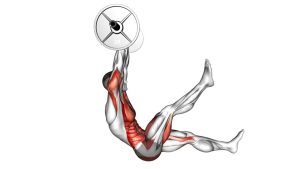
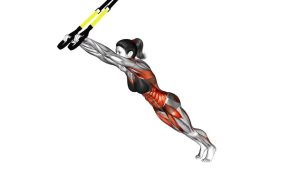
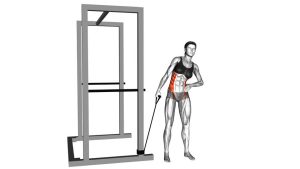
Ring Kneeling Ab Rollout
This exercise works best when the body moves as one controlled unit. First, brace the core before the rings travel forward. Then, keep the hips from dropping as the torso lowers toward the floor. Finally, pull back to the starting position by using the abs and shoulders together rather than bending the elbows or sitting the hips back too early.
Quick Overview
| Body Part | Core |
|---|---|
| Primary Muscle | Rectus abdominis |
| Secondary Muscle | Transverse abdominis, obliques, lats, serratus anterior, shoulders, hip flexors |
| Equipment | Gymnastic rings or suspension straps, plus an optional knee pad or exercise mat |
| Difficulty | Intermediate to advanced, depending on range of motion and ring height |
Sets & Reps (By Goal)
- Technique practice: 2–3 sets × 4–6 slow reps with a short range of motion
- Core strength: 3–4 sets × 6–10 controlled reps with 60–90 seconds rest
- Muscle endurance: 2–3 sets × 10–15 reps using a moderate range and smooth tempo
- Advanced control: 4–5 sets × 4–8 deep reps with a 1–2 second pause near full extension
Progression rule: Increase range of motion before increasing reps. However, never progress deeper if the lower back starts to sag.
Setup / Starting Position
- Set the rings low: Adjust the rings so they hang within comfortable reach from a kneeling position.
- Kneel on the floor: Place both knees on a mat or pad, keeping them roughly hip-width apart.
- Grip the rings firmly: Hold one ring in each hand with the arms straight and the hands below or slightly in front of the shoulders.
- Brace your core: Tighten the abs as if preparing for a plank. Keep the ribs down and the pelvis controlled.
- Set your body line: Start tall from the knees with the shoulders relaxed, elbows extended, and spine neutral.
A higher ring setup makes the exercise easier. Meanwhile, lower rings and a longer rollout make the movement more difficult.
Execution (Step-by-Step)
- Brace before moving: Lock in your ribs, abs, and glutes before the rings travel forward.
- Roll the rings forward: Slowly let the rings move away from your knees while your torso leans forward as one unit.
- Keep the arms straight: Maintain extended elbows without shrugging the shoulders or collapsing through the chest.
- Reach your controlled end range: Stop when your body is long and diagonal, but before the lower back arches.
- Pause briefly: Hold tension for a moment near the hardest point while breathing under control.
- Pull back smoothly: Use your abs, lats, and shoulders to bring the rings back toward the start position.
- Finish tall: Return to the kneeling position without snapping the hips backward or losing posture.
Pro Tips & Common Mistakes
- Move slowly: A controlled forward phase builds more core strength than a fast drop.
- Do not bend the elbows: Bent elbows turn the movement into more of a pulling drill and reduce the core challenge.
- Keep the ribs down: Rib flare usually means the abs are losing control and the lower back is taking over.
- Avoid hip sag: The hips should travel forward with the torso, not collapse toward the floor.
- Use a shorter range first: Quality matters more than depth, especially with unstable rings.
- Press lightly into the rings: Keep shoulder tension active, but do not shrug toward the ears.
- Control the return: Pull back with steady tension instead of bouncing or jerking the rings.
FAQ
What muscles does the Ring Kneeling Ab Rollout work?
It mainly targets the rectus abdominis while also training the transverse abdominis, obliques, lats, shoulders, and serratus anterior. Because the rings move freely, the stabilizing demand is higher than many fixed ab rollout variations.
Is the Ring Kneeling Ab Rollout beginner-friendly?
It can be too challenging for complete beginners. However, beginners can make it easier by raising the rings, using a shorter range of motion, and practicing slow partial reps first.
Should I feel this in my lower back?
No. You may feel general trunk tension, but the lower back should not feel pinched or overloaded. If it does, reduce the rollout distance and brace harder before moving.
How is this different from an ab wheel rollout?
The ring version adds more instability because each hand moves independently. As a result, your shoulders, lats, and obliques must work harder to keep the path controlled.
How can I make the exercise harder?
Lower the rings, increase the forward reach, pause longer near full extension, or slow down the return phase. Nevertheless, only progress when your spine stays neutral.
Recommended Equipment
- Gymnastic Rings — essential for performing the ring kneeling ab rollout with adjustable height
- Suspension Trainer — useful alternative if rings are not available
- Exercise Mat — protects the knees and improves comfort during kneeling reps
- Foam Knee Pad — helpful for reducing pressure on the knees during rollout training
- Resistance Bands Set — useful for assisted rollout practice or warm-up core activation
Tip: Choose equipment that allows a stable setup. Additionally, always test ring height and strap security before starting your first working set.