Ring Reverse Ab Rollout: Core Form, Sets, Tips & FAQ
Learn the Ring Reverse Ab Rollout for stronger abs, core control, and plank stability. Includes setup, steps, sets, mistakes, FAQs, and equipment.
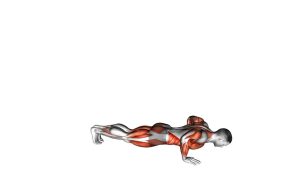
Ring Reverse Ab Rollout
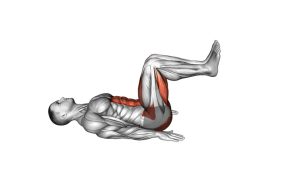
This exercise works best when the body starts in a strong high plank and every rep stays controlled. First, the legs extend behind the body with the feet suspended. Then, the knees travel forward under the torso as the hips lift into a compact tuck. Finally, the legs return back to plank without letting the lower back sag. Because the rings create instability, the abs must work harder to control both the pull-in phase and the return phase.
Quick Overview
| Body Part | Core |
|---|---|
| Primary Muscle | Rectus abdominis |
| Secondary Muscle | Hip flexors, obliques, transverse abdominis, shoulders, lats, and serratus anterior |
| Equipment | Gym rings, suspension straps, or a suspension trainer |
| Difficulty | Intermediate to advanced |
Sets & Reps (By Goal)
- Core control: 3 sets × 6–10 slow reps with 60–90 seconds rest
- Strength endurance: 3–4 sets × 10–15 reps with a smooth tempo
- Advanced core training: 4 sets × 8–12 reps with a 2-second tuck hold
- Technique practice: 2–3 sets × 5–8 reps, focusing on clean plank alignment
Progression rule: Add reps only when your plank return stays clean. After that, increase range, slow the eccentric phase, or pause longer in the tucked position.
Setup / Starting Position
- Set the rings low: Adjust the rings or straps so your feet can hang securely while your hands stay on the floor.
- Place your feet in the straps: Keep both feet supported evenly so the rings do not twist excessively before the rep begins.
- Move into a high plank: Stack your shoulders above your hands and extend your legs behind you.
- Brace your core: Tighten your abs, squeeze your glutes lightly, and keep the ribs from flaring.
- Start with a straight body line: Your shoulders, hips, knees, and ankles should form one strong plank line before you pull the knees forward.
Tip: If the rings swing too much, pause in plank for a few seconds before starting. This helps you control the straps before adding movement.
Execution (Step-by-Step)
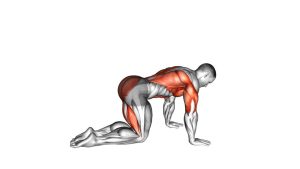
- Begin in plank: Keep your arms straight, hands firm on the floor, and feet suspended behind you.
- Pull the knees forward: Draw your knees toward your chest while keeping the movement controlled.
- Lift the hips naturally: Allow the hips to rise as the knees tuck under the torso.
- Reach peak contraction: Pause briefly when the knees are close to the chest and the abs feel fully engaged.
- Extend back slowly: Push the legs back until your body returns to a straight plank.
- Reset your brace: Before the next rep, confirm that the hips are not sagging and the shoulders remain stable.
Pro Tips & Common Mistakes
- Keep the shoulders stacked: Do not let your body drift too far forward or backward during the tuck.
- Control the straps: Small ring movement is normal, but excessive swinging means you are using momentum.
- Avoid lower-back sagging: Brace before the legs extend back, especially near the end of each rep.
- Do not rush the return: The eccentric phase builds serious core strength when performed slowly.
- Use a compact range first: Beginners should master a smaller knee tuck before chasing a deep tuck.
- Keep the arms straight: The arms stabilize the body while the abs and hips control the leg movement.
- Breathe with control: Exhale as the knees pull in, then inhale lightly as the legs extend back.
FAQ
What muscles does the Ring Reverse Ab Rollout work?
The main target is the rectus abdominis. However, the hip flexors, obliques, transverse abdominis, shoulders, lats, and serratus anterior also help stabilize the body during the suspended plank and knee tuck.
Is this the same as a regular ab rollout?
No. A regular ab rollout usually moves the arms forward while the feet stay fixed. In this variation, the hands stay on the floor while the suspended legs move forward and backward. As a result, it feels more like a suspended knee tuck with a reverse rollout pattern.
Is the Ring Reverse Ab Rollout beginner-friendly?
It is usually better for intermediate trainees because the rings add instability. Beginners should first master planks, mountain climbers, and floor knee tucks before using suspended straps.
Why does my lower back sag during the return?
Lower-back sagging usually means the abs lose tension as the legs extend. To fix it, shorten the range, slow down the return, and squeeze your glutes lightly before reaching full plank.
How can I make this exercise easier?
Use a smaller knee tuck, slow the tempo, and perform fewer reps. Additionally, you can practice with sliders on the floor before moving back to suspended rings.
Recommended Equipment
- Gymnastics Rings with Adjustable Straps — ideal for suspended core work and scalable bodyweight training
- Suspension Trainer Straps — a practical alternative for reverse rollouts, knee tucks, and plank variations
- Thick Exercise Mat — supports your hands, knees, and setup area during core training
- Push-Up Handles — helps some athletes keep a stronger wrist position during plank-based exercises
- Core Sliders — useful for easier floor-based regressions before progressing to rings
Tip: Choose equipment that allows stable foot support and smooth movement. If the rings or straps swing too much, reduce speed and focus on control before increasing difficulty.