Single Dead Bug: Proper Form, Core Benefits, Sets, Tips & FAQ
Learn the Single Dead Bug exercise for core stability, ab control, and better coordination. Step-by-step form, sets, mistakes, FAQs, and gear.
Single Dead Bug
This movement is best performed slowly because the goal is not speed, momentum, or maximum range. Instead, the main focus is keeping the torso quiet while the limbs move with control. As a result, the Single Dead Bug is useful for beginners, home workouts, warm-ups, and core stability training.
Quick Overview
| Body Part | Core |
|---|---|
| Primary Muscle | Abdominals, especially the rectus abdominis and deep core stabilizers |
| Secondary Muscle | Hip flexors, obliques, shoulder stabilizers, and pelvic stabilizers |
| Equipment | No equipment required; an exercise mat is optional |
| Difficulty | Beginner-friendly, but still effective when performed slowly and precisely |
Sets & Reps (By Goal)
- Beginner core control: 2–3 sets × 6–8 reps per side with slow, clean movement
- Core stability warm-up: 2 sets × 8–10 reps per side before strength training
- Ab endurance: 3–4 sets × 10–12 reps per side with short rest periods
- Technique practice: 1–2 sets × 5–6 reps per side using a very slow tempo
Progression rule: First, increase control and range. Then, add more reps only when your lower back and hips remain stable.
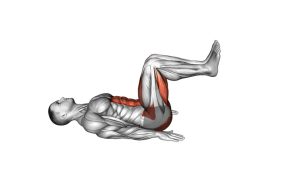
Setup / Starting Position
- Lie on your back: Start flat on the floor or on an exercise mat.
- Raise your arms: Extend both arms upward so your hands are above your shoulders.
- Lift your legs: Bend both knees to about 90 degrees with your shins roughly parallel to the floor.
- Set your torso: Keep your ribs controlled and avoid letting the lower back arch excessively.
- Relax your neck: Keep your head on the floor and avoid lifting the chin toward the chest.
Tip: Before starting, pause for one second in the top position so your body feels balanced and controlled.
Execution (Step-by-Step)
- Start from the dead bug position: Keep both arms vertical and both knees bent above the hips.
- Extend opposite limbs: Slowly move one arm overhead while the opposite leg reaches forward and downward.
- Control the range: Lower only as far as you can without losing trunk stability.
- Pause briefly: Hold the extended position for a moment while keeping the torso steady.
- Return to center: Bring the arm and leg back to the starting position with control.
- Switch sides: Repeat the same pattern with the other arm and opposite leg.
Pro Tips & Common Mistakes
- Move slowly: A slower tempo makes the abs work harder and reduces momentum.
- Do not rush the return: Bring the arm and leg back with the same control used during the extension.
- Avoid arching the lower back: If your back lifts too much, shorten the leg reach.
- Keep the neck relaxed: The head should stay down unless a specific variation says otherwise.
- Use opposite limbs only: The visible pattern is one arm and the opposite leg moving together.
- Do not chase the floor: The arm and leg do not need to touch the ground to make the exercise effective.
- Control your hips: If the pelvis shifts side to side, reduce range and reset your starting position.
FAQ
What muscles does the Single Dead Bug work?
The Single Dead Bug mainly trains the abdominals and deep core stabilizers. It also involves the hip flexors, obliques, and shoulder stabilizers because the opposite arm and leg move while the torso stays controlled.
Is the Single Dead Bug good for beginners?
Yes. It is beginner-friendly because it is done on the floor, uses no equipment, and allows you to control the range of motion. However, it should still be performed slowly and carefully.
Should my lower back stay flat during the movement?
Your lower back should stay controlled without excessive arching. If your back lifts as the leg extends, reduce the range and keep the movement smaller.
How fast should I perform each rep?
Use a slow tempo. For example, take 2–3 seconds to extend, pause briefly, then take 2–3 seconds to return. This makes the exercise cleaner and more effective.
Can I do Single Dead Bugs every day?
Many people can include low-volume dead bugs often, especially as a warm-up or core activation drill. Still, reduce volume if you feel lower-back discomfort, hip tightness, or poor control.
Recommended Equipment (Optional)
- Exercise Mat — adds comfort and support for floor-based core exercises
- Thick Yoga Mat — useful if your back or hips feel uncomfortable on a hard floor
- Mini Resistance Bands — optional for future dead bug progressions and core activation drills
- Foam Roller — helpful for warm-ups and gentle mobility before core training
- Light Ankle Weights — advanced option only after you can control the basic version perfectly
Tip: Equipment is optional for this exercise. Master the bodyweight version first before adding resistance or extra difficulty.