Weighted Standing Curl: Forearm Grip Strength, Form, Sets, Tips & FAQ
Learn how to perform the Weighted Standing Curl with proper form to build forearm strength, grip endurance, brachioradialis development, and controlled elbow flexion. Includes setup, execution, sets by goal, mistakes, FAQs, and recommended equipment.
Weighted Standing Curl
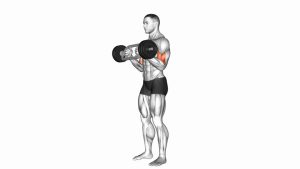
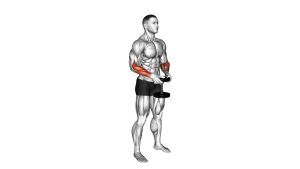
The Weighted Standing Curl is different from a regular dumbbell curl because the plate creates a strong grip challenge. Instead of simply holding a handle, your fingers and hands must clamp the plate securely while your elbows flex and extend. This makes the exercise valuable for lifters who want stronger forearms, better pulling strength, and more complete arm development.
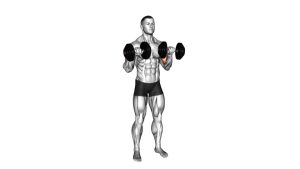
In the demonstrated movement, the athlete stands upright with the plate held in front of the thighs. The elbows stay close to the sides as the plate is curled upward toward the torso. At the top, the weight is controlled briefly before being lowered back down slowly. The torso stays quiet, the shoulders remain relaxed, and the wrists stay firm throughout the repetition.
Quick Overview
| Body Part | Forearms |
|---|---|
| Primary Muscle | Brachioradialis, forearm flexors, grip muscles, and wrist stabilizers |
| Secondary Muscle | Biceps brachii, brachialis, anterior deltoids, and core stabilizers |
| Equipment | Weight plate or grip-style plate |
| Difficulty | Beginner to intermediate |
Sets & Reps (By Goal)
- Forearm strength: Perform 3–5 sets of 6–10 reps using a challenging plate that you can still control without swinging.
- Grip endurance: Perform 2–4 sets of 12–20 reps with a moderate plate and steady tempo from top to bottom.
- Muscle growth: Perform 3–4 sets of 8–15 reps with a brief squeeze at the top and a slow lowering phase.
- Warm-up activation: Perform 1–3 sets of 10–15 reps with a light plate before heavier curls, rows, pull-ups, or deadlifts.
- Forearm finisher: Perform 2–3 controlled sets near technical fatigue, stopping when your wrists start to collapse or your torso begins to swing.
Progression note: Add reps before adding weight. Once you can complete the top end of the rep range with strict form, move to a slightly heavier plate.
Setup / Starting Position
- Stand in a stable stance: Place your feet about hip-width apart with your knees soft and your weight balanced through the middle of the feet.
- Hold the plate with both hands: Grip the sides, edges, or handles of the plate firmly. Your hands should apply even pressure so the weight does not tilt or slip.
- Start with the plate near your thighs: Let the arms hang naturally in front of the body with the elbows slightly bent rather than aggressively locked.
- Set your upper body: Keep your chest lifted, ribs stacked, shoulders relaxed, and neck neutral. Avoid rounding forward before the first rep.
- Keep the elbows close: Position your elbows near your ribs so the curl stays focused on elbow flexion instead of shoulder movement.
- Brace lightly: Tighten your midsection just enough to stop the body from leaning backward as the plate moves upward.
The starting position should feel strong and controlled. If you cannot hold the plate securely before the first rep begins, use a lighter plate or choose a plate with better grip handles.
Execution (Step-by-Step)
- Begin from the bottom position: Hold the plate in front of your thighs with your arms nearly straight, wrists firm, and elbows close to the body.
- Start the curl: Bend your elbows and pull the plate upward toward your lower abdomen. Keep your upper arms mostly still.
- Continue through the middle range: As the plate rises, keep your torso upright and avoid using your hips or lower back to create momentum.
- Control your wrists: Keep the wrists neutral and strong. Do not let the plate bend your wrists backward or pull your hands out of position.
- Reach the top position: Curl the plate close to the front of your torso without letting the elbows flare outward or the shoulders shrug upward.
- Pause briefly: Hold the top position for a moment and squeeze the plate firmly to increase forearm and grip engagement.
- Lower under control: Slowly extend your elbows and return the plate to the starting position. Do not drop the weight or relax your grip too early.
- Reset and repeat: Check your posture, elbows, wrists, and grip before beginning the next repetition.
Pro Tips & Common Mistakes
Pro Tips
- Use a strict tempo: Lift smoothly, pause briefly at the top, and lower slowly to keep constant tension on the forearms and biceps.
- Grip evenly with both hands: Uneven pressure can make the plate tilt and shift tension away from the target muscles.
- Keep the elbows close: This helps maintain tension on the elbow flexors and prevents the front shoulders from taking over.
- Choose the right plate: A plate with side handles is easier to control, while a smooth plate edge increases the grip challenge.
- Use it after heavy pulling: This exercise works well after rows, pull-ups, deadlifts, or biceps training as a forearm-focused accessory.
Common Mistakes
- Swinging the torso: Leaning backward to lift the plate reduces arm tension and increases stress on the lower back.
- Letting the shoulders shrug: The shoulders should stay relaxed so the forearms, biceps, and brachioradialis do most of the work.
- Dropping the weight too fast: A rushed lowering phase removes tension and makes the exercise less effective.
- Over-bending the wrists: Excessive wrist movement can reduce control and make the exercise uncomfortable for the wrists or elbows.
- Using too much weight: If you cannot pause at the top or lower with control, the plate is too heavy for strict reps.
- Letting the elbows drift forward: A small amount of movement is normal, but excessive elbow travel can turn the exercise into a shoulder-assisted curl.
FAQ
What muscles does the Weighted Standing Curl work?
The Weighted Standing Curl primarily works the forearms, brachioradialis, grip muscles, and wrist stabilizers. It also trains the biceps brachii and brachialis because the elbows flex during the curling motion.
Is this exercise better for forearms or biceps?
It trains both, but it is especially useful for forearms and grip strength because the plate must be held securely throughout the entire movement. A normal dumbbell curl usually places less demand on the fingers and plate-gripping muscles.
What weight should I start with?
Start with a light to moderate plate that allows 10–15 clean reps. You should be able to curl the plate without swinging, pause briefly at the top, and lower it slowly.
Should my elbows stay completely still?
Your elbows should stay close to your sides and mostly fixed. A small amount of natural movement is acceptable, but they should not flare outward or travel far forward during the curl.
Why do my wrists bend during this exercise?
Wrist bending usually happens when the plate is too heavy, your grip is fatigued, or the plate shape is difficult to hold. Reduce the load and focus on keeping the wrists firm and neutral.
Can beginners do the Weighted Standing Curl?
Yes. Beginners can use this exercise as long as they start light and focus on strict control. The goal is not to lift the heaviest plate possible, but to build clean forearm, grip, and arm strength.
Recommended Equipment
- Olympic Weight Plate — the main tool for performing weighted standing curls and plate-based forearm training.
- Grip Weight Plates — built-in handles make the plate easier to control during strict curling reps.
- Weightlifting Chalk — helps improve hand contact and reduces slipping during grip-focused exercises.
- Forearm Wrist Roller — useful for building wrist flexor, wrist extensor, and grip endurance alongside curls.
- Adjustable Dumbbells — helpful for adding more biceps and forearm curl variations to your arm workouts.
Equipment tip: Choose a plate that you can hold safely. If the edge is slippery or uncomfortable, use chalk, select a grip-style plate, or lower the weight.