Lying Knee Roll Over Stretch: Form, Benefits, Tips & FAQ
Learn the Lying Knee Roll Over Stretch to improve spinal rotation, ease lower-back tension, and stretch obliques with safe step-by-step form.
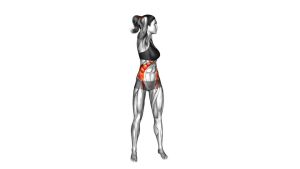
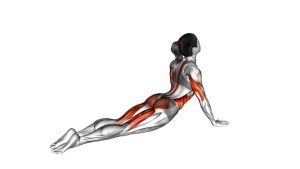
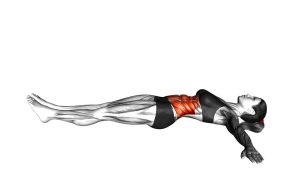
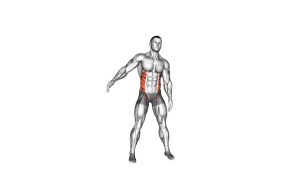
Lying Knee Roll Over Stretch
This stretch works best when it feels slow, relaxed, and controlled. Instead of dropping the knees quickly, guide them toward one side while keeping both shoulders as close to the floor as possible. Meanwhile, your breathing should stay calm, your neck should remain relaxed, and your core should provide light control. Although the exercise looks simple, small details make it much safer and more effective.
Quick Overview
| Body Part | Core |
|---|---|
| Primary Muscle | Obliques |
| Secondary Muscle | Lower back, glutes, hip rotators, rectus abdominis, spinal stabilizers |
| Equipment | Bodyweight only; optional exercise mat or yoga mat |
| Difficulty | Beginner |
Sets & Reps (By Goal)
- General mobility: 2–3 sets × 8–12 slow rolls per side
- Lower-back relaxation: 2 sets × 30–45 seconds per side with calm breathing
- Warm-up preparation: 1–2 sets × 6–10 controlled reps per side
- Cooldown stretching: 2–3 sets × 20–40 second holds per side
- Beginner control practice: 1–2 sets × 5–8 reps per side using a smaller range
Progression rule: First improve control, breathing, and shoulder contact. After that, increase the hold time or range slightly. However, never force the knees to the floor if your shoulders lift aggressively or your lower back feels compressed.
Setup / Starting Position
- Lie on your back: Start supine on a comfortable mat with your head, upper back, and hips supported.
- Open your arms: Extend both arms out to the sides in a T-position. This helps anchor the upper body.
- Bend your knees: Bring both knees up with the hips and knees bent. Keep the legs together or slightly separated.
- Set your shoulders: Relax your shoulders down into the floor without shrugging or pressing too hard.
- Brace lightly: Gently tighten your core as if preparing for a slow rotation, not a hard abdominal crunch.
- Keep your head neutral: Look upward or gently turn your head away from the knees only if it feels natural.
If your lower back feels sensitive, start with your feet on the floor and use a smaller knee roll. Then, as control improves, you can lift the feet or increase the rotation slightly.
Execution (Step-by-Step)
- Begin in the center: Keep both knees bent and stacked over the hips while your arms stay wide for balance.
- Inhale before moving: Take a calm breath in, soften the ribs, and prepare to rotate without rushing.
- Roll the knees to one side: Slowly lower both knees toward the floor while allowing the pelvis and lower spine to rotate.
- Keep the shoulders grounded: As the knees travel sideways, keep the opposite shoulder heavy on the mat.
- Pause at your comfortable range: Hold the stretch where you feel mild tension through the obliques, hips, or lower back.
- Breathe into the stretch: Use slow exhales to relax the torso instead of pushing the knees down by force.
- Return with control: Engage the core gently and bring the knees back to the center without snapping or swinging.
- Repeat on the other side: Roll the knees across the body in the opposite direction using the same slow tempo.
Pro Tips & Common Mistakes
Pro Tips
- Move slowly: A slow roll gives the spine and hips time to adapt to the rotation.
- Use your breath: Exhale as the knees lower. This helps reduce unnecessary tension through the ribs and lower back.
- Keep the arms wide: A wider arm position makes it easier to keep the shoulders anchored.
- Control the return: The return to center matters as much as the stretch because it trains rotational control.
- Adjust the knee angle: Bringing the knees closer to the chest may increase the lower-back stretch. Moving them farther away may feel easier.
- Stay within a mild stretch: Aim for comfortable tension, not maximum range.
Common Mistakes
- Dropping the knees too fast: This turns the stretch into a momentum-based twist and can irritate the lower back.
- Letting both shoulders lift: If the upper body rolls with the knees, the spinal stretch becomes less effective.
- Forcing the knees to the floor: Depth is not required. Control and comfort are more important.
- Holding the breath: Breath-holding increases tension and makes the stretch feel more aggressive.
- Overarching the lower back: Keep the ribs controlled and avoid excessive lumbar extension before rotating.
- Ignoring discomfort: Mild stretch is fine. Sharp pain, pinching, or radiating symptoms are not.
FAQ
What does the Lying Knee Roll Over Stretch target?
It mainly targets the obliques, lower back, hips, and spinal stabilizers. Additionally, it helps improve gentle rotational mobility through the trunk while encouraging the shoulders to stay grounded.
Is the Lying Knee Roll Over Stretch good for lower-back tightness?
Yes, it can help many people reduce mild lower-back stiffness because it combines controlled rotation with relaxed breathing. However, it should feel gentle. If symptoms increase, reduce the range or stop the movement.
Should my knees touch the floor?
No. Your knees do not need to touch the floor. In fact, forcing that position can create unnecessary stress. Instead, lower the knees only as far as you can while keeping the shoulders relaxed and the movement pain-free.
Should I keep my feet on the floor or lifted?
Both versions are useful. Keeping the feet on the floor is easier and more beginner-friendly. Lifting the feet can increase control demands, so it should only be used when the basic version feels smooth.
How often can I do this stretch?
Most people can perform it daily or several times per week, especially during warm-ups, cooldowns, or mobility sessions. Still, volume should stay comfortable. If soreness or irritation appears, use fewer reps and a smaller range.
Is this a stretch or a core exercise?
It can be both. When performed slowly with control, it trains the obliques and deep core to guide rotation. When held at end range with calm breathing, it becomes more of a mobility and flexibility drill.
Who should avoid this movement?
Anyone with acute back pain, recent spinal injury, severe disc symptoms, or radiating nerve pain should avoid forcing this stretch. In those cases, professional guidance is the safer choice.
Recommended Equipment (Optional)
- Exercise Mat — provides cushioning for your spine, shoulders, and hips during floor mobility work
- Extra-Thick Yoga Mat — useful if you need more comfort for the lower back and pelvis
- Yoga Block — can support the knees if your rotation range is limited
- Stretching Strap — helpful for pairing this drill with hamstring, hip, and lower-body mobility work
- Foam Roller — useful before or after the stretch to release tension through the back, hips, and glutes
Tip: Equipment is optional. However, a supportive mat can make the movement more comfortable and help you stay relaxed during longer holds.