One-Arm Front Plank: Form, Core Benefits, Sets, Tips & FAQ
Learn the One-Arm Front Plank for core stability, anti-rotation strength, and shoulder control with setup, steps, tips, FAQs, and equipment.
One-Arm Front Plank
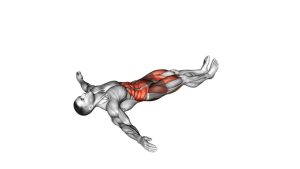
This exercise works best when the movement is slow, clean, and deliberate. First, the body starts in a strong forearm plank. Then, the weight shifts toward one supporting arm while the opposite arm reduces contact or lifts slightly. As a result, the core must work harder to keep the hips from twisting.
Because the video shows a controlled alternating pattern, this guide focuses on a stable one-arm support phase, a smooth return to center, and a careful switch to the opposite side. Therefore, every rep should feel like a core-control drill rather than a fast arm-lifting movement.
Quick Overview
| Body Part | Core |
|---|---|
| Primary Muscle | Rectus abdominis and obliques |
| Secondary Muscle | Transverse abdominis, glutes, shoulders, chest, lower back stabilizers |
| Equipment | No equipment required; exercise mat optional |
| Difficulty | Intermediate because it requires anti-rotation control and shoulder stability |
Sets & Reps (By Goal)
- Core stability: 3 sets × 6–10 controlled switches per side
- Anti-rotation strength: 3–4 sets × 5–8 slow reps per side with a 2–3 second hold
- Endurance: 2–3 sets × 20–40 seconds alternating slowly
- Beginner progression: 2–3 sets × 4–6 reps per side with feet wider apart
- Advanced control: 3–5 sets × 8–12 reps per side with a longer single-arm hold
Progression rule: Add hold time before adding speed. In addition, keep each rep smooth and stable before bringing the feet closer together.
Setup / Starting Position
- Start on the floor: Place your forearms on the ground with your elbows under your shoulders.
- Extend your legs: Step both feet back until your body forms a straight plank line.
- Set your base: Keep your feet slightly apart to improve balance, especially while learning.
- Brace your core: Tighten your abs as if preparing for a light punch to the stomach.
- Lock in your hips: Squeeze your glutes so your pelvis does not drop or rotate.
- Keep your head neutral: Look down toward the floor and avoid lifting your chin.
Execution (Step-by-Step)
- Begin in a strong forearm plank: Keep your shoulders stacked over your elbows and your body straight.
- Shift your weight slowly: Move slightly toward one forearm without letting the hips twist.
- Reduce contact with the opposite arm: Lighten the non-supporting arm or lift it slightly if you can stay controlled.
- Hold the one-arm position: Pause briefly while keeping your ribs down, glutes tight, and hips level.
- Return to center: Place the opposite forearm back down and regain equal pressure through both arms.
- Switch sides: Shift toward the other forearm and repeat the same controlled pattern.
- Continue alternating: Move slowly from side to side without bouncing, rushing, or rotating the torso.
Pro Tips & Common Mistakes
Pro Tips
- Use a wider foot stance first: This gives you more stability and helps reduce hip rotation.
- Move slowly: A slower transition creates more core tension and better control.
- Press the supporting forearm down: This helps stabilize the shoulder and upper body.
- Keep your glutes active: Strong glute tension protects the lower back and keeps the pelvis steady.
- Breathe through the hold: Do not hold your breath, because steady breathing improves control.
Common Mistakes
- Rotating the hips too much: If your hips turn heavily, widen your feet or slow the movement down.
- Letting the lower back sag: Brace harder and squeeze your glutes before each arm switch.
- Rushing the transition: Fast reps reduce anti-rotation benefit and increase form breakdown.
- Shrugging the shoulder: Keep the supporting shoulder strong but not jammed toward the ear.
- Lifting the arm too high: The video shows a controlled support change, so avoid turning it into a big reach.
FAQ
What muscles does the One-Arm Front Plank work?
The One-Arm Front Plank mainly works the abs and obliques. Additionally, it trains the transverse abdominis, glutes, shoulders, chest, and lower back stabilizers because the body must resist rotation.
Is the One-Arm Front Plank good for core strength?
Yes. It is especially useful for core stability because one arm supports more of the body while the core keeps the torso from twisting. Therefore, it trains control as well as strength.
Should beginners do this exercise?
Beginners can try it only after they can hold a regular forearm plank with good form. However, they should start with wide feet, short holds, and small weight shifts.
How do I stop my hips from rotating?
Widen your feet, squeeze your glutes, brace your abs, and slow down the arm transition. Also, keep your chest facing the floor instead of turning sideways.
Is this exercise better than a regular plank?
It is not always better, but it is more challenging for anti-rotation control. A regular plank builds basic endurance, while the One-Arm Front Plank adds a stronger stability demand.
Recommended Equipment (Optional)
- Exercise Mat — adds comfort for the forearms during plank holds
- Yoga Blocks — useful for modified core drills and controlled progressions
- Resistance Bands Set — helpful for pairing plank work with shoulder and core activation drills
- Ab Wheel — supports advanced core strength progression after plank control improves
- Push-Up Bars / Handles — useful for related plank and upper-body stability variations
Tip: Start with a comfortable mat first. Then, add other tools only when your plank line, hip control, and shoulder stability are consistent.