Reverse Crunch : Proper Form, Lower Abs Tips & FAQ
Learn Reverse Crunch for stronger lower abs with controlled hip lift form, sets, mistakes, FAQs, and core training tips.
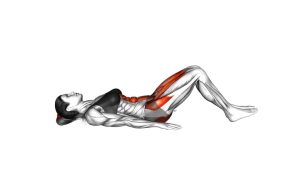
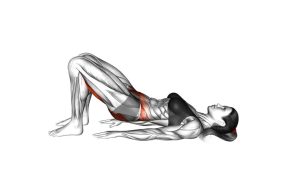
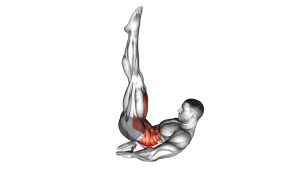
Reverse Crunch
This variation works best when the movement stays compact, slow, and deliberate. The goal is not to kick the legs overhead or create momentum. Instead, you should curl the pelvis upward, bring the knees closer to the chest, and then lower the hips with control. Therefore, every rep should feel like a precise abdominal contraction, not a rocking motion.
Quick Overview
| Body Part | Core |
|---|---|
| Primary Muscle | Rectus abdominis, especially the lower abdominal region |
| Secondary Muscle | Hip flexors, deep core stabilizers, and obliques for light control |
| Equipment | None; optional exercise mat for comfort |
| Difficulty | Beginner to Intermediate |
Sets & Reps (By Goal)
- Beginner control: 2–3 sets × 8–10 reps, using a slow and clean tempo.
- Core endurance: 3–4 sets × 12–15 reps, resting 30–45 seconds between sets.
- Lower-ab strength: 3–4 sets × 8–12 reps with a 1–2 second pause at the top.
- Home ab workout finisher: 2 sets × 15–20 reps, only if form stays controlled.
Progression rule: First improve control, then add reps. If your hips drop quickly or your legs swing, reduce the reps and slow the movement down.
Setup / Starting Position
- Lie on your back: Position your body flat on the floor with your head, shoulders, and back supported.
- Place your arms beside you: Keep your hands close to the floor for balance, but avoid pushing aggressively.
- Bend your knees: Bring your thighs upward while keeping the knees bent throughout the movement.
- Brace your core: Gently tighten your abs before the first rep so your lower back does not arch excessively.
- Keep the movement compact: Start with your legs elevated and ready, not fully relaxed on the floor.
Tip: A soft mat can make the movement more comfortable, especially because the hips lift and return to the floor repeatedly.
Execution (Step-by-Step)
- Start with bent knees: Keep your knees close together and maintain the same bend as you begin.
- Exhale and curl: Use your abs to tilt the pelvis backward and lift the hips slightly off the floor.
- Bring the knees inward: Let the knees travel toward the chest without kicking or throwing the legs.
- Pause briefly: Hold the top position for a moment while keeping the movement tight and controlled.
- Lower with control: Slowly return the hips to the floor without dropping or relaxing the abs completely.
- Repeat smoothly: Move into the next rep while maintaining continuous core tension.
Pro Tips & Common Mistakes
- Use a small range: A short hip lift is enough when the abs are doing the work.
- Avoid leg swinging: Do not throw your knees toward your face; instead, curl the pelvis upward.
- Control the lowering phase: The return is just as important as the lift.
- Keep your neck relaxed: Let your head rest naturally instead of lifting or straining it.
- Do not overuse your arms: Your hands may stabilize you, but they should not drive the movement.
- Maintain bent knees: Keeping the knees bent helps the movement stay focused and controlled.
- Breathe with each rep: Exhale during the hip lift and inhale as you lower.
- Stop before momentum takes over: When reps get sloppy, the set is finished.
FAQ
What muscles does Reverse Crunch work?
It mainly works the rectus abdominis, with strong emphasis on the lower abdominal region. Additionally, the hip flexors and deep core stabilizers assist with positioning and control.
Is this exercise good for lower abs?
Yes. Because the hips curl upward and the pelvis tilts backward, this movement strongly challenges lower-core control. However, it should be performed slowly to avoid turning it into a leg swing.
Should my hips lift off the floor?
Yes, but only slightly. The visible goal is a compact hip lift created by abdominal contraction, not a large roll or uncontrolled rocking motion.
Why do I feel this in my hip flexors?
Some hip flexor involvement is normal because your legs are elevated. However, if the hip flexors dominate, reduce your range, slow down, and focus on curling the pelvis instead of pulling with the thighs.
Can beginners do this reverse crunch variation?
Yes. Beginners can use fewer reps, a smaller hip lift, and slower tempo. As control improves, they can gradually increase reps or add a short pause at the top.
Recommended Equipment (Optional)
- Exercise Mat — provides cushioning for your back and hips during floor-based ab training.
- Thick Yoga Mat — useful if you need extra comfort while performing repeated hip lifts.
- Ab Mat — supports floor core workouts and can improve comfort during abdominal sessions.
- Core Sliders — helpful for progressing into other controlled core and lower-ab exercises.
- Light Ankle Weights — optional advanced tool, but only use them after mastering strict bodyweight form.
Tip: For this exercise, comfort and control matter more than equipment. Start with bodyweight only before adding any resistance.